

Linux & Edge AI
AI Pyramid
ハードウェア制御
アプリケーションと工場出荷時の機能
LLM-8850 Card
LLM630 Compute Kit
Module LLM
CoreMP135
UnitV2 内蔵認識サービス
準備
ドライバーのインストール
使用するオペレーティングシステムに応じて、対応する SR9900 ドライバーをダウンロードしてください。
Windows の場合
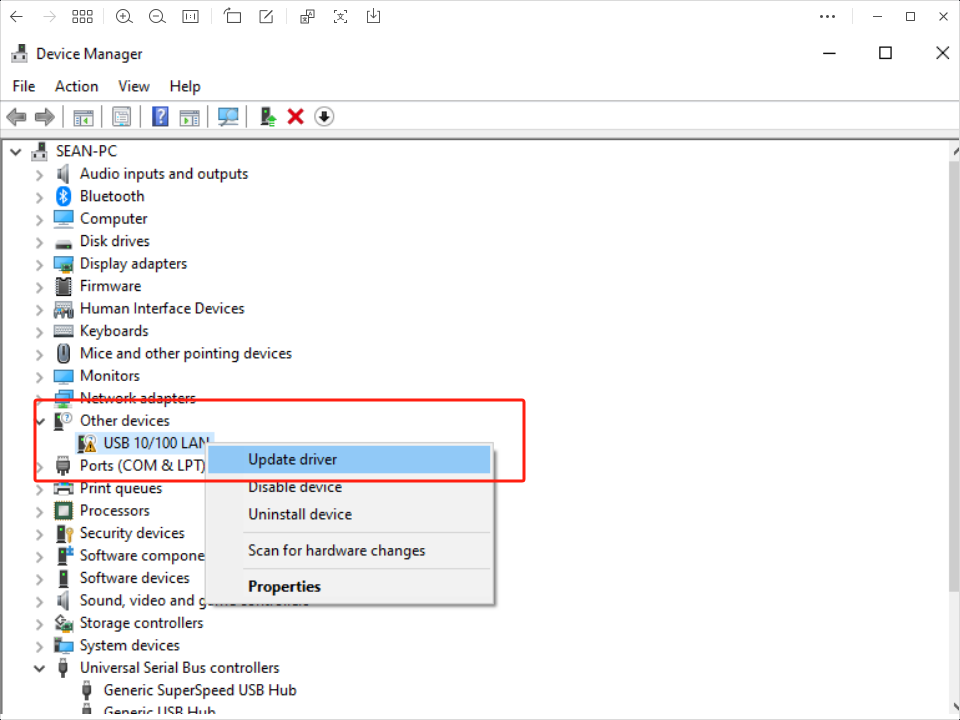
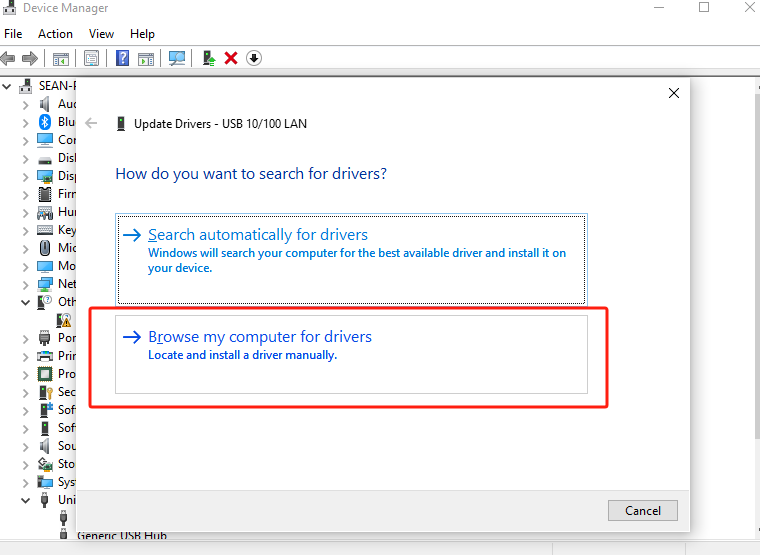
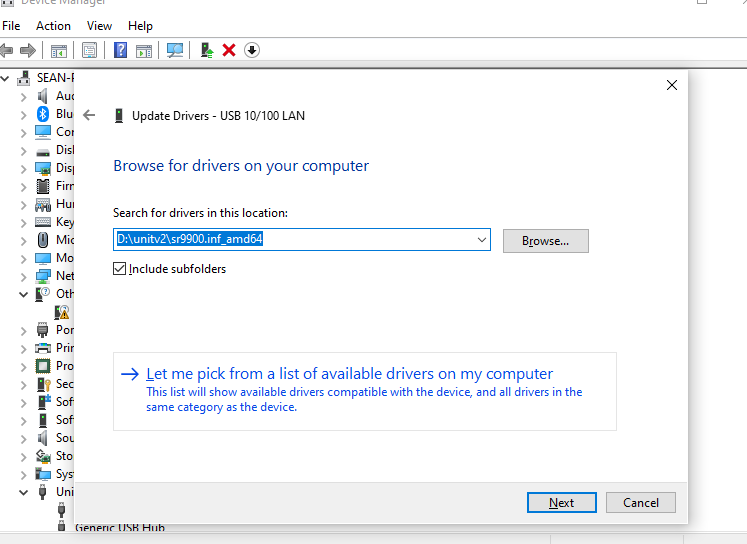
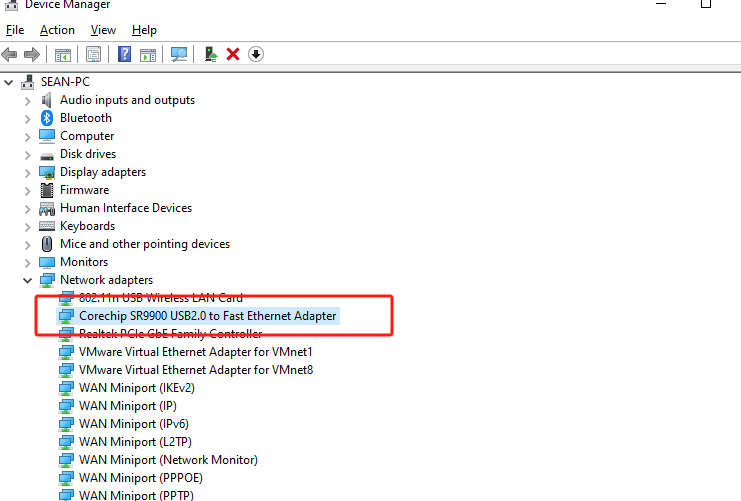
ドライバーの ZIP パッケージをデスクトップに解凍します -> デバイスマネージャーで、現在認識されていないデバイス(名前が USB 10/100 LAN、または SR9900 を含むもの)を選択します -> 右クリックして「ドライバーの更新」を選択します -> ZIP パッケージを解凍したフォルダーを選択します -> 「OK」をクリックし、更新が完了するまで待ちます。

macOS の場合
ドライバーの ZIP パッケージを解凍します -> SR9900_v1.x.pkg ファイルをダブルクリックして開きます -> 画面の指示に従って「次へ」をクリックし、インストールします。(パッケージには、詳細なドライバーインストール手順の PDF が含まれています)
インストール完了後、ネットワークカードを正常に有効化できない場合は、ターミナルを開き、以下のコマンドでネットワークカードを再度有効化してください。
sudo ifconfig en10 down
sudo ifconfig en10 upデバイスの接続
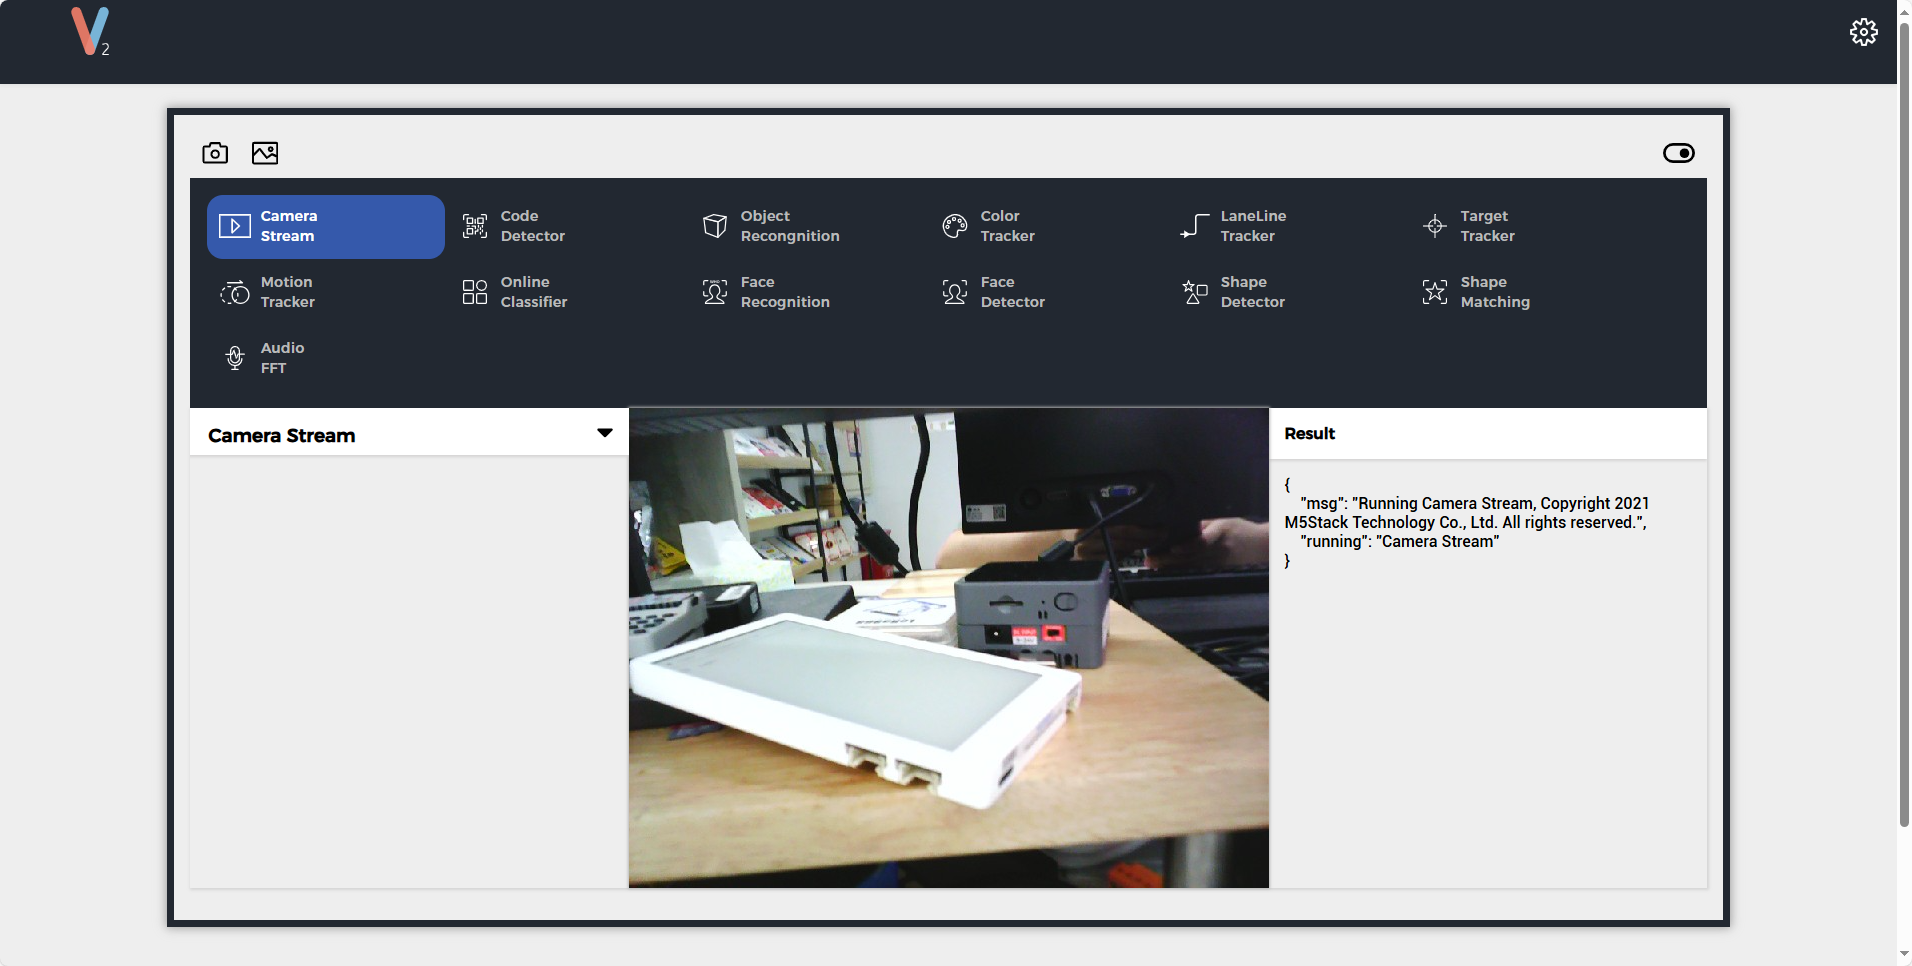
USB に接続して給電すると、UnitV2 は自動的に起動します。電源インジケーターは赤色と白色に点灯し、起動が完了すると消灯します。UnitV2 には、M5Stack が開発した基本的な AI 認識アプリケーションが内蔵されており、顔認識、物体追跡などの一般的な認識機能を備えています。これにより、ユーザーは AI 認識アプリケーションを迅速に構築できます。以下の 2 つの接続方法により、PC またはモバイル端末のブラウザーから、ドメイン名 unitv2.py または IP:10.254.239.1 にアクセスして、認識機能のプレビューページを表示できます。認識処理中、UnitV2 はシリアルポート(底面の HY2.0-4P コネクタ)を介して、認識サンプルデータ(JSON 形式、UART: 115200bps 8N1)を継続的に出力します。
Safari ブラウザーとの互換性に一部問題があります。Chrome でのアクセスを推奨します。Ethernet モード接続: UnitV2 には有線ネットワークカードが内蔵されています。Type-C ポートを介して PC を接続すると、UnitV2 とのネットワーク接続が自動的に確立されます。AP モード接続: UnitV2 の起動時には、デフォルトでAP ホットスポット(SSID: M5UV2_XXX、PWD: 12345678)が有効になります。ユーザーは Wi-Fi 経由で UnitV2 に接続し、ネットワーク接続を確立できます。

認識処理中、UnitV2 はシリアルポート(底面の HY2.0-4P インターフェース)を介して、認識サンプルデータ(JSON 形式、UART:
115200bps 8N1)を継続的に出力します。
機能の切り替え
機能ページのナビゲーションバーをクリックするか、デバイスのシリアルインターフェースから JSON コマンドを送信することで、異なる認識機能を切り替えられます。注意:コマンド文字列の末尾以外には、改行を挿入しないでください。
機能定義
Audio FFT
Code Detector
Face Detector
Lane Line Tracker
Motion Tracker
Shape Matching
Camera Stream
Online Classifier
Color Tracker
Face Recognition
Target Tracker
Shape Detector
Object Recognition機能切り替えコマンド
{
    "function":"Object Recognition",
    "args":[
        "yolo_20class"
    ]
} 応答
- 機能の切り替えに成功すると、以下の応答が返されます。
{
    "msg":"function switched to Object Recognition."
}- 指定した機能が存在しない場合は、以下の応答が返されます。
{
    "error":"function Object Recognition not exist"
} - 機能の切り替えに失敗した場合は、以下の応答が返されます。
{
    "error":"invalid function."
}Camera Stream
機能説明
480P のリアルタイム映像プレビュー
機能切り替えコマンド
{
    "function": "Camera Stream",
    "args": ""
}Code Detector
機能説明
画面内の QR コードを認識し、QR コードの座標と内容を返します。
機能切り替えコマンド
{
    "function": "Code Detector",
    "args": ""
}出力例
{
    "running":"Code Detector",
    "num":2, // Number of QR codes
    "code":[
        {
            "prob": 0.987152, // confidence level (math.)
            "x":10, // 0 ~ 640
            "y":10, // 0 ~ 480
            "w":30,
            "h":30, // Bounding boxes for QR codes
            "type":"QR/DM/Maxi",  // include "Background", "QR/DM/Maxi", "SmallProgramCode", "PDF-417", "EAN", "Unknown"
            "content":"m5stack"
        },
        {
            "prob": 0.987152, // confidence level (math.)
            "x":10,
            "y":10,
            "w":30,
            "h":30, // Bounding boxes for QR codes
            "type":"QR/DM/Maxi",  // include "Background", "QR/DM/Maxi", "SmallProgramCode", "PDF-417", "EAN", "Unknown"
            "content":"m5stack"
        }
    ]
}Object Recognition
機能説明
YOLO Fastest と NanoDet に基づく物体検出です。V-Training に対応しています。
- カスタムモデルをトレーニングする場合は、チュートリアル「UnitV2 V-Training」を参照してください。
機能切り替えコマンド
//Select the parameter "nanodet_80class" to switch to this function.
{
    "function": "Object Recognition",
    "args": ["nanodet_80class"]
}デフォルトのイメージには、nanodet_80class と yolo_20class モデルが内蔵されており、そのまま使用できます。モデルがサポートする認識対象は以下のとおりです。
yolo_20class: [
    "aeroplane", "bicycle", "bird", "boat", "bottle", "bus", "car", "cat", "chair", "cow", "diningtable", "dog",
    "horse", "motorbike", "person", "pottedplant", "sheep", "sofa", "train", "tvmonitor"
]nanodet_80class: [
"person","bicycle","car","motorbike","aeroplane","bus","train","truck","boat","traffic light",
"fire hydrant","stop sign","parking meter","bench","bird","cat","dog","horse","sheep","cow",
"elephant","bear","zebra","giraffe","backpack","umbrella","handbag","tie","suitcase","frisbee",
"skis","snowboard","sports ball","kite","baseball bat","baseball glove","skateboard","surfboard",
"tennis racket","bottle","wine glass","cup","fork","knife","spoon","bowl","banana","apple",
"sandwich","orange","broccoli","carrot","hot dog","pizza","donut","cake","chair","sofa","pottedplant",
"bed","diningtable","toilet","tvmonitor","laptop","mouse","remote","keyboard","cell phone","microwave",
"oven","toaster","sink","refrigerator","book","clock","vase","scissors","teddy bear","hair drier","toothbrush"
]出力例
{
    "num": 1,
    "obj": [
        {
            "prob": 0.938137174,
            "x": 179,
            "y": 186,
            "w": 330,
            "h": 273,
            "type": "person"
        }
    ],
    "running": "Object Recognition"
}
Color Tracker
機能説明
指定した色の領域を検出し、その領域の座標を返します。
LAB しきい値スライダーを直接調整して背景を除去し、関心のある色領域を取得できます。画面上で関心のある色領域を直接枠指定することもでき、システムが対象領域で最も割合の大きい色を自動計算して背景を除去します。計算結果を基にスライダーをさらに調整すると、より良いフィルタリング結果が得られます。「To Mask Mode」ボタンをクリックすると Mask モードに切り替わり、フィルタリング効果を直接確認できます。「To RGB Mode」ボタンをクリックすると RGB モードに戻ります。
- LAB しきい値は 0 ~ 255 にマッピングされます。
- LAB の L は輝度を表します。通常、このしきい値(0 ~ 255)を設定しないことで、輝度の影響を無視します。ただし、この場合アルゴリズムが黒と白を区別できなくなるため、注意してください。
- アルゴリズムは最大の対象のみを返します。
機能切り替えコマンド
{
    "function": "Color Tracker",
    "args": ""
}- LAB 値の指定
// * LAB thresholds are mapped to 0~255
{
    "config":"Color Tracker",
    "l_min":0, // 0 ~ 255
    "l_max":0, // 0 ~ 255
    "a_min":0, // 0 ~ 255
    "a_max":0, // 0 ~ 255
    "b_min":0, // 0 ~ 255
    "b_max":0 // 0 ~ 255
} - LAB しきい値設定の応答
{
    "running":"Color Tracker",
    "msg":"Data updated."
}- ROI の指定(しきい値を自動計算)
{
    "config":"Color Tracker",
    "x":0, // 0 ~ 640
    "y":0, // 0 ~ 480
    "w":30,
    "h":30,
}- ROI 設定の応答
// * va and vb refers to the degree of color dispersion within the ROI, if the dispersion is high, the tracking effect is poor.
{
    "running":"Color Tracker",
    "a_cal":0.0,
    "b_cal":0.0, // Calculation Threshold
    "va":0.0,
    "vb":0.0, // Color dispersion rate
    "l_min":0, // Fixed value 0
    "l_max":255, // Fixed value 255
    "a_min":0, // a_cal - (10 + (int)(va / 2.0f))
    "a_max":0, // a_cal + (10 + (int)(va / 2.0f))
    "b_min":0, // b_cal - (10 + (int)(vb / 2.0f))
    "b_max":0  // b_cal + (10 + (int)(vb / 2.0f))
} 出力例
{
    "running":"Color Tracker",
    "cx": 0, // Center X-axis coordinates
    "cy": 0, // Center Y-axis coordinates
    "r": 0, // radius
    "mx": 0, // moment x position
    "my": 0 // moment y position
}Lane Line Tracker
機能説明
画面内の道路線を検出して直線にフィッティングし、その直線の角度と座標を返します。
- LAB しきい値スライダーを直接調整して背景を除去し、関心のある色領域を取得できます。画面上で関心のある色領域を直接枠指定することもでき、システムが対象領域で最も割合の大きい色を自動計算して背景を除去します。計算結果を基にスライダーをさらに調整すると、より良いフィルタリング結果が得られます。「To Mask Mode」ボタンをクリックすると Mask モードに切り替わり、フィルタリング効果を直接確認できます。「To RGB Mode」ボタンをクリックすると RGB モードに戻ります。
機能切り替えコマンド
{
    "function": "Lane Line Tracker",
    "args": ""
}
- LAB しきい値と ROI の設定方法は Color Tracker と同じです。設定コマンド内の config を
"config":"Lane Line Tracker"に変更してください。
出力例
{
    "running":"Lane Line Tracker",
    "x":0,
    "y":0, // Base point of the fitted line
    "k":0  // Slope of the fitted line
} Target Tracker
機能説明
MOSSE アルゴリズムを使用して、画面上の対象を選択し追跡します。追跡する対象を画面上で枠指定するだけで実行できます。
機能切り替えコマンド
{
    "function": "Target Tracker",
    "args": ""
}
出力例
{
    "running":"Target Tracker",
    "x":0,//0~640
    "y":0,//0~480
    "w":0,
    "h":0
} Motion Tracker
機能説明
移動する対象を検出して追跡し、対象の座標と角度を返します。「Set as background」ボタンをクリックして背景を設定します。このアルゴリズムは、ゆっくり変化する背景に適応できます。
機能切り替えコマンド
{
    "function": "Motion Tracker",
    "args": ""
}- 背景設定コマンド
{
    "config":"Motion Tracker",
    "operation":"update"
} - 背景設定コマンドの応答
{
    "running":"Motion Tracker",
    "msg":"Background updated."
}出力例
{
    "running":"Motion Tracker",
    "num":2,
    "roi":[
        {
            "x":0,
            "y":0,
            "w":0,
            "h":0,
            "angle":0.0,
            "area":0
        },
        {
            "x":0,
            "y":0,
            "w":0,
            "h":0,
            "angle":0.0,
            "area":0
        }
    ]
} Online Classifier
機能説明
この機能は、緑色のターゲットボックス内のオブジェクトをリアルタイムでトレーニングし、分類できます。トレーニングした特徴量はデバイスに保存でき、次回以降も使用できます。
Resetボタンをクリックして既存のカテゴリをクリアし、トレーニングモードに入ります。
+ボタンをクリックして新しいカテゴリを作成します。
- トレーニングするカテゴリを選択します。
- トレーニングするオブジェクトを緑色のターゲットボックス内に配置します。
Trainボタンをクリックして、1 回のトレーニングを完了します。
- オブジェクトの角度を変えながらトレーニングを繰り返し、希望する結果が得られるまで続けます。
save&runボタンをクリックしてトレーニング結果をデバイスに保存し、トレーニングモードを終了してオブジェクトの認識と分類を開始します。
機能切り替えコマンド
{
    "function": "Online Classifier",
    "args": ""
}
- デバイスをトレーニングモードに移行
//This instruction will put the device into training mode and extract the features once to store them under the specified class. If class_id does not exist, the class will be created.
{
    "config":"Online Classifier",
    "operation":"train",
    "class_id":1, // Integer (0 ~ N), class ID
    "class":"class_1" // String, class
}- トレーニングモード移行の応答
{
    "running":"Online Classifier",
    "msg":"Training [class name] [num of training] times"
}- 保存して認識を開始
{
    "config":"Online Classifier",
    "operation":"saverun",
}- 保存・認識コマンドの応答
{
    "running":"Online Classifier",
    "msg":"Save and run."
}- このコマンドを実行すると、デバイスはトレーニングモードに入り、すべての分類がクリアされます。
{
    "config":"Online Classifier",
    "operation":"reset",
} - クリアコマンドの応答
{
    "running":"Online Classifier",
    "msg":" Please take a picture."
}出力例
{
    "running":"Online Classifier",
    "class_num":2, // Number of classes identified
    "best_match":"class_1", // Best match class
    "best_score":0.83838, // Best Match Score
    "class":[ // Scores for each class
        {
            "name":"class_1",
            "score":0.83838
        },
        {
            "name":"class_2",
            "score":0.66244
        }
    ]
}Face Recognition
機能説明
顔を検出して認識します。
- Reset ボタンをクリックして、既存の顔情報をすべてクリアします。
- ボタンをクリックして、新しい顔を作成します。
- トレーニングする顔を選択します。
- カメラを見て、トレーニングする顔が正しい位置に収まるようにします。
- Train ボタンをクリックします。
- トレーニング中、バウンディングボックスが黄色の場合はトレーニング中です。認識精度を高めるため、頭をゆっくり回してさまざまな角度をサンプリングできます。
- バウンディングボックスが赤色になった場合は対象を見失っています。通常は顔の向きが大きく変わったことが原因です。顔が再び検出されるまで顔の位置を調整してください。
- 希望する結果が得られたら Stop をクリックします。これでデバイスは顔を認識できるようになります。
- Save ボタンをクリックして特徴データをデバイスに保存すると、次回以降も使用できます。
機能切り替えコマンド
{
    "function": "Face Recognition",
    "args": ""
}- 新しい顔認識情報の作成
//To create a new face, provide the face_id in order (0 ~ N).
{
    "config":"Face Recognition",
    "operation":"train",
    "face_id":1, // Integer (0 ~ N), face ID
    "name":"tom" // String, Names of faces
}
//For example, there are already 3 faces (0~2), to create a new face, you need to specify the id as 3.- 作成に成功
{
    "running":" Face Recognition ",
    "msg":"Training tom"
}- 作成に失敗
{
    "running":"Face Recognition",
    "msg":"Invalid face id"
}
{
"config":" Face Recognition ",
"operation":" stoptrain",
}{
"running":"Face Recognition",
"msg":"Exit training mode."
}- 保存して実行
{
    "config":" Face Recognition ",
    "operation":"saverun",
}
{
"running":"Face Recognition",
"msg":"Faces saved."
}- すべての顔を削除
{
    "config":"Face Recognition",
    "operation":"reset",
}
{
"running":"Face Recognition",
"msg":"Reset success"
}出力例
- トレーニングモード
{
    "running":"Face Recognition",
    "status":"training", // training or missing
    "x":0,
    "y":0,
    "w":0,
    "h":0, //  Facial recognition bounding box
    "prob":0, // Detection confidence rate
    "name":0,
}- 通常モード(一致スコア > 0.5)
{
    "running":"Face Recognition",
    "num":1, // Number of faces recognized
    "face":[
        {
            "x":0, // 0 ~ 320
            "y":0, // 0 ~ 240
            "w":30,
            "h":30, // Facial recognition bounding box
            "prob":0, // Detection confidence rate
            "match_prob":0.8, // Matching Confidence Rate
            "name": "tom",
            "mark":[ // landmarks
                {
                    "x":0,
                    "y":0
                },
                {
                    "x":0,
                    "y":0
                },
                {
                    "x":0,
                    "y":0
                },
                {
                    "x":0,
                    "y":0
                },
                {
                    "x":0,
                    "y":0
                },
            ]
        },
    ]
} - 通常モード(一致スコア <= 0.5)
{
    "running":"Face Recognition",
    "num":1, //  Number of faces recognized
    "face":[
        {
            "x":0, // 0 ~ 320
            "y":0, // 0 ~ 240
            "w":30,
            "h":30, // Facial recognition bounding box
            "prob":0, // confidence level (math.)
            "name": "unidentified",
            "mark":[ // landmarks
                {
                    "x":0,
                    "y":0
                },
                {
                    "x":0,
                    "y":0
                },
                {
                    "x":0,
                    "y":0
                },
                {
                    "x":0,
                    "y":0
                },
                {
                    "x":0,
                    "y":0
                },
            ]
        },
    ]
} Face Detector
機能説明
フレーム内の顔を検出し、5 点のランドマークを返します。
機能切り替えコマンド
{
    "function": "Face Detector",
    "args": ""
}出力例
{
    "running":"Face Detector",
    "num":1, //  Number of faces recognized
    "face":[
        {
            "x":0,
            "y":0,
            "w":30,
            "h":30, // Facial recognition bounding box
            "prob":0, // confidence level (math.)
            "mark":[ // landmark
                {
                    "x":0,
                    "y":0
                },
                {
                    "x":0,
                    "y":0
                },
                {
                    "x":0,
                    "y":0
                },
                {
                    "x":0,
                    "y":0
                },
                {
                    "x":0,
                    "y":0
                }
            ]
        }
    ]
}Shape Detector
機能説明
画像内の図形を検出し、面積を計算します。正方形、長方形、三角形、五角形、円を認識できます。「Set as background」ボタンをクリックして背景を設定します。このアルゴリズムは、ゆっくり変化する背景に適応できます。
機能切り替えコマンド
{
    "function": "Shape Detector",
    "args": ""
}- 現在の画面を背景として設定
{
    "config":"Shape Detector",
    "operation":"update"
}
{
"running":"Shape Detector",
"msg":"Background updated."
}出力例
{
    "running":"Shape Detector",
    "num":2,
    "shape":[
        {
            "name":"Rectangle", // "unidentified", "triangle", "square", "rectangle", "pentagon", "circle"
            "x":0,
            "y":0,
            "w":0,
            "h":0,
            "angle":0.0, // Can be used when the shape is square or rectangular
            "area":0
        },
        {
            "name":"Rectangle", // "unidentified", "triangle", "square", "rectangle", "pentagon", "circle"
            "x":0,
            "y":0,
            "w":0,
            "h":0,
            "angle":0.0, // Can be used when the shape is square or rectangular
            "area":0
        }
    ]
} Shape Matching
機能説明
任意の図形をマッチングします(ただし、図形には曲線を含めないことを推奨します)。アップロードした図形は特徴データに変換され、デバイスに保存されるため、次回以降も使用できます。
- 追加ボタンをクリックして図形を追加します。以下に示す図形テンプレート画像をアップロードする必要があります(PNG 形式、白背景に黒い図形)。ファイル名が図形名になります。
- RESET ボタンをクリックして、アップロードしたすべての図形をクリアします。
Set as backgroundボタンをクリックして背景を設定します。このアルゴリズムは、ゆっくり変化する背景に適応します。
機能切り替えコマンド
{
    "function": "Shape Matching",
    "args": ""
}出力例
// The shape returned here is the filename of the uploaded template, please note that if the confidence rate is lower than 30%, it will be labeled as unidentified.
{
    "running":"Shape Matching",
    "num":2,
    "shape":[
        {
            "name":"arrow", // Your customized shape name cannot be recognized when the confidence rate is less than 30
            "max_score":83, // Confidence score, if shape is unknown, no
            "x":0,
            "y":0,
            "w":0,
            "h":0,
            "area":0
        },
        {
            "name":"unidentified", // Your customized shape name is not recognized when the confidence score is less than 30.
            "x":0,
            "y":0,
            "w":0,
            "h":0,
            "area":0
        },
    ]
} Audio FFT
デバイスのマイクから音声を取得し、リアルタイムで FFT(高速フーリエ変換)を実行して時間周波数グラフを描画します。下図の緑色のグラフは音声の RMS を示しており、現在の音量を表します。
- マイクの周波数応答のカットオフ周波数は約 10 kHz です。
機能切り替えコマンド
なし
出力例
なし
モデルスクリプト
Python スクリプトから内部モデルを呼び出します。
from json.decoder import JSONDecodeError
import subprocess
import json
import base64
import serial
import time
from datetime import datetime
from PIL import Image
import os
import io

uart_grove = serial.Serial('/dev/ttyS0', 115200, timeout=0.1)
reconizer = subprocess.Popen(['/home/m5stack/payload/bin/object_recognition', '/home/m5stack/payload/uploads/models/nanodet_80class'],
                             stdin=subprocess.PIPE, stdout=subprocess.PIPE, stderr=subprocess.PIPE)

reconizer.stdin.write("_{\"stream\":1}\r\n".encode('utf-8'))
reconizer.stdin.flush()

img = b''

while True:
    today = datetime.now()
    path = str(today.strftime("%Y_%m_%d") + "/")
    newpath = "/media/sdcard/" + path

    line = reconizer.stdout.readline().decode('utf-8').strip()
    if not line:
        break  # Process finished or empty line

    try:
        doc = json.loads(line)
        if 'img' in doc:
            byte_data = base64.b64decode(doc["img"])
            img = bytes(byte_data)
        elif 'num' in doc:
            for obj in doc['obj']:
                uart_grove.write(str(obj['type'] + '\n').encode('utf-8'))
                if obj['type'] == "aeroplane":
                    print('aeroplane ' + today.strftime("%Y_%m_%d_%H_%M_%S"))
                    if os.path.exists(newpath):
                        image_path = newpath + today.strftime("%Y_%m_%d_%H_%M_%S") + ".jpg"
                        img = Image.open(io.BytesIO(byte_data))
                        img.save(image_path, 'jpeg')
                    else:
                        os.mkdir(newpath)
                        image_path = newpath + today.strftime("%Y_%m_%d_%H_%M_%S") + ".jpg"
                        img = Image.open(io.BytesIO(byte_data))
                        img.save(image_path, 'jpeg')
                    time.sleep(1)
                else:
                    print('Not detect '+ today.strftime("%Y_%m_%d_%H_%M_%S"))
    except JSONDecodeError as e:
        print("Error: Invalid JSON string")
        print("JSONDecodeError:", str(e))