pdf-icon

Product Guide

Industrial Control

Real-Time AI Voice Assistant

AtomS3R-M12 Volcengine Kit

Offline Voice Recognition

Thread

Module Gateway H2

IoT Measuring Instruments

IoT Cloud

Ethernet Camera

DIP Switch Usage Guide

Module GPS v2.0

Module GNSS

Module ExtPort For Core2

Module LoRa868 V1.2

Using Module LoRa868 v1.2 with Meshtastic

1.Introduction to Meshtastic

Meshtastic is an open-source, off-grid communication project based on LoRa (Long Range) wireless technology. It is designed to enable point-to-point (P2P) or mesh network communication in environments without cellular networks or internet access. Utilizing ultra-low power hardware and license-free frequency bands, it supports long-range message transmission.
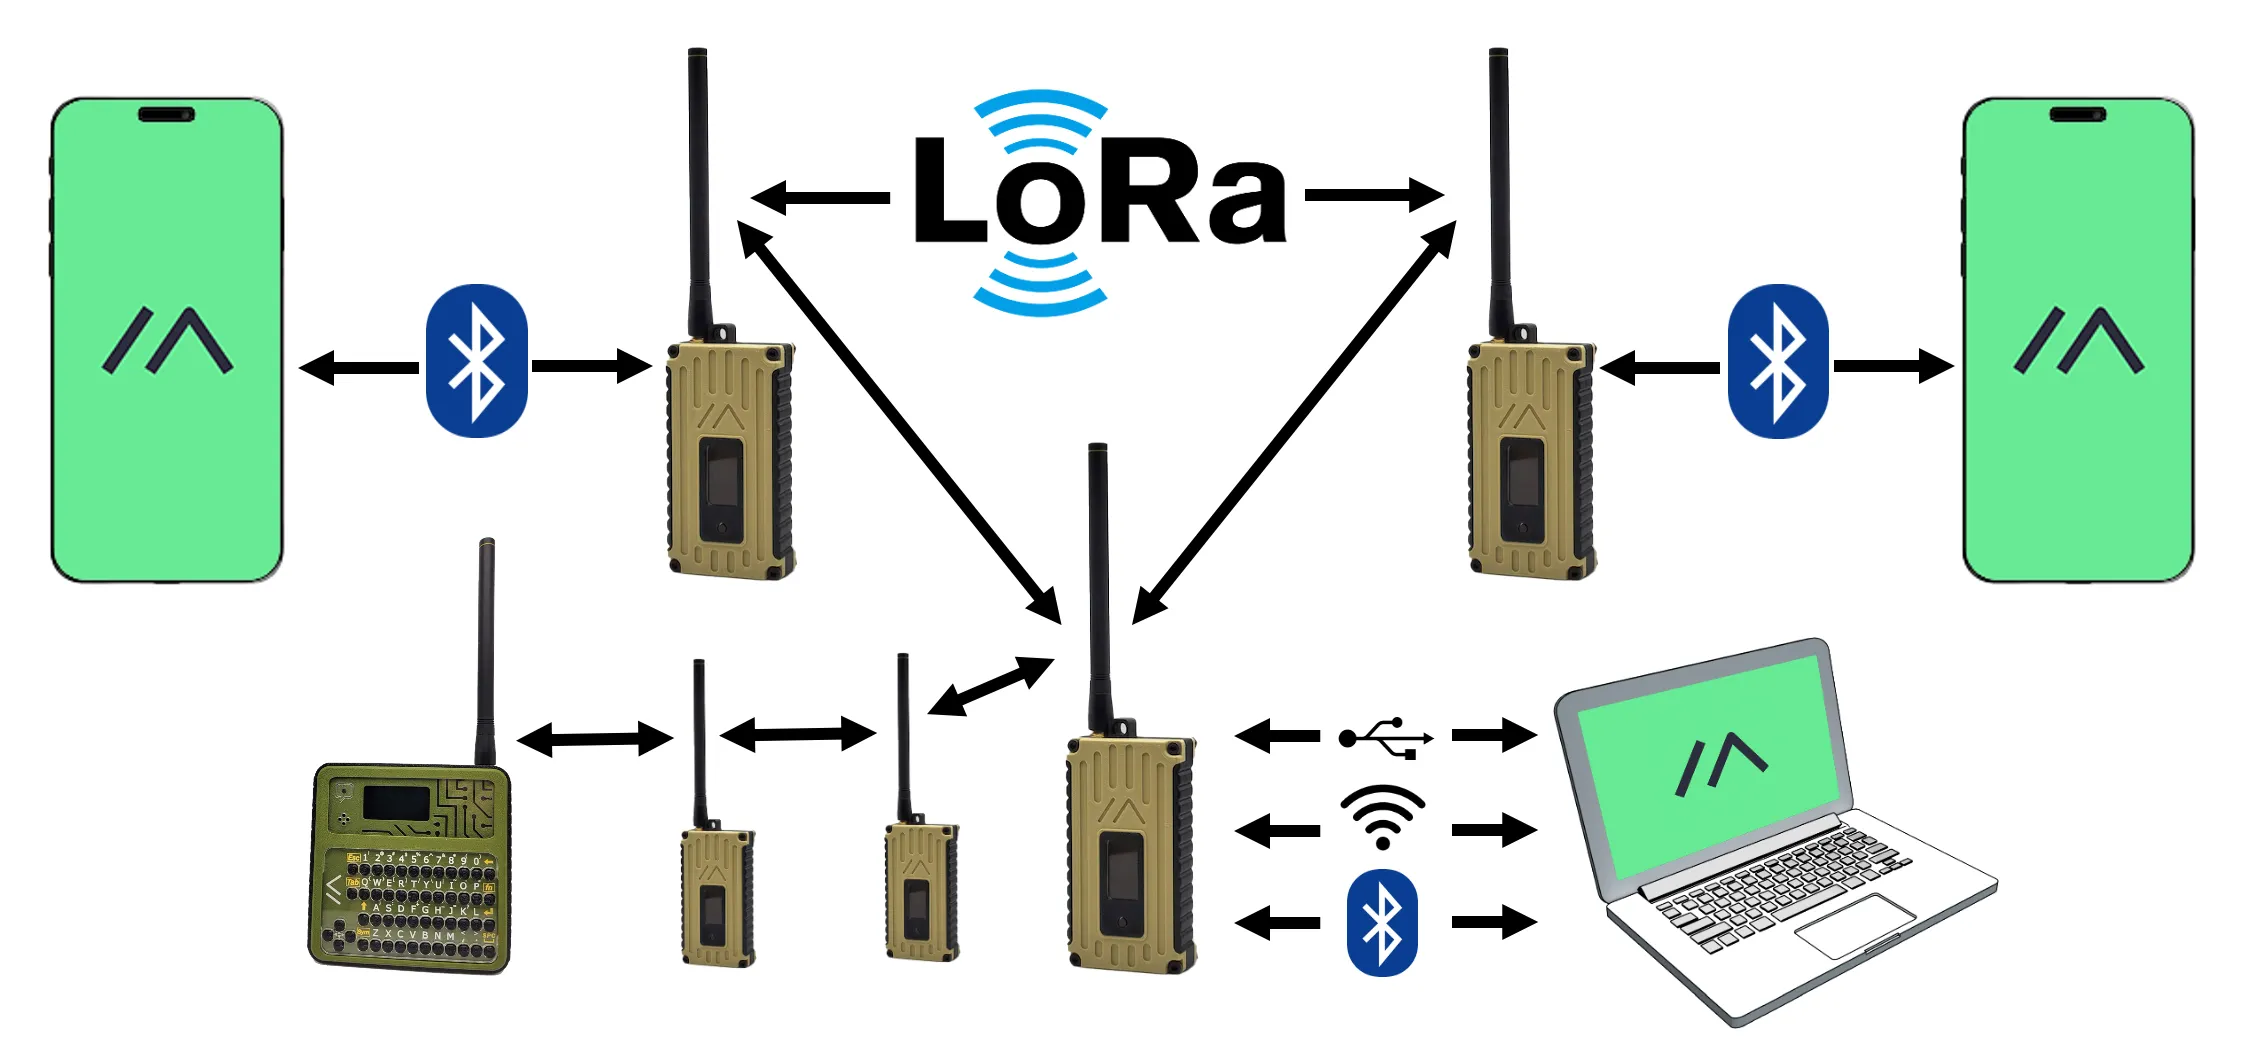
Core Features

  • Long-range communication: Stable communication over several kilometers
  • Low power consumption: Suitable for extended outdoor use
  • End-to-end encryption: Uses AES-256
  • Mesh relay: Every node acts as a repeater
  • Mobile support: Can pair with a smartphone app via Bluetooth to send messages
  • GPS support: Some devices include location functionality

How It Works

Meshtastic uses LoRa radios to communicate over unlicensed frequency bands (such as 433 / 470 / 868 / 915 MHz). Devices broadcast messages to form a multi-hop relay network and can connect to smartphone apps via Bluetooth. Each device functions as both a transmitter and a relay, forming a mesh network without relying on base stations or routers.

Use Cases

  • Outdoor adventures: Communication between team members in areas without signal
  • Emergency rescue: Quickly establish local communication networks during disasters
  • Community networking: Build local shared messaging networks
  • IoT applications: Data collection among agricultural sensors

2.Preparation

Hardware Preparation

Safety Warning
Do NOT connect or power on the device without installing the antenna, as this may cause permanent hardware damage!

Installing M5Burner

M5Burner is a unified firmware flashing tool developed by M5Stack. It allows users to easily flash various firmware versions onto different devices.

Download and install the appropriate version of the M5Burner tool based on your computer's operating system by clicking the link below.

Software Version Download Link
M5Burner_Windows Download
M5Burner_macOS Download
M5Burner_Linux Download

Flashing Firmware to the Main Controller

Operation Sequence
It is recommended NOT to connect the Module LoRa868 v1.2 before flashing firmware to the main controller.

Open M5Burner, select "ALL" at the bottom of the device list on the left. In the search bar at the top, type "Meshtastic" and choose the firmware that matches your main controller device from the results, then click Download.

Connect the main controller to your computer via USB data cable, click Burn, select the corresponding USB port and baud rate 1500000, then click Start to begin flashing. Once you see the message Burn successfully, click here to return, click it to finish. When the Meshtastic logo "//\" appears on the main controller screen, disconnect the device from the computer.

If any issues occur during flashing, you may need to install a USB driver on your computer, or long-press the reset button on the main controller to enter download mode. For details, refer to the documentation page of your specific main controller.

Configuring Pins and Connecting the Module

Refer to the pin information shown in the M5Burner firmware images and instructions, then adjust the DIP switches accordingly by following the Module LoRa868 v1.2 DIP Switch Guide. In short, if the main controller is Core1 or Core2, set long pins 2, 5, 7 and short pin 1 to ON on the Module LoRa868 v1.2.

Remove the red dust cap from the antenna port of the module, install the included antenna properly, and attach the module to the main controller. After ensuring everything is correctly and securely installed, power on the main controller. The Meshtastic logo "//\" should appear on its screen.

Mobile App

Depending on your smartphone's operating system, download and install the Meshtastic app from one of the following sources:

The iOS and Android versions of the Meshtastic app have similar functionality but differ greatly in their interfaces. Therefore, the steps and screenshots are provided separately below.

Open the Meshtastic app. After granting Bluetooth and other permissions, you will enter the Bluetooth page where nearby nodes detected by your phone are displayed. If multiple nodes are nearby, you can check the four-character code displayed at the top right corner of the device screen. Tap the matching four-character code on your phone, enter the six-digit Bluetooth pairing code shown on the device to bind it with your phone.

After pairing, tap "Set LoRa Region", select the region parameters based on your hardware region (in this example, European Union 868MHz), and then tap "Save" at the bottom. The device will reboot and reconnect to the phone. All setup is now complete and you can begin regular use.

Open the Meshtastic app, read the app introduction, and tap the ">" button in the lower-right corner to enter the Node Settings page. Tap the "+" button and grant Bluetooth permissions to start scanning for nearby nodes. If multiple nodes are found, check the four-character code shown on the top-right corner of your device screen. Tap the matching code on your phone, enter the six-digit Bluetooth pairing code shown on the device to bind it.

After pairing, tap "Set Region - LoRa" at the top, select the appropriate region parameter based on your hardware region (in this example, European Union 868MHz), and tap "Send" at the bottom. The device will reboot and reconnect to the phone. All setup is now complete and you can begin regular use.

3.Function Usage

Location Information

Since Core1 / Core2 with Module LoRa868 v1.2 does not have GPS functionality, we can share the smartphone's GPS location with the device. This is useful for team members to view each other's locations in outdoor scenarios.

Using iOS 18 as an example, go to the system Settings (not the Meshtastic app), find "App - Meshtastic", and enable "Share Location" at the bottom. Set "Interval" to your desired frequency and turn on "Smart Position".

Return to the Meshtastic app. In the Settings page, scroll down and tap "Position". Set "DEVICE GPS" to “Enabled” and "Update Interval" to match the phone’s location sharing interval. In "POSITION FLAGS", enable "Timestamp" to track the time of the location. Tap "Save" at the bottom to save the settings to the device.

In the Node Settings page of the Meshtastic app, enable "Provide phone location to mesh", then tap the three-dot menu in the top right and select "Radio configuration".

Tap "Position", set "GPS mode" to "ENABLED" and "GPS update interval" to your preferred frequency. In "Position flags", enable "TIMESTAMP" to associate times with locations. Tap "Send" at the bottom to send the settings to the device.

Once location sharing is configured, you can view nearby Meshtastic devices on the Mesh Map / Map page.

Username

By default, Meshtastic identifies each node using a random four-character code, which can be hard to remember. You can set a username to more easily identify devices during communication and management.

In the Settings page of the Meshtastic app, scroll down and tap "User", then enter a long name and a short name. Tap "Save" at the bottom to save the settings to the device.

The short name can have up to four characters and is displayed in the avatar.

In the Node Settings page of the Meshtastic app, tap the three-dot menu in the top right, go to "Radio configuration", then tap "User" and enter a long name and short name. Tap "Send" at the bottom to send the settings to the device.

The short name can have up to four characters and is displayed in the avatar.

Sending Messages

In the Messages page of the Meshtastic app, you can view a list of channels (group chats) and private chats, similar to common instant messaging apps.

In the Messages page of the Meshtastic app, you can view a list of channels (group chats) and private chats, similar to common instant messaging apps.

When a channel or private message is received, the device screen displays the time, source, and message content:

Creating, Sharing, and Joining Channels

Similar to group chat features in common messaging apps, Meshtastic allows you to create, share (invite), and join channels.

Creating: In the Settings page of the Meshtastic app, scroll down and tap "Channels", then tap "Add Channel". After entering the new channel’s configuration, tap "Save" to save it to the device. You will now see this new channel in the Messages list, though it only includes your node at this point.

Sharing: In the Settings page, scroll down and tap "Share QR Code", select the channel you want to share, then screenshot the QR code or tap "Share QR Code & Link" to send it out.

Joining: Use the system camera or QR scanner to scan a received Meshtastic QR code, then confirm as needed. Note: "Add" means adding the channel to your list; "Replace" will overwrite your current channel list. (For more information about the camera or QR scanner, refer to Apple's official guide.)

Creating: In the Channel Settings page of the Meshtastic app, tap "Edit", then "Add". After entering the new channel’s configuration, tap "Save - Send" to send it to the device. You will now see this new channel in the Messages list, though it only includes your node at this point.

Sharing: In the Channel Settings page, select the channel to share, then screenshot the QR code in the middle or click the copy button next to the URL.

Joining: In the Channel Settings page, tap "Scan" at the bottom to scan a received Meshtastic QR code, then confirm as needed. Note: "Add" means adding the channel to your list; "Replace" will overwrite your current channel list.

On This Page