

Arduino Quick Start
2. Devices & Examples
3. M5Unified
4. M5GFX
5. Extensions
Unit
Atomic
Tab5
IoT
Accessories
Module Gateway H2 Arduino Tutorial
This tutorial will introduce how to use the Module Gateway H2 to run Zigbee and Thread Arduino example programs to achieve network communication.
Board Manager Version Requirements
The Zigbee and Thread functionalities require a newer version of the ESP32 Arduino Board Manager, as well as some partition table configuration operations. This tutorial will be implemented based on version v3.1.1. Please refer to the installation tutorial below for setup and configuration.
1. Preparations
- 1.Environment Setup: Refer to the Getting Started with Arduino IDE Tutorial to complete the IDE installation.
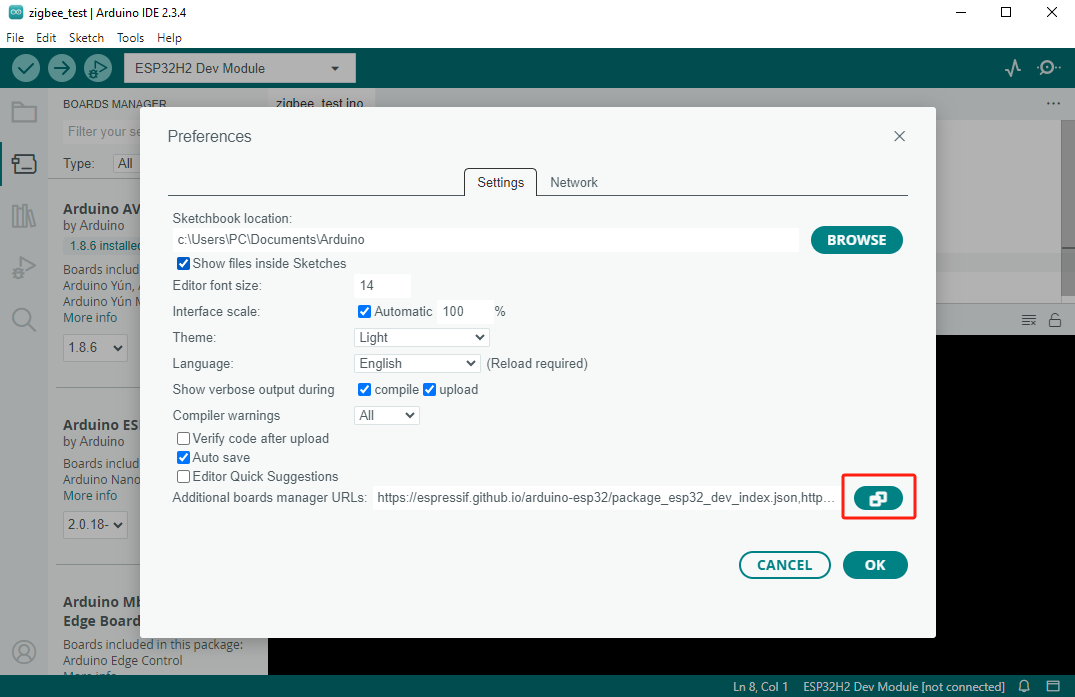
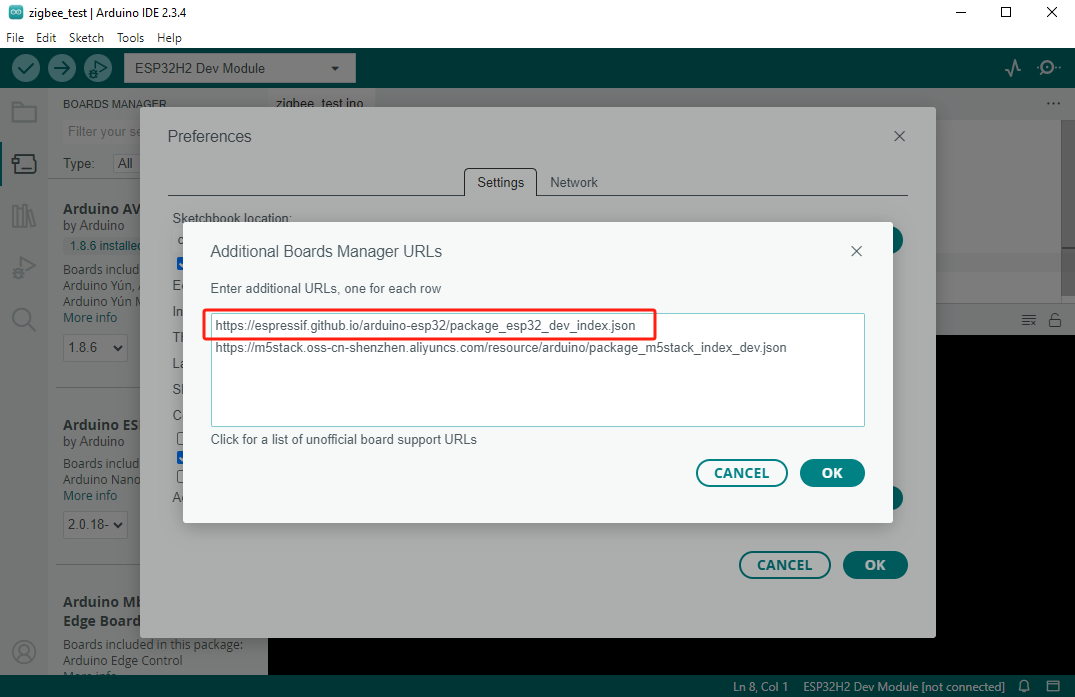
In the Preferences window, locate the input box for "Additional Board Manager URLs" and add the following URL:
https://espressif.github.io/arduino-esp32/package_esp32_dev_index.json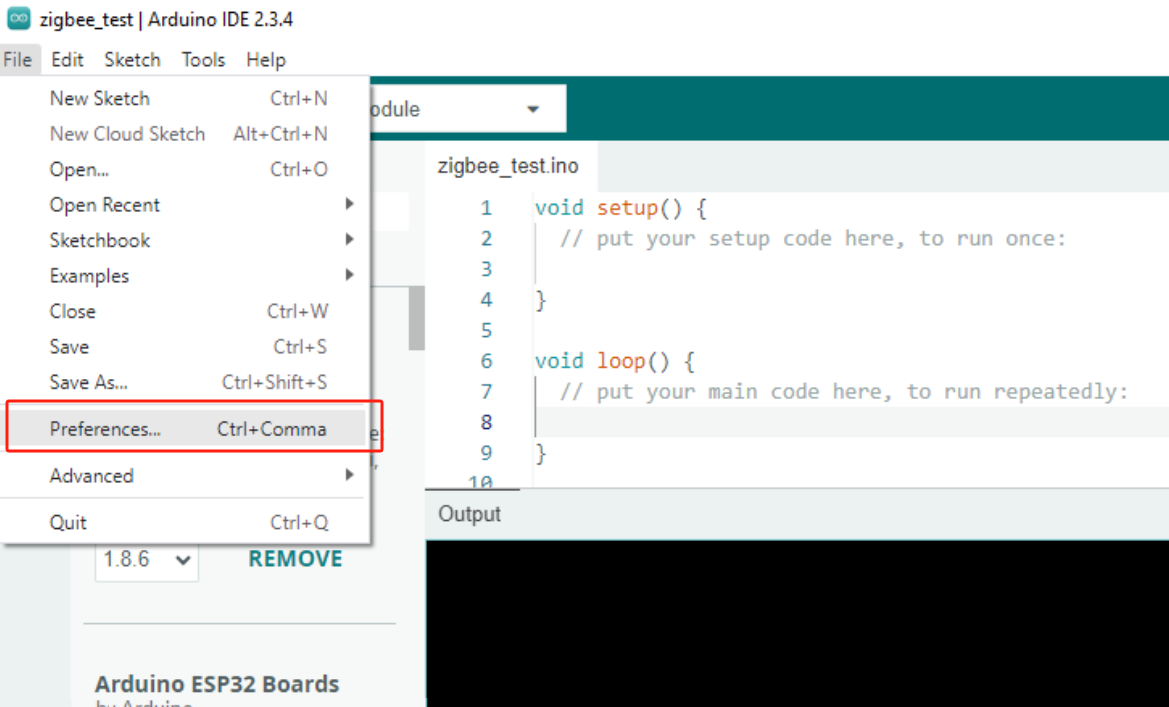
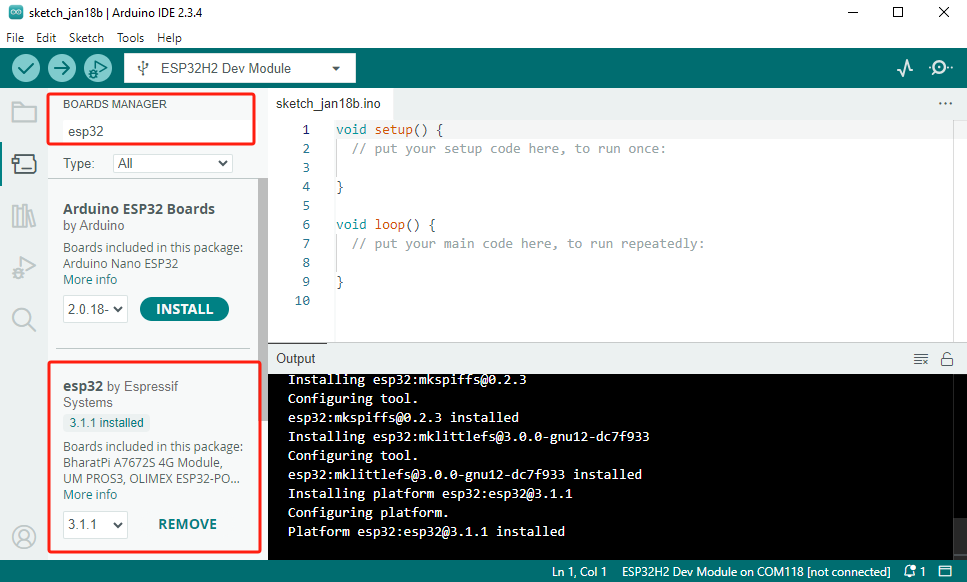
In the Board Manager, search for ESP32 and complete the board installation.
Note: This step requires downloading many toolchains. If you encounter download failures, try changing your network environment or configuring a proxy.
2.Driver Libraries Used:
3.Hardware Products Used:

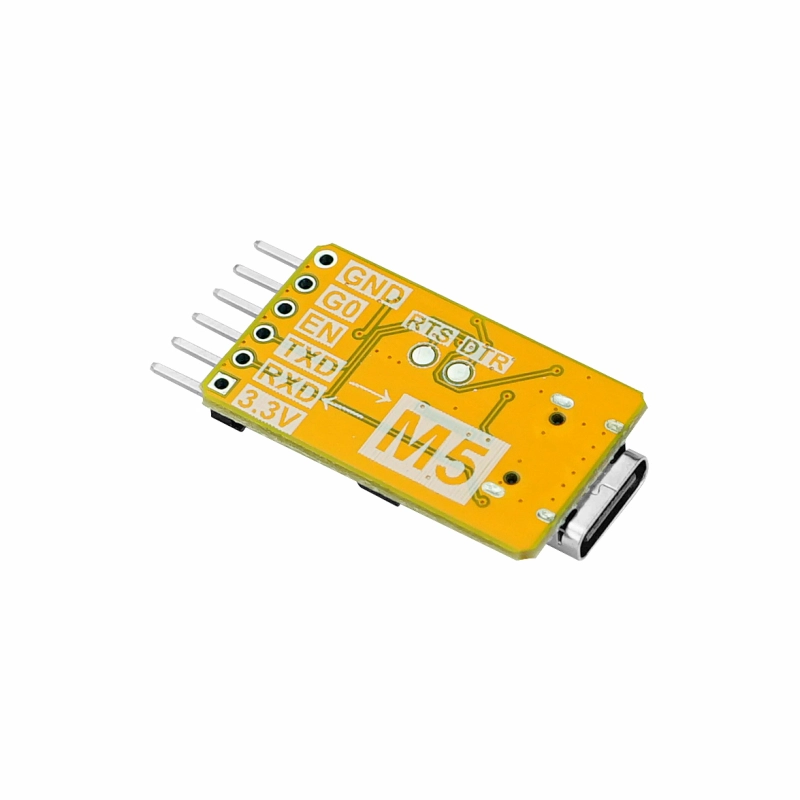
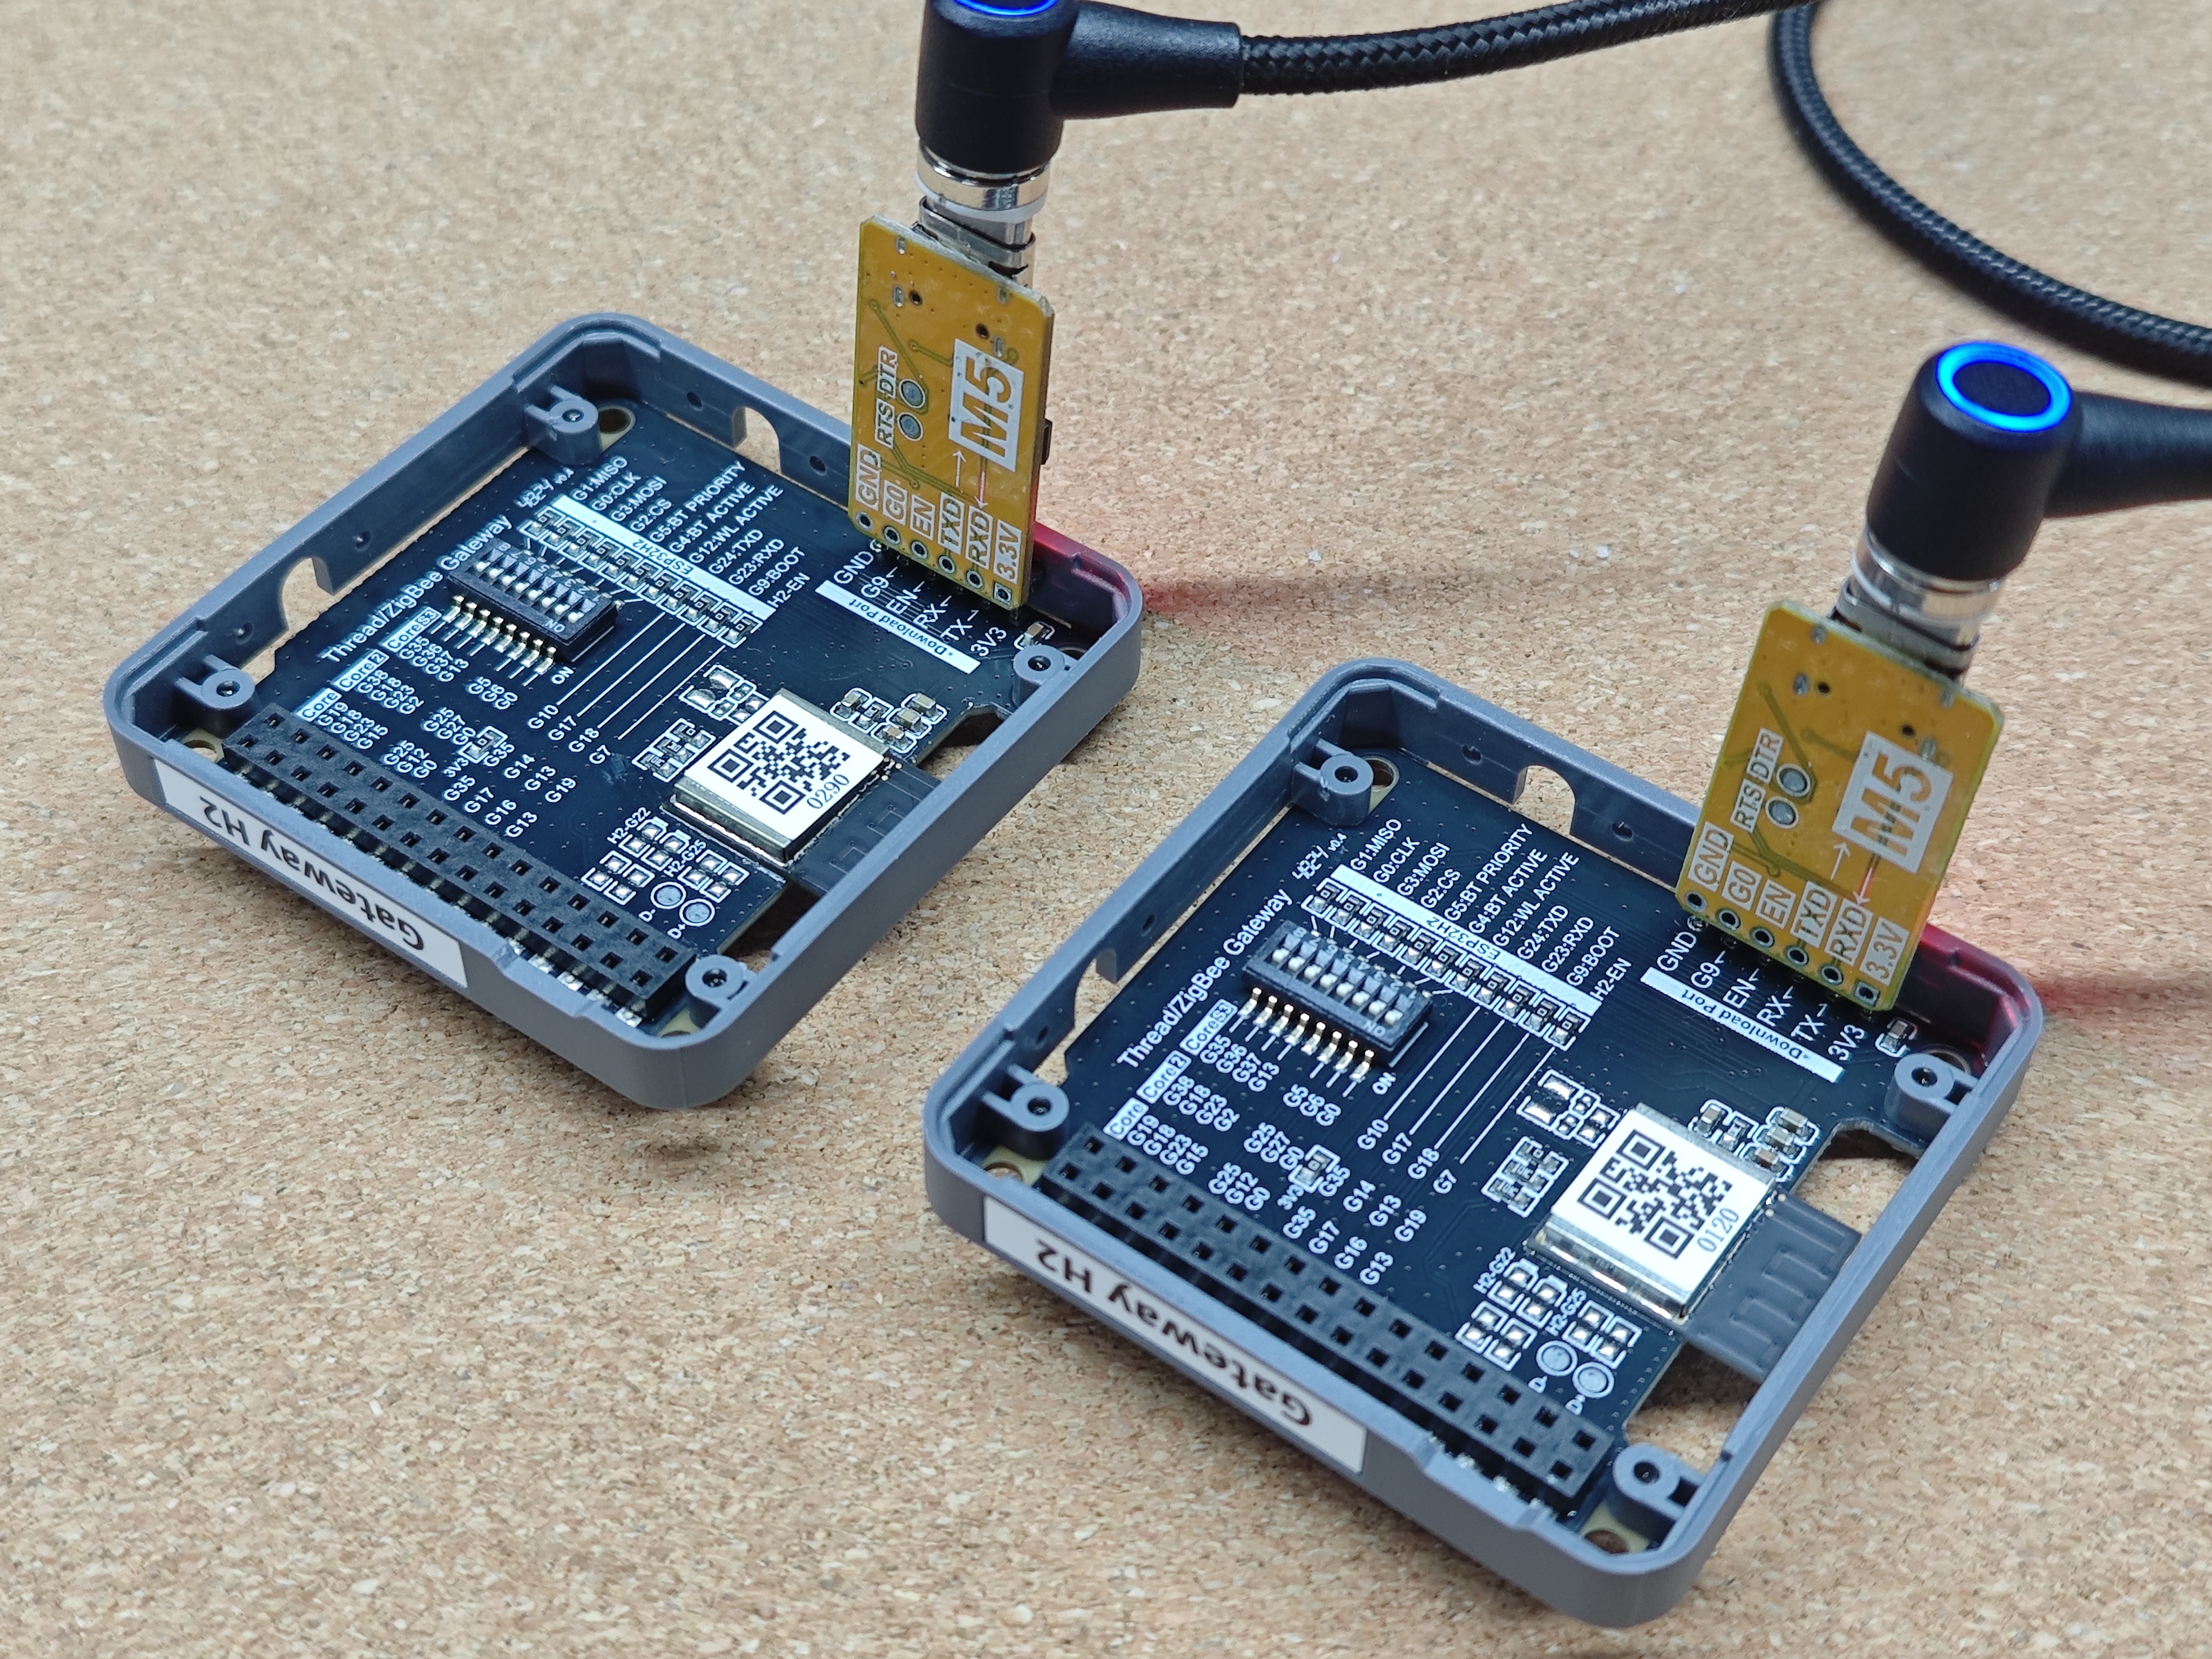
Module Gateway H2
This tutorial will demonstrate using the
Module Gateway H2 + ESP32 Downloader. The core module of the Module Gateway H2 uses the ESP32-H2-MINI-1-N2, which is capable of operating independently. In this tutorial, we will directly flash the example program to the Module Gateway H2 using the ESP32 Downloader and use it as a standalone device.
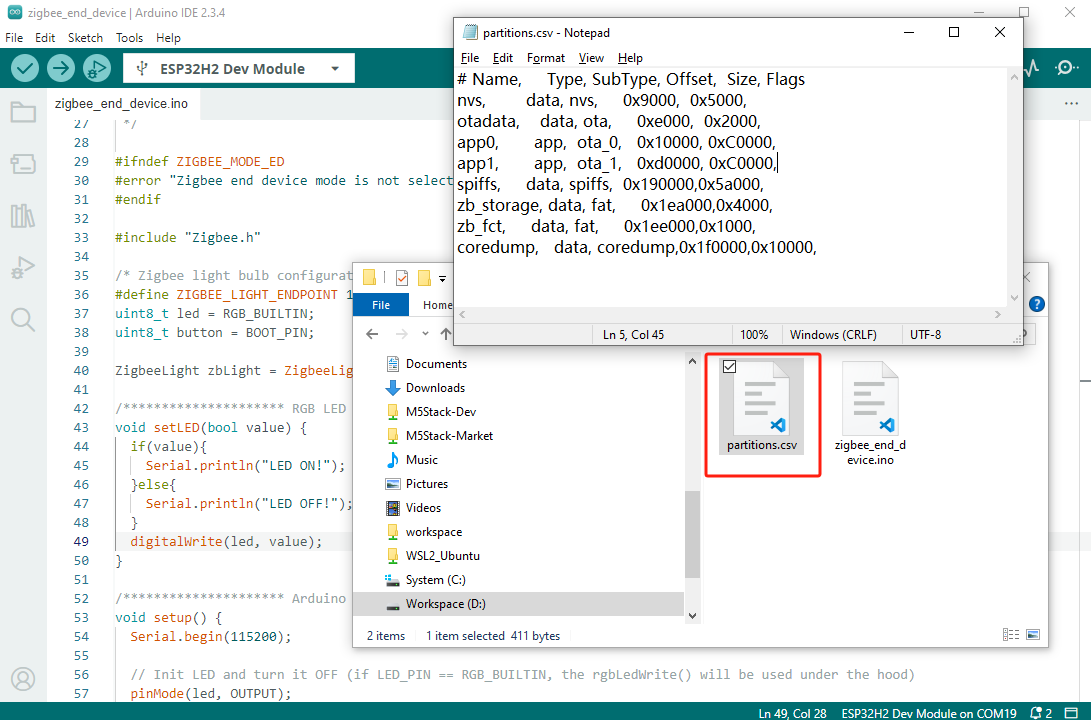
2. Custom Partition Table
Partitions
The core module of the Module Gateway H2 uses the 2MB Flash version of the
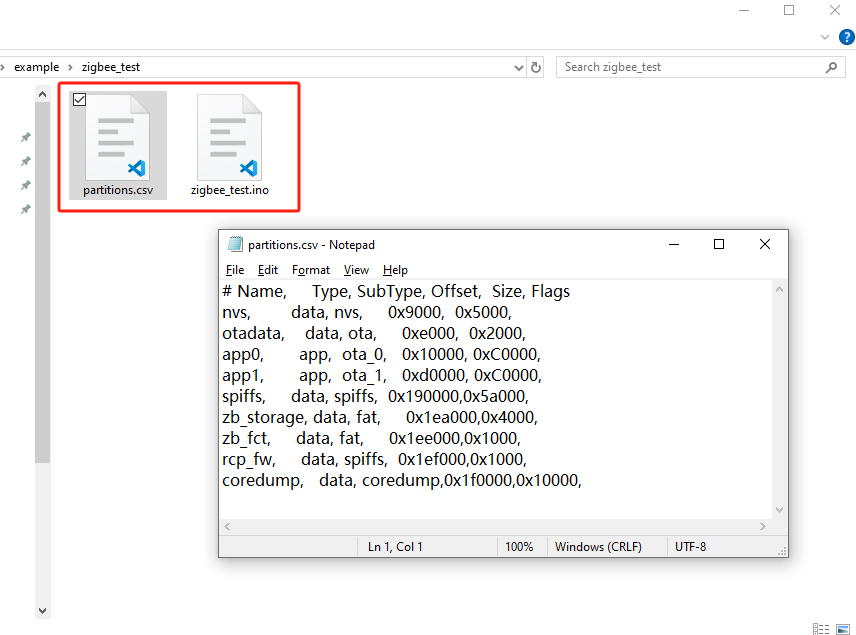
ESP32-H2-MINI-1-N2. Therefore, before compiling the program, we need to adjust the partition table. Since the default partition table options do not provide a configuration for the 2MB version, we will use the custom option. When this option is enabled, you must provide a custom partition table file. Place the file in the same directory as your project (.ino) file and name it partitions.csv, so that the partition table can be correctly loaded during compilation. Different examples below may use different partition tables; please refer to the specific instructions for each example.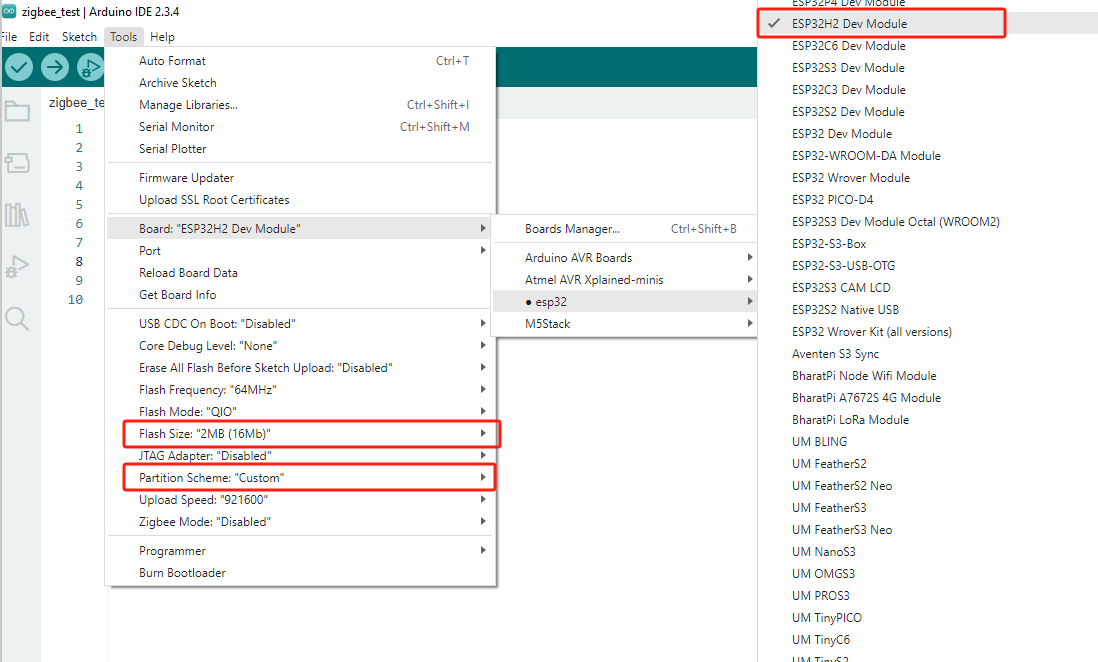
3. Zigbee
Coordinator & End Device
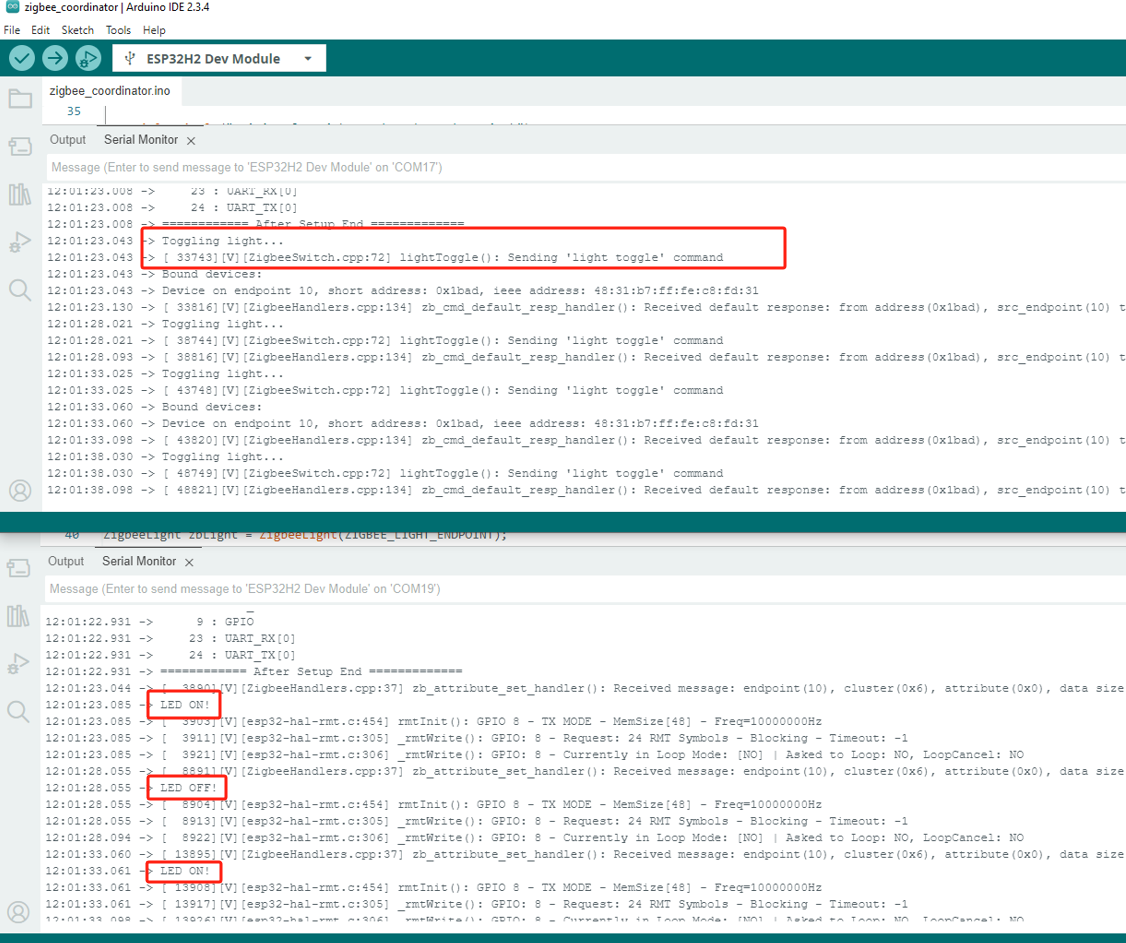
This example will use 2x Module Gateway H2 devices, which will be programmed with the Zigbee OnOff Switch (Coordinator) and Zigbee OnOff Light (End Device) respectively.
After the Coordinator starts, it will automatically create a network and wait for devices to join; once device joining and binding are complete, it will periodically send commands to toggle the light.
The End Device, upon startup, will be able to receive control commands from the Coordinator and print the current LED status.
Zigbee OnOff Light (End Device)
Arduino IDE Tools Menu Configuration:
- Select the correct board:
Tools -> Board: ESP32H2 Dev Module - Enable erase:
Tools -> Erase All Flash Before Sketch Upload: Enable(Disabling this may cause connection failures) - Select flash size:
Tools -> Flash Size: 2MB - Select End Device mode:
Tools -> Zigbee mode: Zigbee ED (end device) - Select Zigbee partition scheme:
Tools -> Partition Scheme: custom
Zigbee End Device Partition Table Configuration
The following Zigbee example program will use this partition table configuration for compilation. Please enable the
custom partition table option before compiling, and copy the following partition table into a file named partitions.csv in the same directory as your project (.ino) file.- Zigbee 2MB with spiffs
# Name,     Type, SubType, Offset,  Size, Flags
nvs,        data, nvs,     0x9000,  0x5000,
otadata,    data, ota,     0xe000,  0x2000,
app0,       app,  ota_0,   0x10000, 0xC0000,
app1,       app,  ota_1,   0xd0000, 0xC0000,
spiffs,     data, spiffs,  0x190000,0x5a000,
zb_storage, data, fat,     0x1ea000,0x4000,
zb_fct,     data, fat,     0x1ee000,0x1000,
coredump,   data, coredump,0x1f0000,0x10000,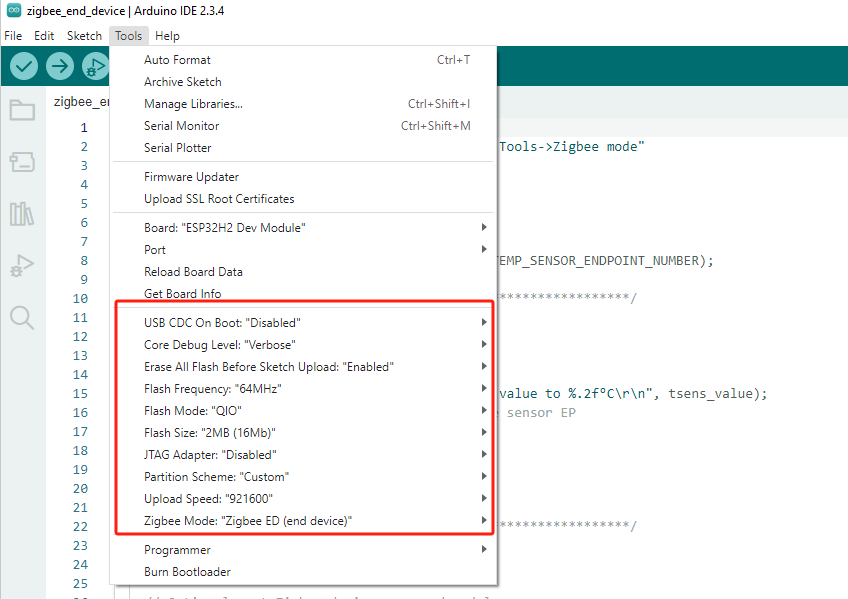
cpp
1 2 3 4 5 6 7 8 9 10 11 12 13 14 15 16 17 18 19 20 21 22 23 24 25 26 27 28 29 30 31 32 33 34 35 36 37 38 39 40 41 42 43 44 45 46 47 48 49 50 51 52 53 54 55 56 57 58 59 60 61 62 63 64 65 66 67 68 69 70 71 72 73 74 75 76 77 78
#ifndef ZIGBEE_MODE_ED
#error "Zigbee end device mode is not selected in Tools->Zigbee mode"
#endif

#include "Zigbee.h"

/* Zigbee light bulb configuration */
#define ZIGBEE_LIGHT_ENDPOINT 10
uint8_t led = RGB_BUILTIN;
uint8_t button = BOOT_PIN;

ZigbeeLight zbLight = ZigbeeLight(ZIGBEE_LIGHT_ENDPOINT);

/********************* RGB LED functions **************************/
void setLED(bool value) {
  if(value){
    Serial.println("LED ON!");
  }else{
    Serial.println("LED OFF!");
  }
  digitalWrite(led, value);
}

/********************* Arduino functions **************************/
void setup() {
  Serial.begin(115200);

  // Init LED and turn it OFF (if LED_PIN == RGB_BUILTIN, the rgbLedWrite() will be used under the hood)
  pinMode(led, OUTPUT);
  digitalWrite(led, LOW);

  // Init button for factory reset
  pinMode(button, INPUT_PULLUP);

  // Optional: set Zigbee device name and model
  zbLight.setManufacturerAndModel("Espressif", "ZBLightBulb");

  // Set callback function for light change
  zbLight.onLightChange(setLED);

  // Add endpoint to Zigbee Core
  Serial.println("Adding ZigbeeLight endpoint to Zigbee Core");
  Zigbee.addEndpoint(&zbLight);

  // When all endpoints are registered, start Zigbee. By default, it acts as a ZIGBEE_END_DEVICE.
  if (!Zigbee.begin()) {
    Serial.println("Zigbee failed to start!");
    Serial.println("Rebooting...");
    ESP.restart();
  }
  Serial.println("Connecting to network");
  while (!Zigbee.connected()) {
    Serial.print(".");
    delay(100);
  }
  Serial.println();
}

void loop() {
  // Checking button for factory reset
  if (digitalRead(button) == LOW) {  // Push button pressed
    // Key debounce handling
    delay(100);
    int startTime = millis();
    while (digitalRead(button) == LOW) {
      delay(50);
      if ((millis() - startTime) > 3000) {
        // If key pressed for more than 3 seconds, factory reset Zigbee and reboot
        Serial.println("Resetting Zigbee to factory and rebooting in 1s.");
        delay(1000);
        Zigbee.factoryReset();
      }
    }
    // Toggle light by pressing the button
    zbLight.setLight(!zbLight.getLightState());
  }
  delay(100);
}Zigbee OnOff Switch (Coordinator)
Arduino IDE Tools Menu Configuration:
- Select the correct board:
Tools -> Board: ESP32H2 Dev Module - Enable erase:
Tools -> Erase All Flash Before Sketch Upload: Enable(Disabling this may cause connection failures) - Select flash size:
Tools -> Flash Size: 2MB - Select Coordinator mode:
Tools -> Zigbee mode: Zigbee ZCZR (coordinator/router) - Select Zigbee partition scheme:
Tools -> Partition Scheme: custom
Zigbee Coordinator Partition Table Configuration
The following Zigbee example program will use this partition table configuration for compilation. Please enable the
custom partition table option before compiling, and copy the following partition table into a file named partitions.csv in the same directory as your project (.ino) file.- Zigbee ZCZR 2MB with spiffs
# Name,     Type, SubType, Offset,  Size, Flags
nvs,        data, nvs,     0x9000,  0x5000,
otadata,    data, ota,     0xe000,  0x2000,
app0,       app,  ota_0,   0x10000, 0xC0000,
app1,       app,  ota_1,   0xd0000, 0xC0000,
spiffs,     data, spiffs,  0x190000,0x5a000,
zb_storage, data, fat,     0x1ea000,0x4000,
zb_fct,     data, fat,     0x1ee000,0x1000,
rcp_fw,     data, spiffs,  0x1ef000,0x1000,
coredump,   data, coredump,0x1f0000,0x10000,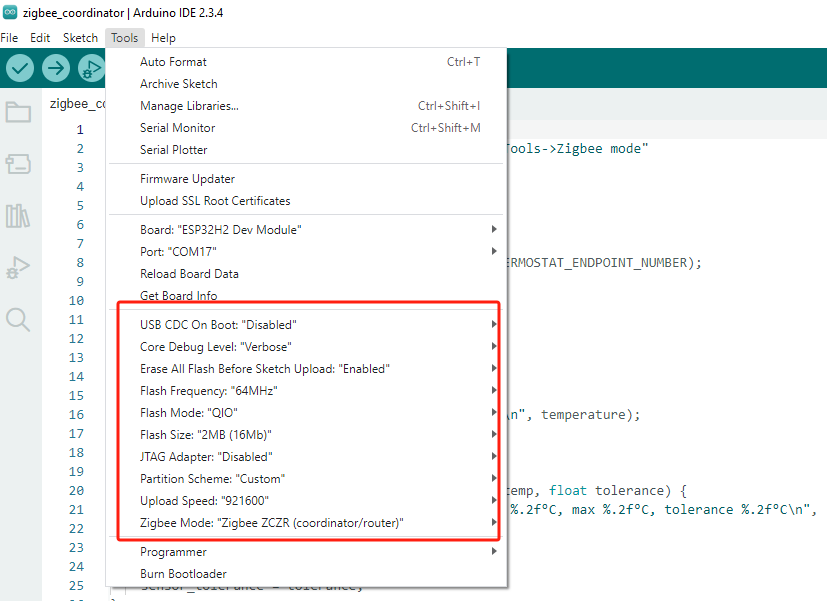

cpp
1 2 3 4 5 6 7 8 9 10 11 12 13 14 15 16 17 18 19 20 21 22 23 24 25 26 27 28 29 30 31 32 33 34 35 36 37 38 39 40 41 42 43 44 45 46 47 48 49 50 51 52 53 54 55 56 57 58 59 60 61 62 63 64 65 66 67 68 69 70 71 72 73 74 75 76 77 78 79 80 81
#ifndef ZIGBEE_MODE_ZCZR
#error "Zigbee coordinator mode is not selected in Tools->Zigbee mode"
#endif
#include "Zigbee.h"
#define SWITCH_ENDPOINT_NUMBER 5
#define TOGGLE_INTERVAL 5000 // Toggle interval (milliseconds)
ZigbeeSwitch zbSwitch = ZigbeeSwitch(SWITCH_ENDPOINT_NUMBER);
void setup() {
Serial.begin(115200);
// Optional: set Zigbee device name and model
zbSwitch.setManufacturerAndModel("Espressif", "ZigbeeSwitch");
// Optional: allow multiple lights to bind to the switch
zbSwitch.allowMultipleBinding(true);
// Add endpoint to Zigbee Core
Serial.println("Adding ZigbeeSwitch endpoint to Zigbee Core");
Zigbee.addEndpoint(&zbSwitch);
// Open network for 180 seconds after boot
Zigbee.setRebootOpenNetwork(180);
// When all endpoints are registered, start Zigbee with ZIGBEE_COORDINATOR mode
if (!Zigbee.begin(ZIGBEE_COORDINATOR)) {
Serial.println("Zigbee failed to start!");
Serial.println("Rebooting...");
ESP.restart();
}
Serial.println("Waiting for Light to bind to the switch");
// Wait for the switch to bind to a light:
while (!zbSwitch.bound()) {
Serial.printf(".");
delay(500);
}
// Optional: List all bound devices and read manufacturer and model name
std::list<zb_device_params_t *> boundLights = zbSwitch.getBoundDevices();
for (const auto &device : boundLights) {
Serial.printf("Device on endpoint %d, short address: 0x%x\r\n", device->endpoint, device->short_addr);
Serial.printf(
"IEEE Address: %02X:%02X:%02X:%02X:%02X:%02X:%02X:%02X\r\n", device->ieee_addr[7], device->ieee_addr[6], device->ieee_addr[5], device->ieee_addr[4],
device->ieee_addr[3], device->ieee_addr[2], device->ieee_addr[1], device->ieee_addr[0]
);
char *manufacturer = zbSwitch.readManufacturer(device->endpoint, device->short_addr, device->ieee_addr);
char *model = zbSwitch.readModel(device->endpoint, device->short_addr, device->ieee_addr);
if (manufacturer != nullptr) {
Serial.printf("Light manufacturer: %s\r\n", manufacturer);
}
if (model != nullptr) {
Serial.printf("Light model: %s\r\n", model);
}
}
Serial.println();
}
void loop() {
static unsigned long lastToggleTime = 0;
// Toggle the light state at fixed intervals
if (millis() - lastToggleTime > TOGGLE_INTERVAL) {
lastToggleTime = millis();
Serial.println("Toggling light...");
zbSwitch.lightToggle();
}
// Print the bound lights every 10 seconds
static uint32_t lastPrint = 0;
if (millis() - lastPrint > 10000) {
lastPrint = millis();
zbSwitch.printBoundDevices(Serial);
}
}Usage Steps
- 1.Ensure that the Coordinator is running and has created a network, then flash the OnOff Light code to the End Device.
- 2.Once the device starts, it will automatically search for and join the network, and the OnOff Switch will periodically send light toggle commands.
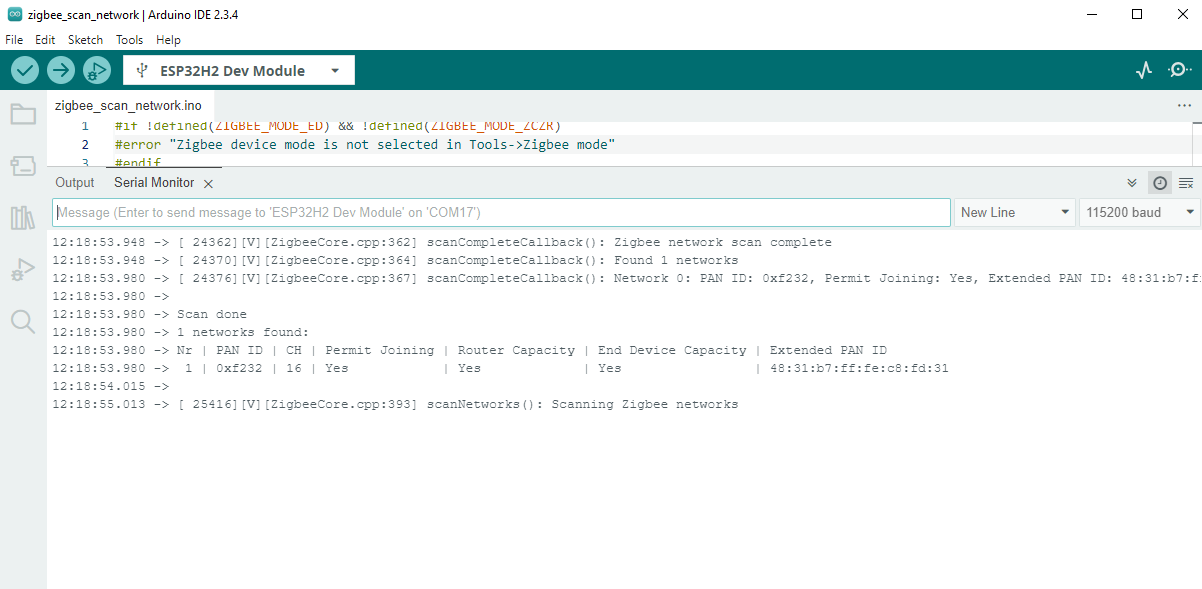
4. Zigbee Scan Network
Arduino IDE Tools Menu Configuration:
- Select the correct board:
Tools -> Board: ESP32H2 Dev Module - Enable erase:
Tools -> Erase All Flash Before Sketch Upload: Enable(Disabling this may cause connection failures) - Select flash size:
Tools -> Flash Size: 2MB - Select Coordinator mode:
Tools -> Zigbee mode: Zigbee ZCZR (coordinator/router) - Select Zigbee partition scheme:
Tools -> Partition Scheme: custom
Zigbee Example Partition Table Configuration
The following Zigbee example program will use this partition table configuration for compilation. Please enable the
custom partition table option before compiling, and copy the following partition table into a file named partitions.csv in the same directory as your project (.ino) file.- Zigbee ZCZR 2MB with spiffs
# Name,     Type, SubType, Offset,  Size, Flags
nvs,        data, nvs,     0x9000,  0x5000,
otadata,    data, ota,     0xe000,  0x2000,
app0,       app,  ota_0,   0x10000, 0xC0000,
app1,       app,  ota_1,   0xd0000, 0xC0000,
spiffs,     data, spiffs,  0x190000,0x5a000,
zb_storage, data, fat,     0x1ea000,0x4000,
zb_fct,     data, fat,     0x1ee000,0x1000,
rcp_fw,     data, spiffs,  0x1ef000,0x1000,
coredump, data, coredump,0x1f0000,0x10000,Zigbee Scan Network
This example uses the Module Gateway H2 to perform a Zigbee network scan and prints the network information to the serial port.
cpp
1 2 3 4 5 6 7 8 9 10 11 12 13 14 15 16 17 18 19 20 21 22 23 24 25 26 27 28 29 30 31 32 33 34 35 36 37 38 39 40 41 42 43 44 45 46 47 48 49 50 51 52 53 54 55 56 57 58 59 60 61 62 63 64 65 66 67 68 69 70 71 72 73 74 75 76 77 78 79 80 81 82
#if !defined(ZIGBEE_MODE_ED) && !defined(ZIGBEE_MODE_ZCZR)
#error "Zigbee device mode is not selected in Tools->Zigbee mode"
#endif

#include "Zigbee.h"

#ifdef ZIGBEE_MODE_ZCZR
zigbee_role_t role = ZIGBEE_ROUTER;  // or can be ZIGBEE_COORDINATOR, but it won't scan itself
#else
zigbee_role_t role = ZIGBEE_END_DEVICE;
#endif

void printScannedNetworks(uint16_t networksFound) {
    if (networksFound == 0) {
        Serial.println("No networks found");
    } else {
        zigbee_scan_result_t *scan_result = Zigbee.getScanResult();
        Serial.println("\nScan done");
        Serial.print(networksFound);
        Serial.println(" networks found:");
        Serial.println("Nr | PAN ID | CH | Permit Joining | Router Capacity | End Device Capacity | Extended PAN ID");
        for (int i = 0; i < networksFound; ++i) {
        // Print all available info for each network found
        Serial.printf("%2d", i + 1);
        Serial.print(" | ");
        Serial.printf("0x%04hx", scan_result[i].short_pan_id);
        Serial.print(" | ");
        Serial.printf("%2d", scan_result[i].logic_channel);
        Serial.print(" | ");
        Serial.printf("%-14.14s", scan_result[i].permit_joining ? "Yes" : "No");
        Serial.print(" | ");
        Serial.printf("%-15.15s", scan_result[i].router_capacity ? "Yes" : "No");
        Serial.print(" | ");
        Serial.printf("%-19.19s", scan_result[i].end_device_capacity ? "Yes" : "No");
        Serial.print(" | ");
        Serial.printf(
            "%02x:%02x:%02x:%02x:%02x:%02x:%02x:%02x", scan_result[i].extended_pan_id[7], scan_result[i].extended_pan_id[6], scan_result[i].extended_pan_id[5],
            scan_result[i].extended_pan_id[4], scan_result[i].extended_pan_id[3], scan_result[i].extended_pan_id[2], scan_result[i].extended_pan_id[1],
            scan_result[i].extended_pan_id[0]
        );
        Serial.println();
        delay(10);
        }
        Serial.println("");
        // Delete the scan result to free memory for code below.
        Zigbee.scanDelete();
    }
}

void setup() {
    Serial.begin(115200);

    // Initialize Zigbee stack without any endpoints just for scanning
    if (!Zigbee.begin(role)) {
        Serial.println("Zigbee failed to start!");
        Serial.println("Rebooting...");
        ESP.restart();
    }

    Serial.println("Setup done, starting Zigbee network scan...");
    // Start Zigbee Network Scan with default parameters (all channels, scan time 5)
    Zigbee.scanNetworks();
}

void loop() {
    // Check Zigbee Network Scan process
    int16_t ZigbeeScanStatus = Zigbee.scanComplete();
    if (ZigbeeScanStatus < 0) {  // It is busy scanning or encountered an error
        if (ZigbeeScanStatus == ZB_SCAN_FAILED) {
        Serial.println("Zigbee scan has failed. Starting again.");
        delay(1000);
        Zigbee.scanNetworks();
        }
        delay(100);
        // Another option is status ZB_SCAN_RUNNING - just wait.
    } else {  // Found zero or more wireless networks
        printScannedNetworks(ZigbeeScanStatus);
        delay(1000);
        Zigbee.scanNetworks();  // Start over...
    }
    // The loop can perform other tasks...
}Usage Steps
- 1.Once the device starts, it will automatically begin scanning. If there are active Zigbee networks nearby, the current scan results will be displayed after each scan, and a new scan will automatically begin.
5. OpenThread
Example Programs
In the menu path
File -> Examples -> OpenThread, you can find OpenThread-related example programs. Before compiling the programs, please refer to the partition table configuration and other settings below.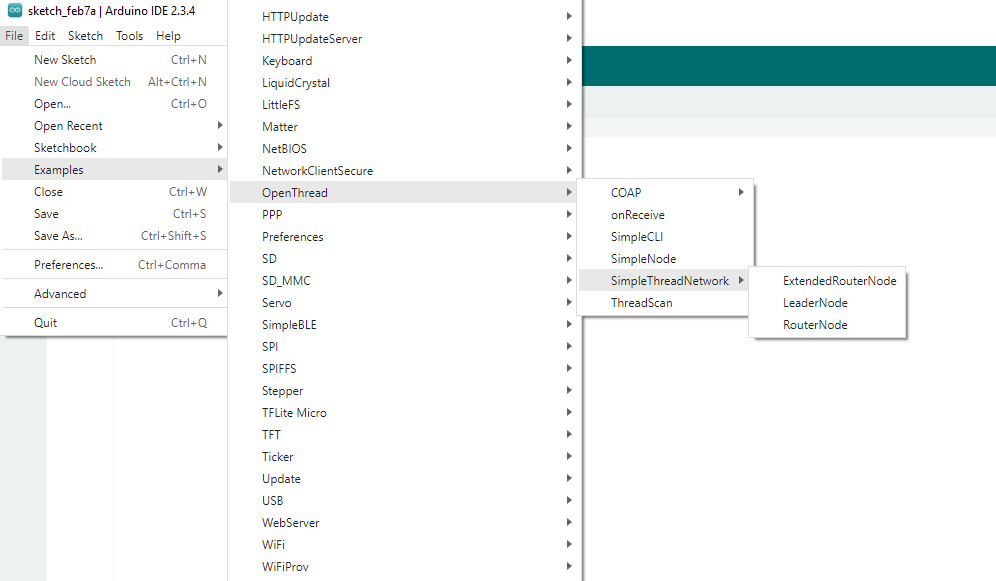
Arduino IDE Tools Menu Configuration:
- Select the correct board:
Tools -> Board: ESP32H2 Dev Module - Enable erase:
Tools -> Erase All Flash Before Sketch Upload: Enable(Disabling this may cause connection failures) - Select flash size:
Tools -> Flash Size: 2MB - Select Zigbee partition scheme:
Tools -> Partition Scheme: Minimal SPIFFS (1.3MB APP/700K SPIFFS)

Page Tools