pdf-icon

如何使用M5Unified库

本文档将指导您完成 M5Unified 的入门过程,M5Unified 是一个用于 Arduino IDE 和 ESP-IDF 的库。
* 本文档是基于库M5Unified版本v0.0.7来介绍的。

M5Unified是什么?

M5Unified 是一个使用 ArduinoFramework 处理基于 ESP32 的 M5Stack 产品的库。

直到现在,M5Stack/M5Core2/M5StickC/M5StickCPlus/M5Atom 每个产品都有单独的库,它们的用法(API)也不同。有了M5Unified,所有的M5Stack系列都可以用相同的用法(API)来处理,非常方便。

此外,一旦您习惯了 M5Unified,您可以使用单个程序代码运行不同的 M5Stack 系列(例如,带屏幕的 M5Stack 和不带屏幕的 M5Atom)。

M5Unified 不仅可以与Arduino 框架一起使用,还可以与ESP-IDF 框架一起使用。

支持的设备

也可能支持下面列出的设备以外的设备。请查看 M5Unified存储库 以获取最新信息。

主要设备

  • M5Stack Basic / Gray / Go / Fire

  • M5Stack Core2 / Core2 for AWSIoT EduKit / M5Tough

  • M5StickC / M5StickCPlus

  • M5Stack CoreInk

  • M5Paper

  • M5Atom Lite / Matrix / Echo / PSRAM / U

  • M5Stamp Pico / C3 /C3U

  • M5Station

扩展显示器

  • Unit LCD

  • Unit OLED

  • Atom Display / Lite (Connect to M5Atom Lite / Matrix / PSRAM)

扩展扬声器

  • SPK HAT (connects to M5StickC / M5StickCPlus / M5Stack CoreInk)

  • Atomic SPK (connects to M5Atom Lite / PSRAM)

安装ArduinoIDE

安装 ArduinoIDE

安装库文件

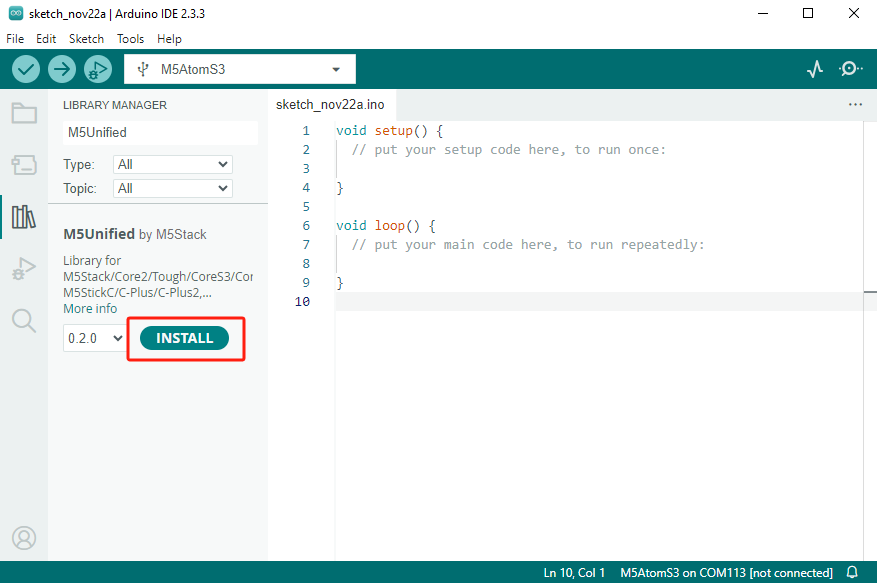
启动ArduinoIDE并按照以下步骤安装库文件M5Unified。

如何使用库管理器

安装 M5Unified 库。

  • 1."项目" -> "包含库" -> "库管理..." 你会在编辑器的左侧看到 "库管理" 。
  • 2.在 "筛选搜查结果" 搜索框输入M5Unified, 当“M5Unified by M5Stack”字段出现时单击“安装”。
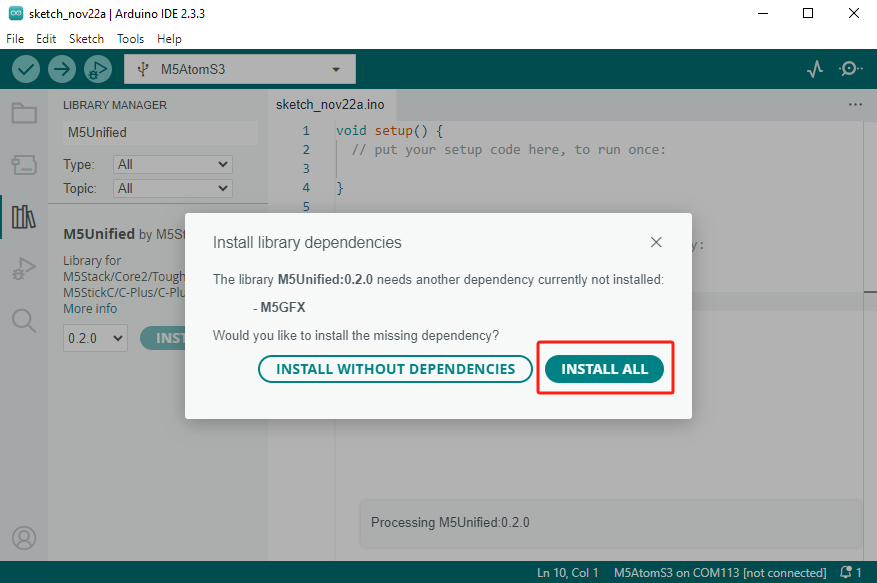
  • 3.如果看到 "安装库的依赖", 单机 "全部安装".
在使用其他UNIT、MODULE、HAT和BASE时,可能会多次使用库管理器。请记住如何使用它。

输入程序

在ArduinoIDE编辑器中输入HelloWorld或blinking RGB LEDs的程序代码。

HelloWorld (适用于带显示屏的设备)

显示屏和串口监视器将显示“HelloWorld!”,并每秒计数一次。

#include <M5Unified.h> // Make the M5Unified library available to your program.

// global variables (define variables to be used throughout the program)
uint32_t count;


// setup function is executed only once at startup.
// This function mainly describes the initialization process.
void setup() {

  auto cfg = M5.config(); // Assign a structure for initializing M5Stack
  // If config is to be set, set it here
  // Example.
  // cfg.external_spk = true;

  M5.begin(cfg);                        // initialize M5 device

  M5.Display.setTextSize(3);            // change text size
  M5.Display.print("Hello World!!!") ;  // display Hello World! and one line is displayed on the screen
  Serial.println("Hello World!!!") ;    // display Hello World! and one line on the serial monitor
  count = 0;                            // initialize count

}

// loop function is executed repeatedly for as long as it is running.
// loop function acquires values from sensors, rewrites the screen, etc.
void loop() {

  Display.setCursor(0, 20);             // set character drawing coordinates (cursor position)
  Display.printf("COUNT: %d\n", count); // display count on screen
  Serial.printf("COUNT: %d\n", count);  // display count serially
  count++;                              // increase count by 1
  delay(1000);                          // wait 1 second(1,000msec)

}

Blinking RGB LEDs (适用于带有RGB LED的设备,例如M5Atom和M5Stamp)

M5Unifed v0.0.7 不支持 RGB LED,需要外部库,例如 FastLED。
参考 安装库文件 并安装库“FastLED”。

串口监视器将显示“Hello World!”,并且每秒闪烁绿色RGB LED。

#include <M5Unified.h> // enable the M5Unified library.
#include <FastLED.h> // enable FastLED (RGB LED) library.

// Specify the number of RGB LEDs (25 for M5Atom Matrix).
#define NUM_LEDS 1
// Specify DATA PIN of RGB LEDs.
#define LED_DATA_PIN 27

// global variables (define variables to be used throughout the program)
uint32_t count;
CRGB leds[NUM_LEDS];

// setup function is executed only once at startup.
// This function mainly describes the initialization process.
void setup() {

  auto cfg = M5.config(); // assign a structure for initializing M5Stack
  // If config is to be set, set it here
  // Example.
  // cfg.external_spk = true;

  M5.begin(cfg); // initialize M5 device, Display is also initialized
  FastLED.addLeds<WS2811, LED_DATA_PIN, GRB>(leds, NUM_LEDS); // initialize RGB LEDs
  FastLED.setBrightness(20); // set the brightness (more than 20 may break due to heat.)
  Serial.println("Hello World!!!") ; // display Hello World!!! on serial monitor and one line is displayed on the serial monitor
  count = 0; // initialize count

}

// loop function is executed repeatedly for as long as it is running.
// loop function acquires values from sensors, rewrites the screen, etc.
void loop() {

  leds[0] = CRGB::Red; // set LED[0] to red
  FastLED.show(); // display LEDs
  delay(500); // wait 0.5 seconds
  leds[0] = CRGB::Black; // set LED to black
  FastLED.show(); // show LEDs (lights off because they are black)
  delay(500); // wait 0.5 seconds

  Serial.printf("COUNT: %d\n", count); // display count value on serial
  count++; // increase count by 1.
}

编译

1. 将设备连接到电脑

将要写入程序的设备连接到PC。

选择开发板

  • 打开菜单"工具" -> "开发板" -> "M5Stack" 选择你要编程的板子。

3. 选择端口

检查并选择设备连接到的端口。(该图显示了 Windows 上的COM?端口。)

  • 每个操作系统的端口名称

? > 名称可能因设备中的芯片和操作系统版本而异。

操作系统 端口名称 (CH2104) 端口名称 (CH9102) 备注
Windows COM? COM? ?是一个数字(COM1 和 COM3 在 Windows 11 中不可用,因为它们供系统使用。)
MacOS /dev/tty.SLAB_USBtoUART
/dev/cu.usbserial-XXX
/dev/tty.SLAB_USBtoUART
/dev/cu.usbserial-XXX
Linux /dev/ttyUSB? /dev/ttyACM? ?是一个数字。

4. 编译

编译后从菜单执行 项目 -> 上传 将程序写入设备。如果发生错误,它将以橙色显示,因此请检查消息以找出错误。

相关链接

M5.begin()的参数

有关可在 M5.config() 中设置的项目的详细信息,请参见 此处 .

用法示例

计划编程案例

我计划介绍如何获取传感器值、控制电机等的具体示例。

移植到M5Unified上的要点(从其他特定产品的库文件)

网络上提供的许多信息都使用特定于产品的库,不能按原样使用。在这种情况下,请参考以下文档 移植到M5Unified上的要点

On This Page