

Arduino入門
2. デバイス&サンプル
3. M5Unified
4. M5GFX
5. 拡張モジュール&サンプル
Unit
Atomic
Tab5
IoT
アクセサリー
Chain DualKey BLE HID
Chain DualKey BLE HID に関する API とサンプルプログラムです。
サンプルプログラム
ビルド要件
- M5Stack ボードマネージャーのバージョン >= 3.2.5
- 開発ボードの選択 = M5ChainDualKey
cpp
1 2 3 4 5 6 7 8 9 10 11 12 13 14 15 16 17 18 19 20 21 22 23 24 25 26 27 28 29 30 31 32 33 34 35 36 37 38 39 40 41 42 43 44 45 46 47 48 49 50 51 52 53 54 55 56 57 58 59 60 61 62 63 64 65 66 67 68 69 70 71 72 73 74 75 76 77 78 79 80 81 82 83 84 85 86 87 88 89 90 91 92 93 94 95 96 97 98 99 100 101 102 103 104 105 106 107 108 109 110 111 112 113 114 115 116 117 118 119 120 121 122 123 124 125 126 127 128 129 130 131 132 133 134 135 136 137 138 139 140 141 142 143
#include <BLEDevice.h>
#include <BLEServer.h>
#include <BLEHIDDevice.h>
#include <HIDTypes.h>

const int PIN_BTN_1 = 0;
const int PIN_BTN_2 = 17;

// HID keyboard report structure: 1 byte modifiers + 1 byte reserved + 6 bytes keycodes
struct KeyReport {
  uint8_t modifiers;
  uint8_t reserved;
  uint8_t keys[6];
};

// HID keyboard report map
static const uint8_t hidReportMap[] = {
  0x05, 0x01,  // Usage Page = Generic Desktop
  0x09, 0x06,  // Usage = Keyboard
  0xA1, 0x01,  // Collection = Application
  0x85, 0x01,  // Report ID = 1

  0x75, 0x01,  //   Report Size = 1
  0x95, 0x08,  //   Report Count = 8
  0x05, 0x07,  //   Usage Page = Key Codes
  0x19, 0xE0,  //   Usage Minimum = Keyboard LeftControl
  0x29, 0xE7,  //   Usage Maximum = Keyboard Right GUI
  0x15, 0x00,  //   Logical Minimum = 0
  0x25, 0x01,  //   Logical Maximum = 1
  0x81, 0x02,  //   Input = Data, Variable, Absolute (1 byte Modifiers)

  0x75, 0x08,  //   Report Size = 8
  0x95, 0x01,  //   Report Count = 1
  0x81, 0x01,  //   Input = Constant (1 byte Reserved)

  0x75, 0x08,  //   Report Size = 8
  0x95, 0x06,  //   Report Count = 6
  0x05, 0x07,  //   Usage Page = Key Codes
  0x19, 0x00,  //   Usage Minimum = Reserved
  0x29, 0x65,  //   Usage Maximum = Keyboard Application
  0x15, 0x00,  //   Logical Minimum = 0
  0x25, 0x65,  //   Logical Maximum = 101
  0x81, 0x00,  //   Input = Data, Array (6 bytes Keycodes)
  0xC0         // End Collection
};

BLEHIDDevice* hidDevice;
BLECharacteristic* inputReportCharacteristic;
bool deviceConnected = false;

// Connect status callback
class MyBLEServerCallbacks : public BLEServerCallbacks {
  void onConnect(BLEServer* pServer) override {
    deviceConnected = true;
    Serial.println("BLE connected");
  }
  void onDisconnect(BLEServer* pServer) override {
    deviceConnected = false;
    Serial.println("BLE disconnected");
    BLEDevice::startAdvertising();  // Restart advertising after disconnected
  }
};

// Function to report a key was pressed and released, see keycode definitions:
// https://www.usb.org/sites/default/files/hut1_6.pdf
void sendKey(uint8_t keycode, uint8_t modifier = 0) {
  if (!deviceConnected || inputReportCharacteristic == nullptr) {
    return;
  }
  KeyReport report = { 0 };

  // Pressed
  report.modifiers = modifier;
  report.keys[0] = keycode;
  inputReportCharacteristic->setValue((uint8_t*)&report, sizeof(report));
  inputReportCharacteristic->notify();

  delay(10);

  // Released (clean)
  report.modifiers = 0;
  report.keys[0] = 0;
  inputReportCharacteristic->setValue((uint8_t*)&report, sizeof(report));
  inputReportCharacteristic->notify();
}

void setup() {
  delay(2000);
  Serial.begin(115200);
  Serial.println("Starting Chain DualKey BLE Keyboard");

  pinMode(PIN_BTN_1, INPUT);
  pinMode(PIN_BTN_2, INPUT);

  // Init BLE device, create BLE server, create HID device, input report (ID=1)
  BLEDevice::init("Chain DualKey Keyboard");  // Device name shown on computers and phones
  BLEServer* pServer = BLEDevice::createServer();
  pServer->setCallbacks(new MyBLEServerCallbacks());
  hidDevice = new BLEHIDDevice(pServer);
  inputReportCharacteristic = hidDevice->inputReport(1);

  // Set HID device info
  hidDevice->manufacturer()->setValue("M5Stack");
  hidDevice->pnp(0x02, 0x1234, 0x0001, 0x0100);  // vendorIdSource (0x02=Bluetooth SIG), vendorId, productId, version
  hidDevice->hidInfo(0x00, 0x01);

  // Set HID report map
  hidDevice->reportMap((uint8_t*)hidReportMap, sizeof(hidReportMap));
  hidDevice->startServices();

  // Set BLE security (BOND)
  BLESecurity* pSecurity = new BLESecurity();
  pSecurity->setAuthenticationMode(ESP_LE_AUTH_BOND);

  // Set BLE advertising
  BLEAdvertising* pAdvertising = BLEDevice::getAdvertising();
  pAdvertising->setAppearance(HID_KEYBOARD);
  pAdvertising->addServiceUUID(hidDevice->hidService()->getUUID());
  pAdvertising->start();

  Serial.println("BLE HID Keyboard is advertising, ready to pair.");
}

void loop() {
  static bool lastBtnState_1 = HIGH;
  static bool lastBtnState_2 = HIGH;
  bool btnState_1 = digitalRead(PIN_BTN_1);
  bool btnState_2 = digitalRead(PIN_BTN_2);

  if (lastBtnState_1 == HIGH && btnState_1 == LOW) {
    Serial.println("Button 1 pressed, send 'a'");
    sendKey(0x04);  // 'a' + no modifier
  }
  if (lastBtnState_2 == HIGH && btnState_2 == LOW) {
    Serial.println("Button 2 pressed, send 'v' + LeftCtrl");
    sendKey(0x19, 0x01);  // 'v' + LeftCtrl
    // sendKey(0x19, 0x08);  // 'v' + LeftCmd
  }

  lastBtnState_1 = btnState_1;
  lastBtnState_2 = btnState_2;
  delay(10);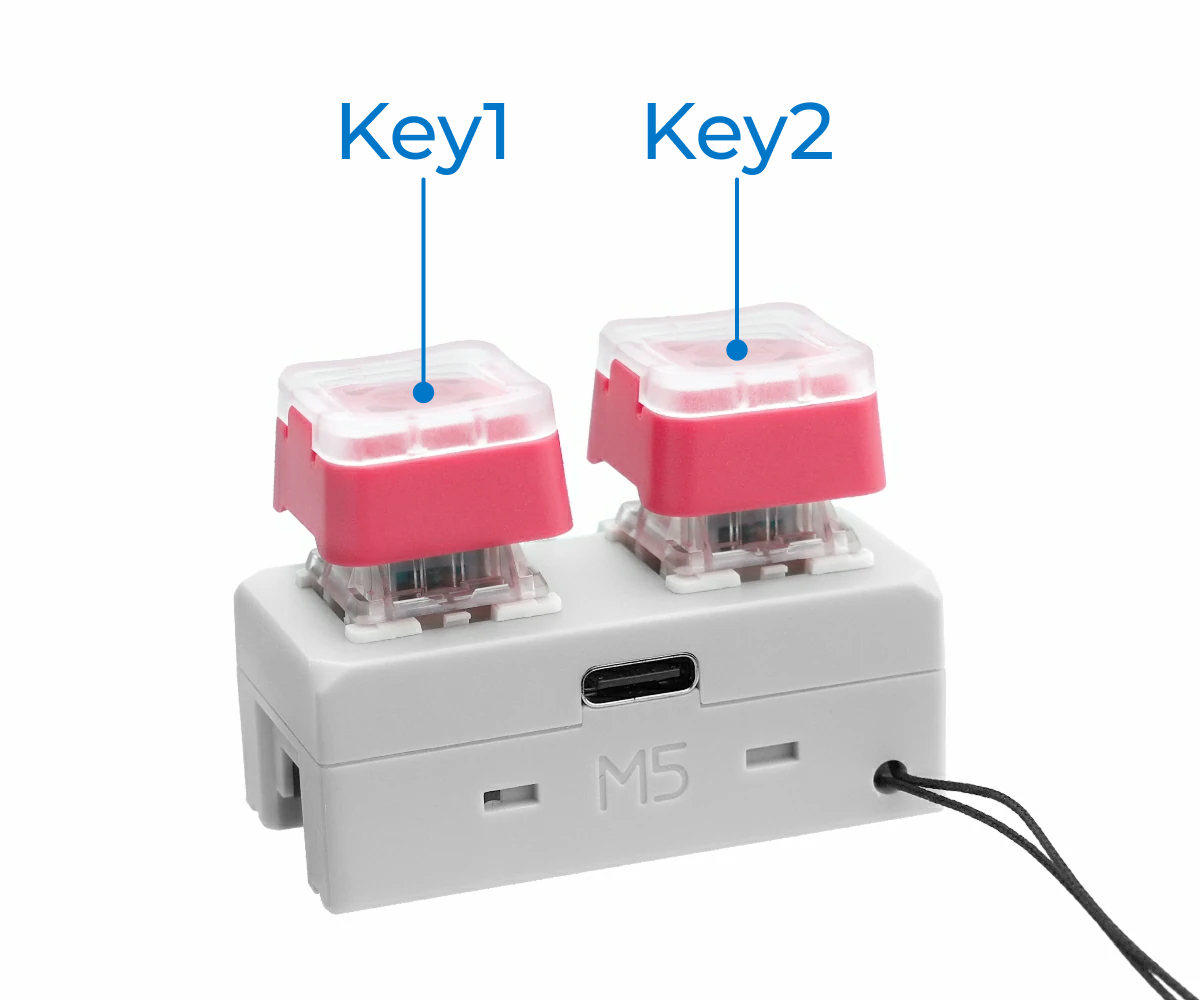
}上記のコードを Arduino IDE にコピーし、コンパイルして Chain DualKey に書き込みます。書き込みが完了したら、PC・スマートフォンなどホスト機器の Bluetooth 設定で Chain DualKey Keyboard という名前のキーボードを見つけ、ペアリングしてください。Key1 を押すと a の文字が入力され、Key2 を押すと Windows では Ctrl + V のショートカットが実行されて貼り付けが行われます(macOS の Command キーについてはコード内のコメントを参照してください)。
シリアル出力は次のようになります:
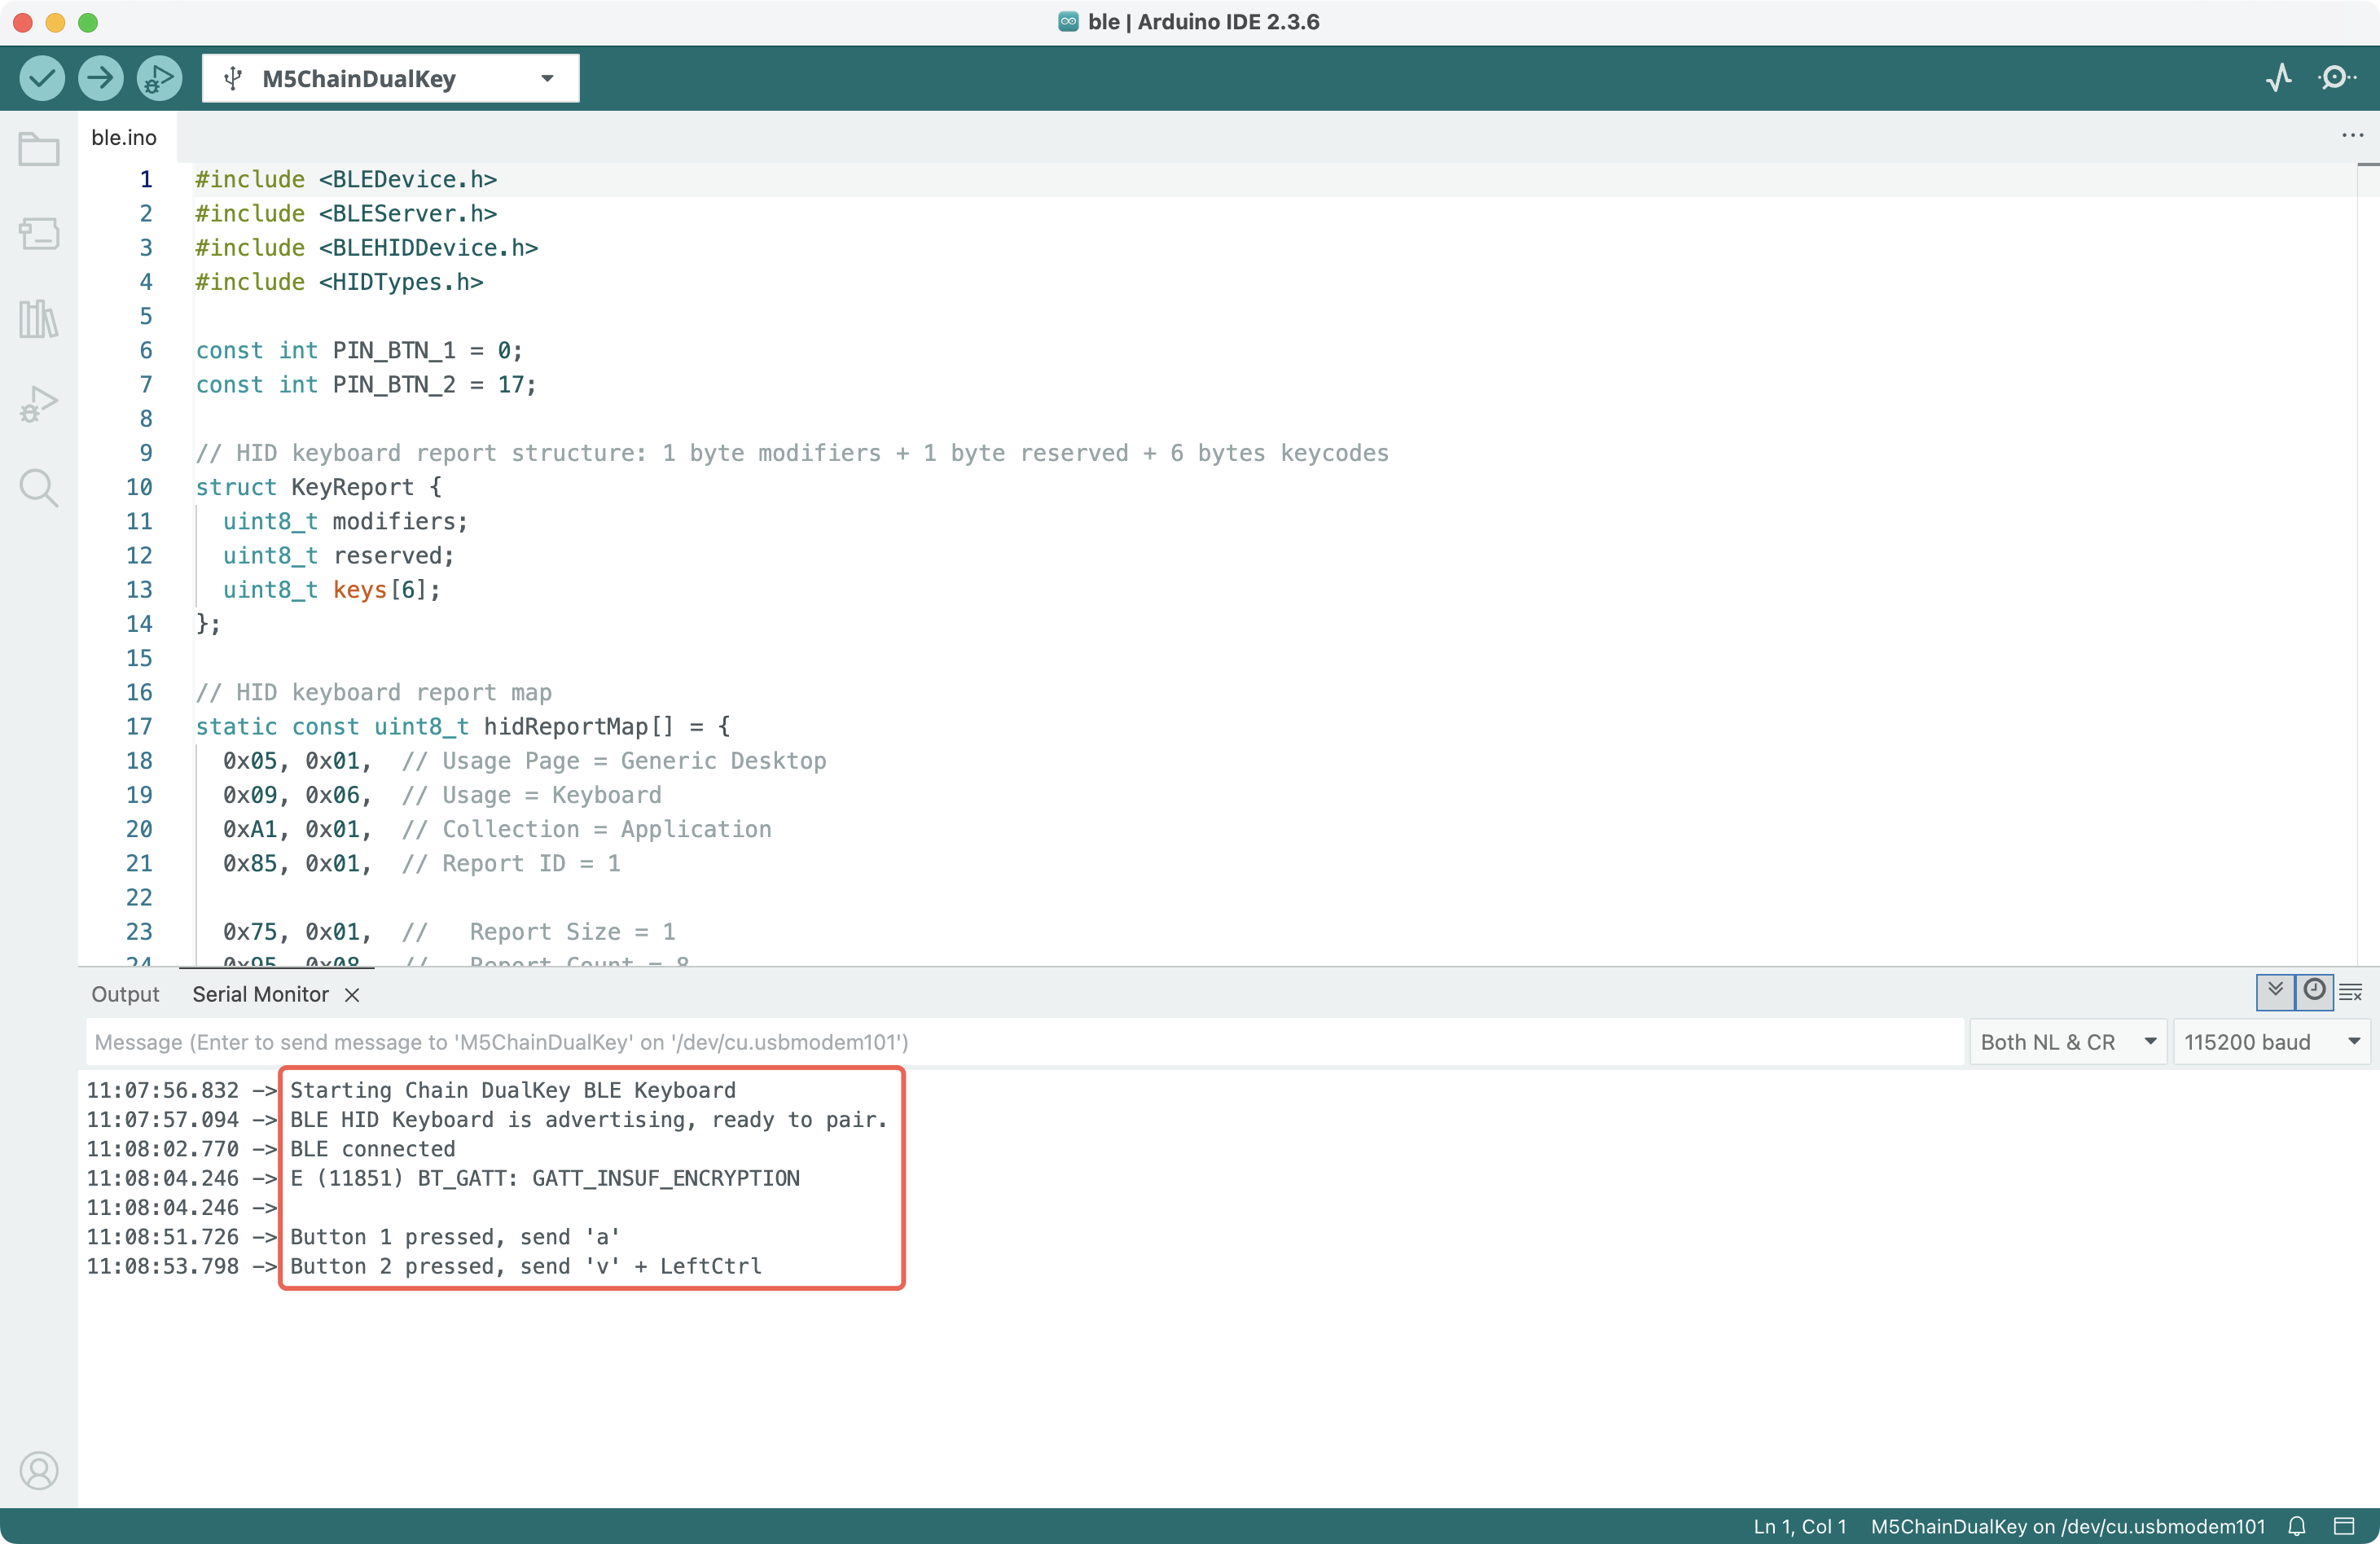
書き込み後にシリアル出力が表示されない場合や、Bluetooth デバイスが見つからない場合は、デバイスを再起動してください。再起動方法は、スイッチを中央位置に動かし、USB-C ケーブルを抜いて再接続します(Key1 を押し続けないでください)。
注意
Bluetooth デバイス情報(名称、manufacturer、pnp、hidInfo、hidReportMap など)を変更する前に、PC・スマートフォン側のペアリングをいったん解除し、Chain DualKey に新しいプログラムを書き込み、再接続する前にホスト側の Bluetooth を再起動(オフ → オン)することを推奨します。これを行わないと、新しい Bluetooth アドバタイズ情報とホスト側の既存レコードが衝突し、ホストの Bluetooth スタックがクラッシュして再起動する可能性があります。
関連リンク
- より多くのキーコードについては、HID Usage Tables 1.6 の
10 Keyboard/Keypad Pageセクションを参照してください。 Ctrl, Shift, Alt, GUI(Windows/Command)などの修飾キーは、上記の通常キーコードを使用せず、個別のmodifiersフィールドを使用します。詳細は Device Class Definition for HID 1.12 の8.3 Report Format for Array Itemsセクションを参照してください。- BLE for ESP32 Arduino Core - GitHub
- ESP32 Arduino BLE - Espressif Docs
- ESP-IDF BT/BLE HID Device Demo - GitHub
- HID Service 1.0 - Bluetooth
- HID over GATT Profile 1.0 - Bluetooth
Page Tools