

Arduino 上手教程
2. 设备开发 & 案例程序
3. M5Unified
4. M5GFX
5. 拓展模块
Unit
Atomic
Tab5
IoT
NanoC6 Thread Arduino
NanoC6 OpenThread Arduino 相关案例程序。
准备工作
编译要求
- M5Stack 板管理版本 >= 3.2.5
- 开发板选项 = M5NanoC6
基本配置步骤
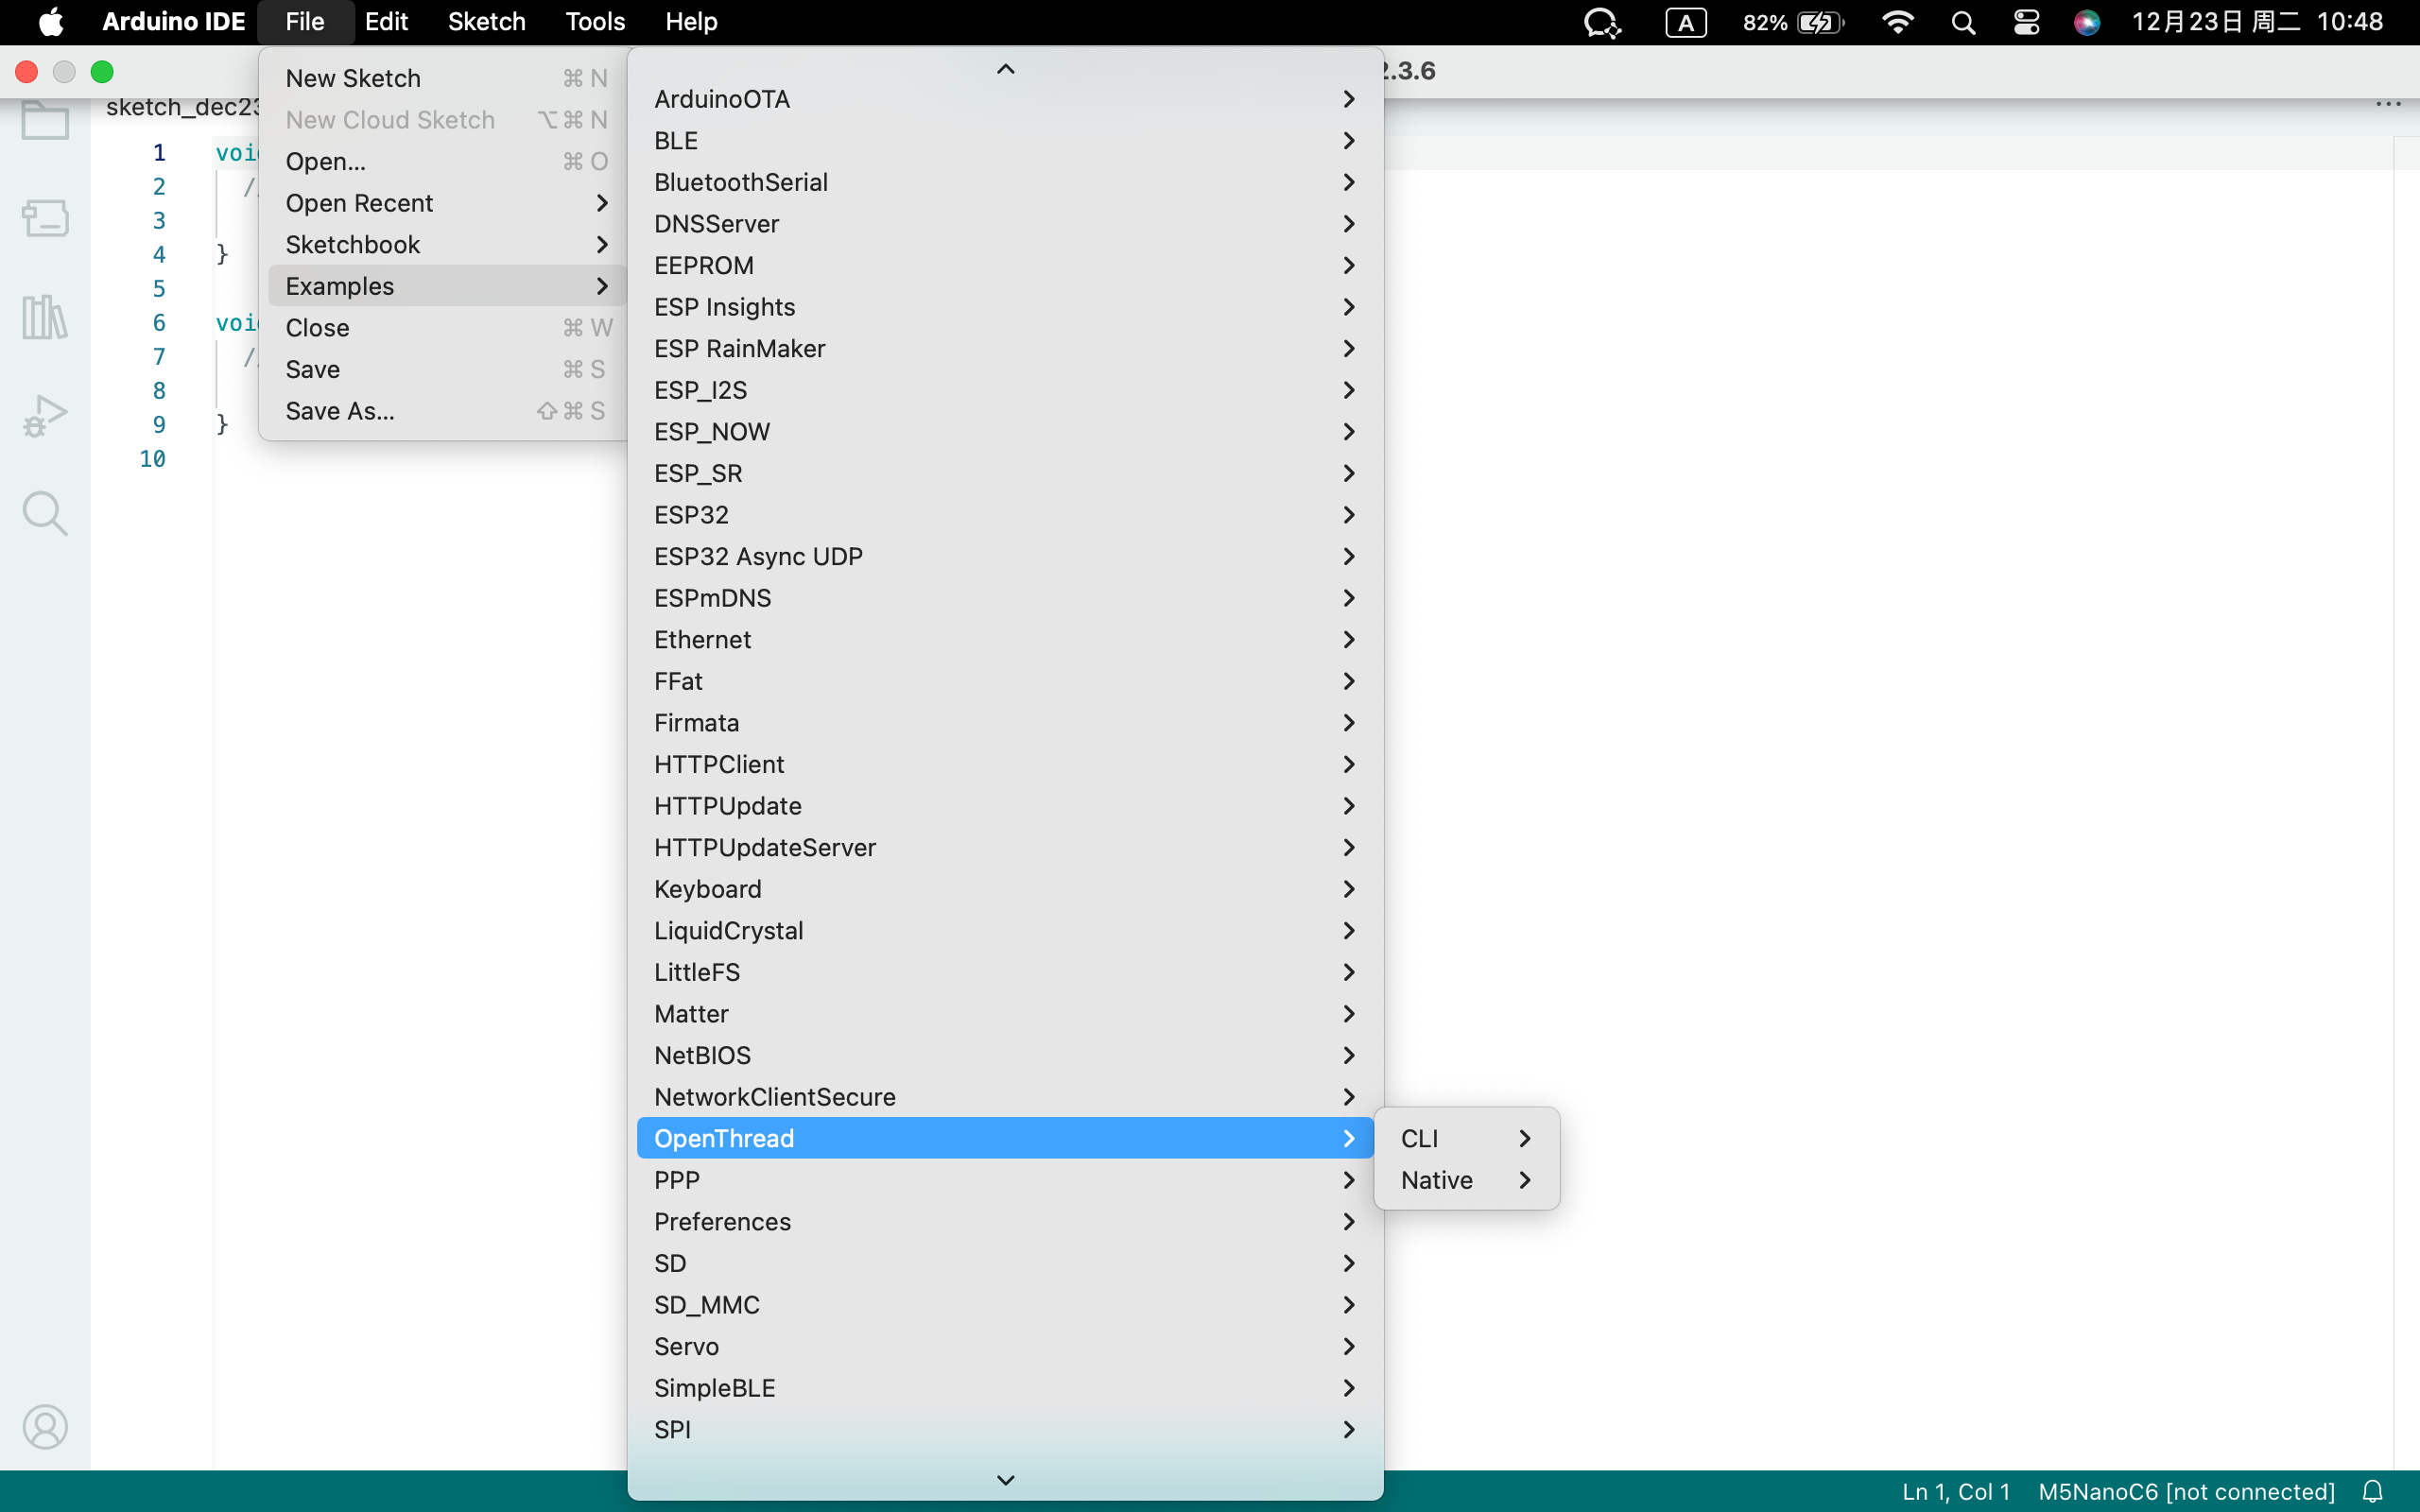
- 打开 Arduino IDE
- 点击示例:
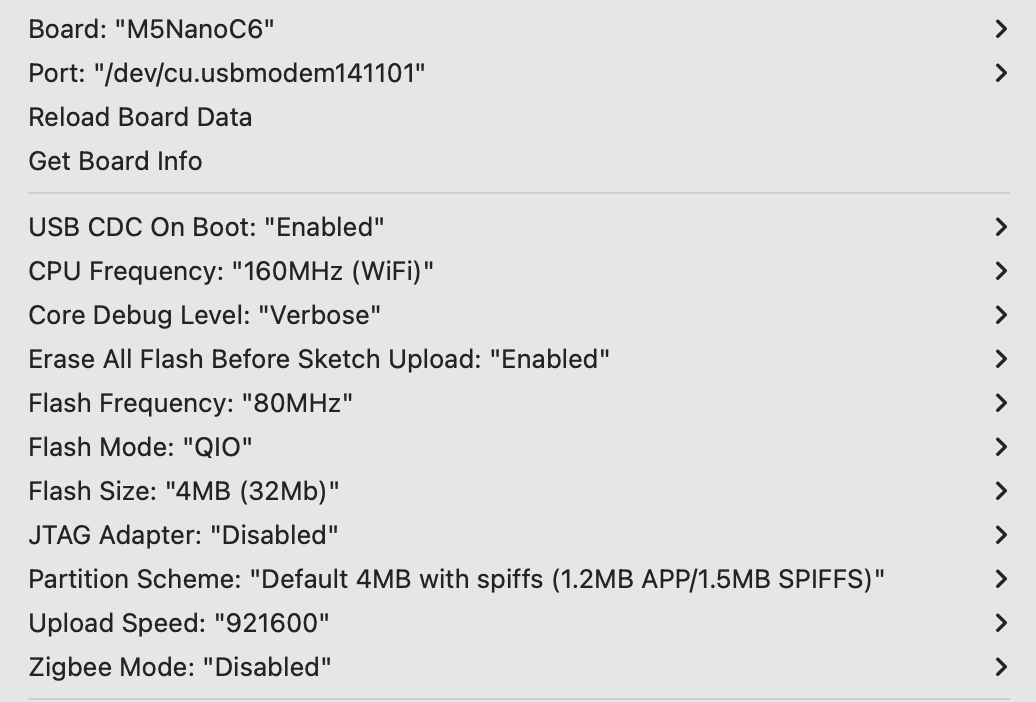
File -> Examples -> OpenThread - 选择正确的开发板:
Tools -> Board: M5NanoC6 - 选择 USB 串口启动使能:
Tools -> USB CDC On Boot: Enabled - 选择 flash 大小:
Tools -> Flash Size: 4MB - 选择分区方案:
Tools -> Partition Scheme: Default 4MB with spiffs (1.2MB APP/1.5MB SPIFFS) - 选择正确的串口:
Tools -> Port - 烧录固件到设备
- 设备将自动启动并尝试加入网络
- 通过串口监视器查看网络状态
案例程序
1. Simple Node
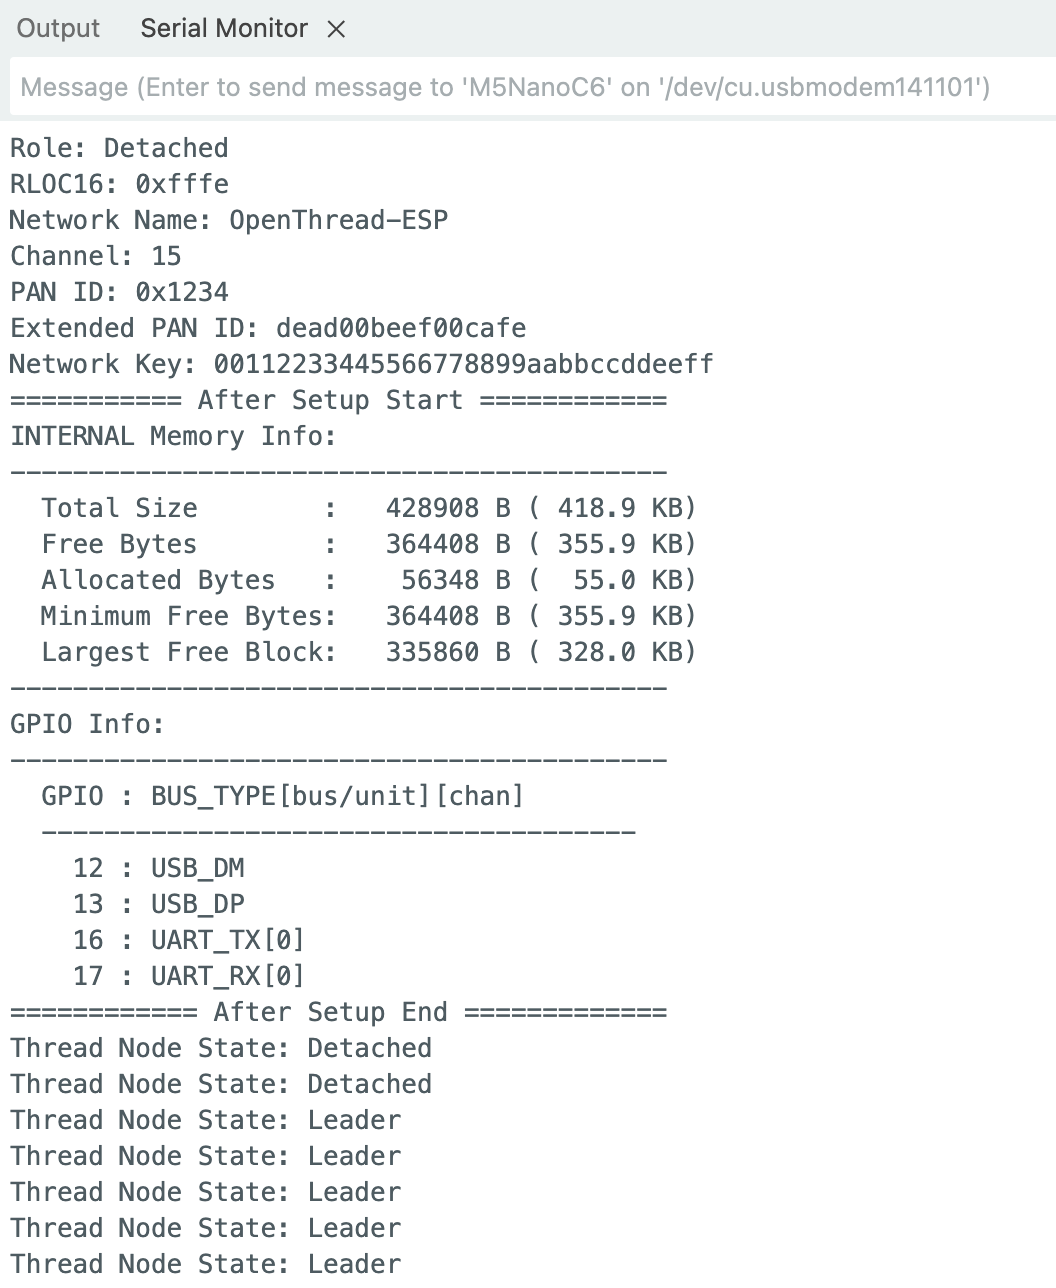
这个例程展示了如何创建一个基本的 Thread 节点。
- 自动启动并加入 Thread 网络。没有对应的 Thread 网络时,启动为 Leader 节点。
- 使用默认网络配置:
- 网络名称:OpenThread-ESP
- 网络前缀:fd00:db8:a0:0::/64
- 网络信道:15
- PAN ID:0x1234
- 扩展 PAN ID:dead00beef00cafe
- 网络密钥:00112233445566778899aabbccddeeff
- 每 5 秒显示一次节点状态
cpp
1 2 3 4 5 6 7 8 9 10 11 12 13 14 15 16 17 18
#include "OThreadCLI.h"
#include "OThreadCLI_Util.h"

// The first device to start Thread will be the Leader
// Next devices will be Router or Child

void setup() {
  Serial.begin(115200);
  OThread.begin();  // AutoStart using Thread default settings
  OThreadCLI.begin();
  OThread.otPrintNetworkInformation(Serial);  // Print Current Thread Network Information
}

void loop() {
  Serial.print("Thread Node State: ");
  Serial.println(OThread.otGetStringDeviceRole());
  delay(5000);
}
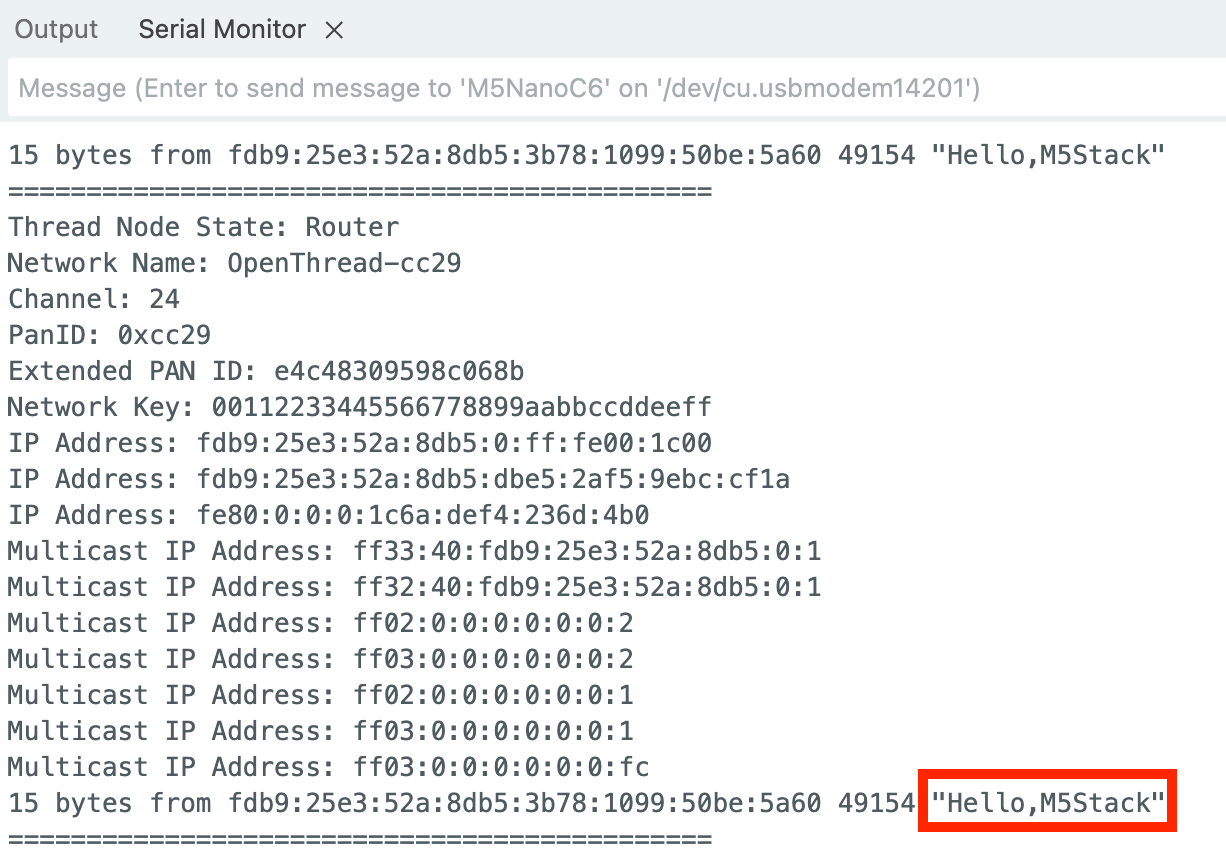
2. Thread Network (CLI)
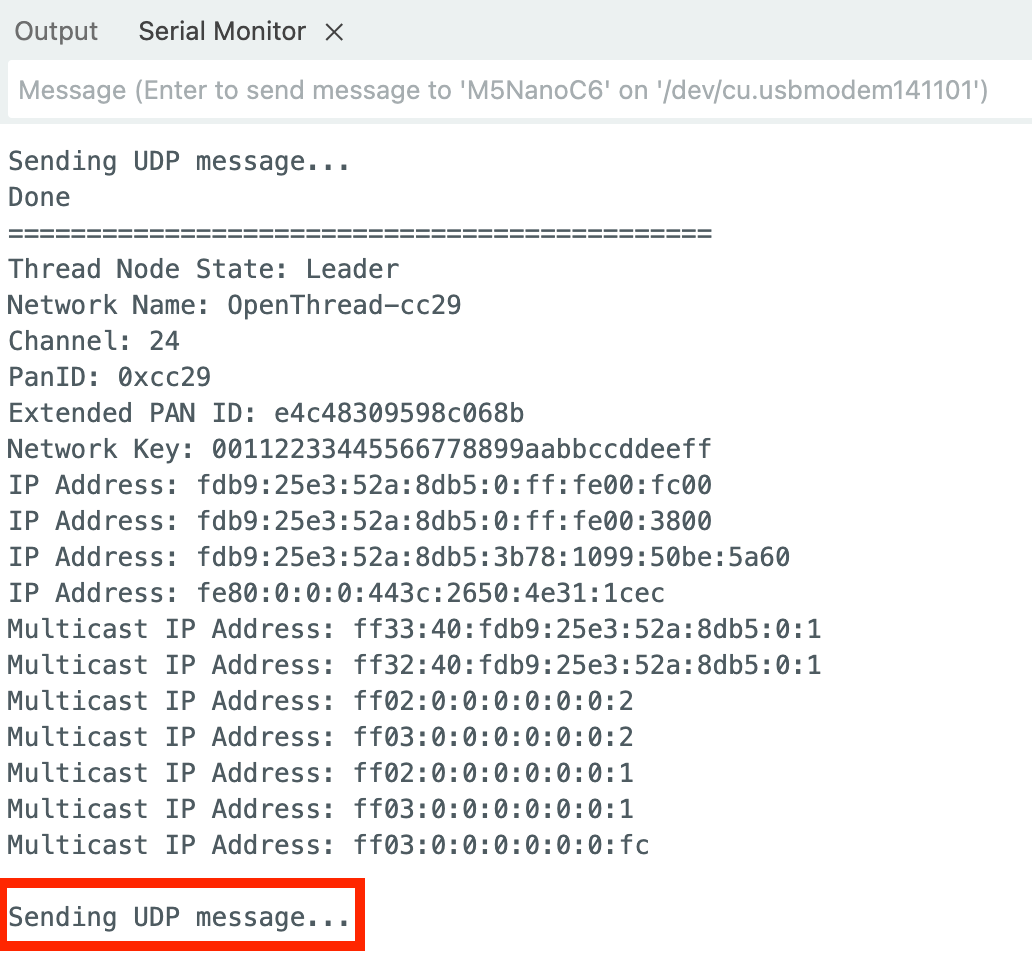
这个例程展示了如何建立一个完整的 Thread 网络,包含两种不同类型的节点。Leader Node 将会发送 "Hello, M5Stack!" 信息给 Router Node。
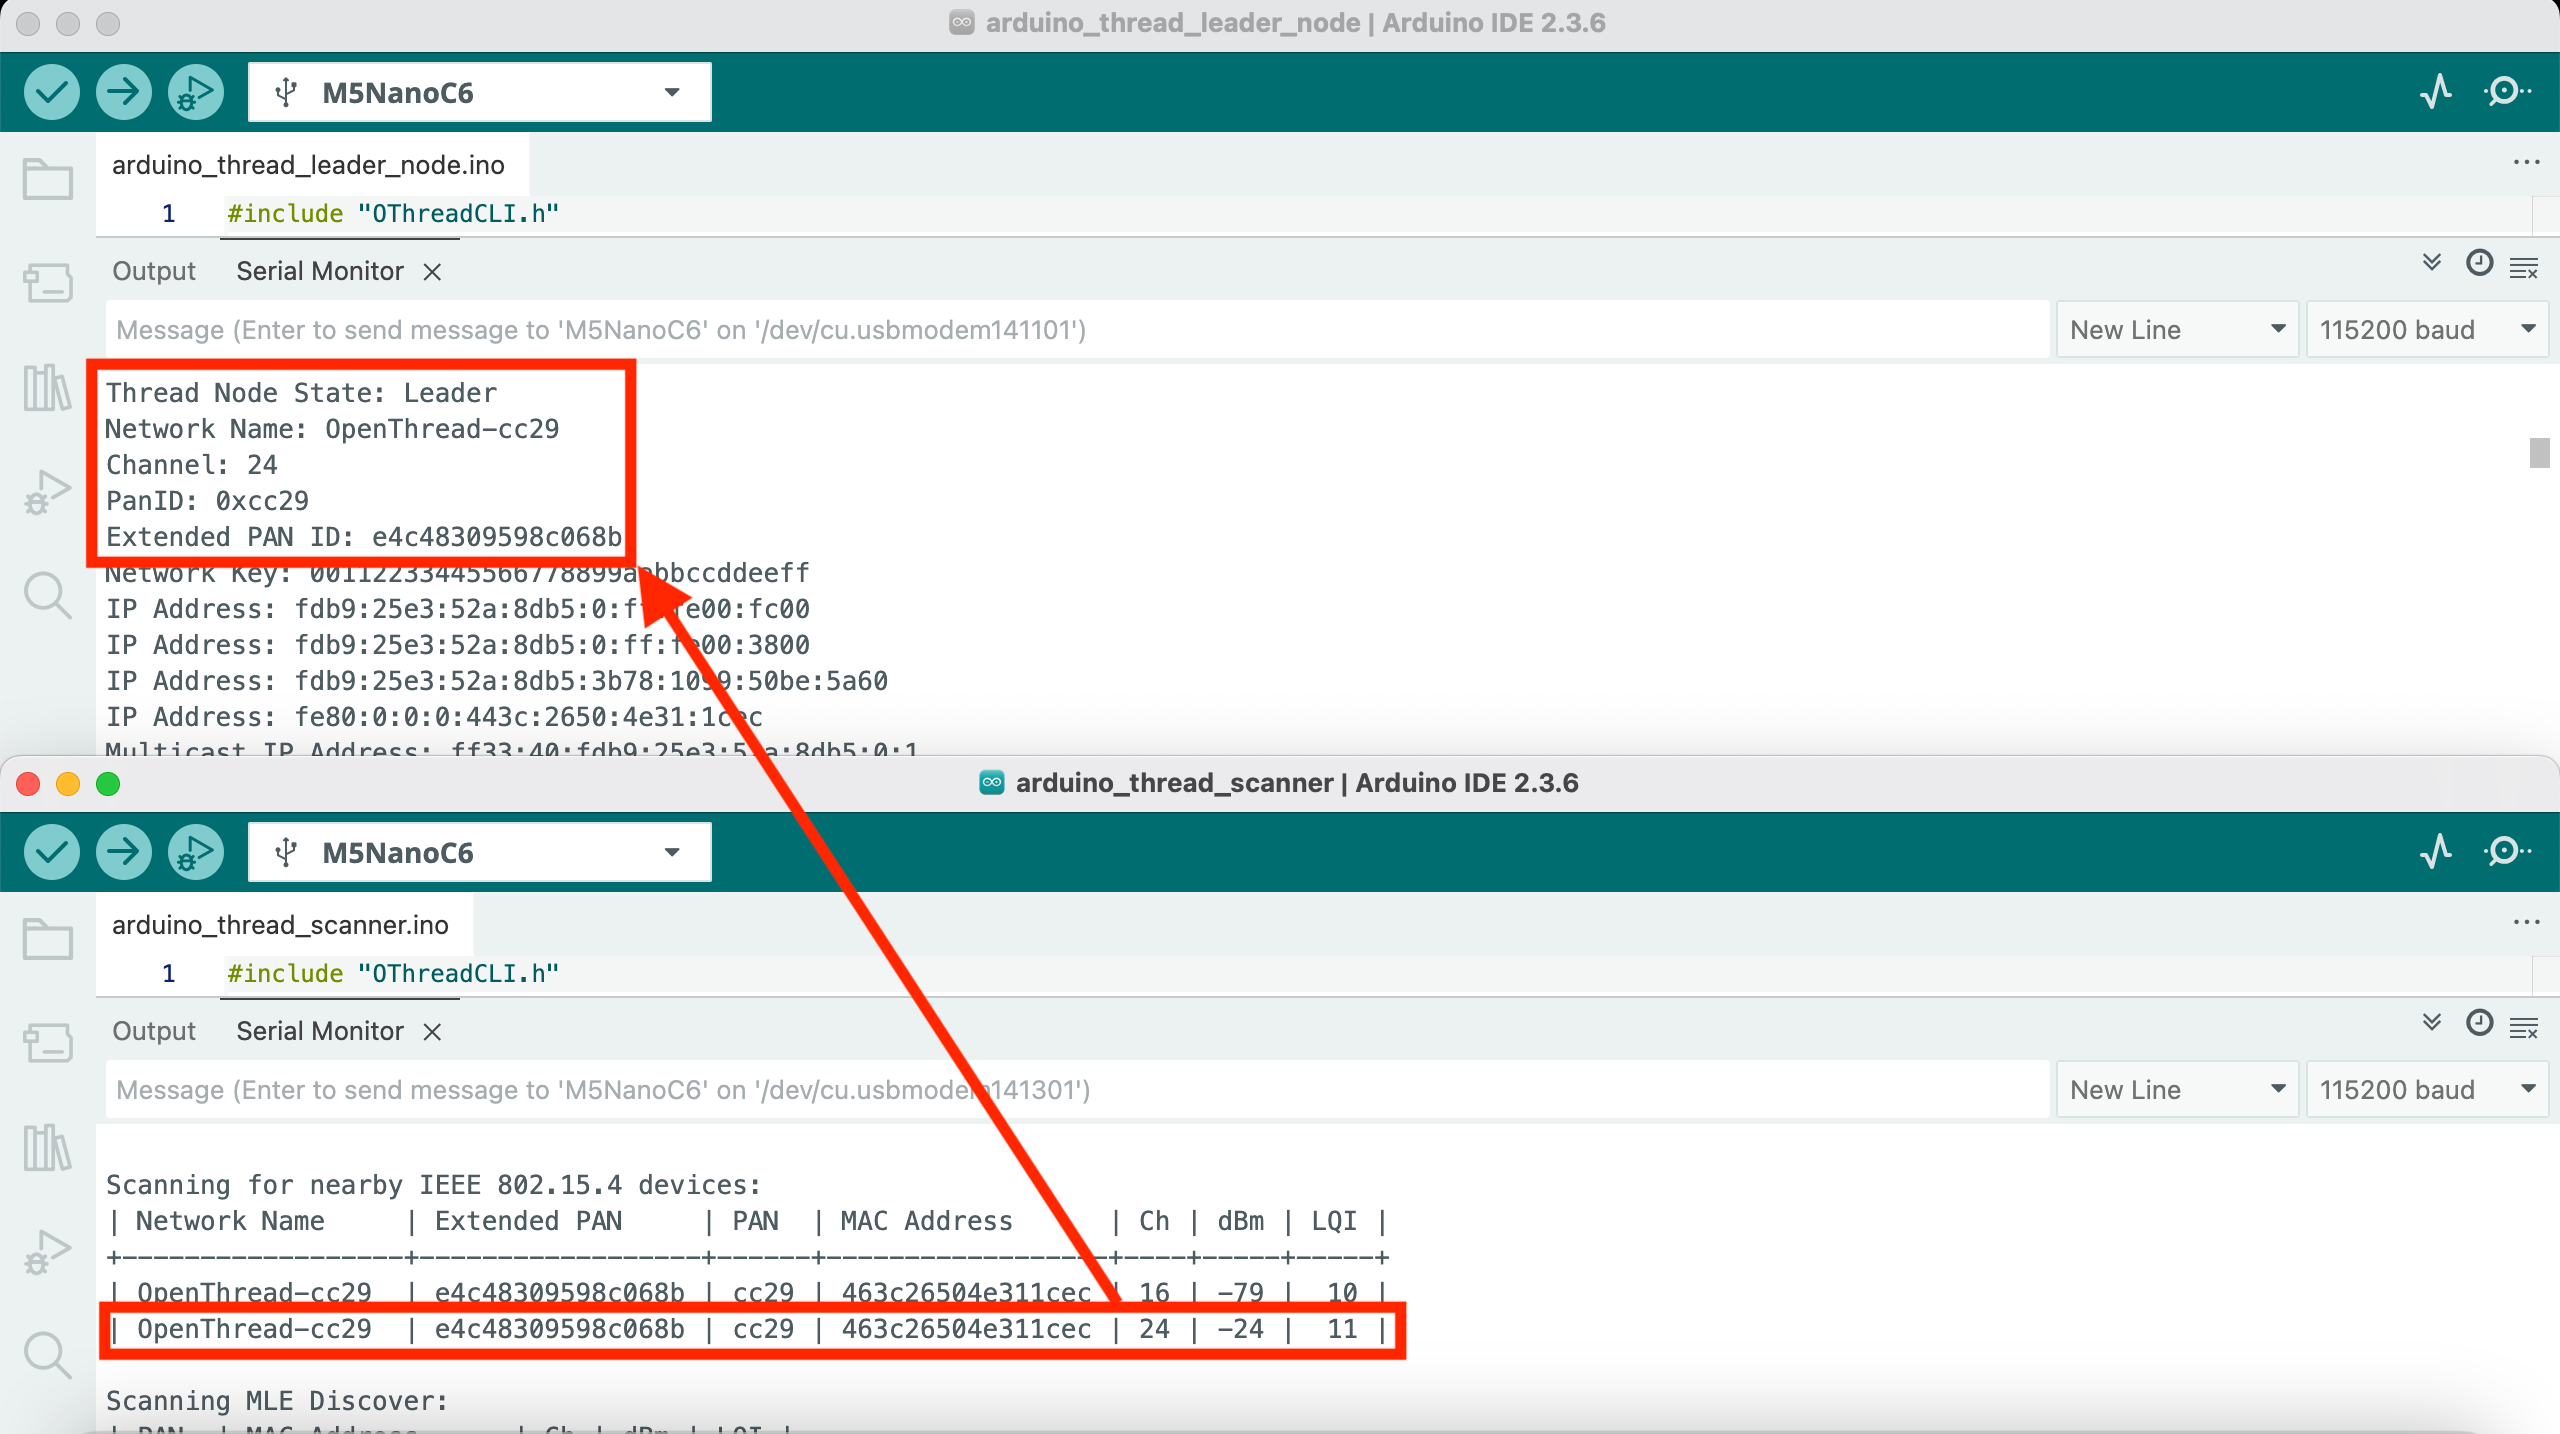
2.1 Leader Node
- 作为网络的第一个设备创建并管理 Thread 网络
- 提供完整的网络数据集
- 显示详细的网络信息:
- 网络名称
- 信道
- PAN ID
- 扩展 PAN ID
- 网络密钥
- IP 地址
- 多播地址
- 发送提示
cpp
1 2 3 4 5 6 7 8 9 10 11 12 13 14 15 16 17 18 19 20 21 22 23 24 25 26 27 28 29 30 31 32 33 34 35 36 37 38 39 40 41 42 43 44 45 46 47 48 49 50 51 52 53 54 55 56 57 58 59 60 61 62 63 64 65 66 67 68 69 70 71 72 73 74 75 76 77 78 79 80 81 82 83
#include "OThreadCLI.h"
#include "OThreadCLI_Util.h"

#define CLI_NETWORK_KEY    "dataset networkkey 00112233445566778899aabbccddeeff"
#define CLI_NETWORK_CHANEL "dataset channel 24"

otInstance *aInstance = NULL;

bool udpInitialized = false;

void setup() {
  Serial.begin(115200);
  OThread.begin(false);
  OThreadCLI.begin();
  Serial.println();
  Serial.println("Setting up OpenThread Node as Leader");
  aInstance = esp_openthread_get_instance();

  OThreadCLI.println("dataset init new");
  OThreadCLI.println(CLI_NETWORK_KEY);
  OThreadCLI.println(CLI_NETWORK_CHANEL);
  OThreadCLI.println("dataset commit active");
  OThreadCLI.println("ifconfig up");
  OThreadCLI.println("thread start");
}

void loop() {
  while (OThreadCLI.available()) {
    Serial.write(OThreadCLI.read());
  }

  Serial.println("=============================================");
  Serial.print("Thread Node State: ");
  Serial.println(OThread.otGetStringDeviceRole());

  if (OThread.otGetDeviceRole() == OT_ROLE_LEADER) {
    const char *networkName = otThreadGetNetworkName(aInstance);
    Serial.printf("Network Name: %s\r\n", networkName);
    uint8_t channel = otLinkGetChannel(aInstance);
    Serial.printf("Channel: %d\r\n", channel);
    uint16_t panId = otLinkGetPanId(aInstance);
    Serial.printf("PanID: 0x%04x\r\n", panId);
    const otExtendedPanId *extPanId = otThreadGetExtendedPanId(aInstance);
    Serial.printf("Extended PAN ID: ");
    for (int i = 0; i < OT_EXT_PAN_ID_SIZE; i++) {
      Serial.printf("%02x", extPanId->m8[i]);
    }
    Serial.println();
    otNetworkKey networkKey;
    otThreadGetNetworkKey(aInstance, &networkKey);
    Serial.printf("Network Key: ");
    for (int i = 0; i < OT_NETWORK_KEY_SIZE; i++) {
      Serial.printf("%02x", networkKey.m8[i]);
    }
    Serial.println();
    char buf[OT_IP6_ADDRESS_STRING_SIZE];
    const otNetifAddress *address = otIp6GetUnicastAddresses(aInstance);
    while (address != NULL) {
      otIp6AddressToString(&address->mAddress, buf, sizeof(buf));
      Serial.printf("IP Address: %s\r\n", buf);
      address = address->mNext;
    }
    const otNetifMulticastAddress *mAddress = otIp6GetMulticastAddresses(aInstance);
    while (mAddress != NULL) {
      otIp6AddressToString(&mAddress->mAddress, buf, sizeof(buf));
      printf("Multicast IP Address: %s\n", buf);
      mAddress = mAddress->mNext;
    }

    if (!udpInitialized) {
      Serial.println("\nInitializing UDP sender...");
      OThreadCLI.println("udp open");
      delay(100);
      udpInitialized = true;
      Serial.println("UDP initialized");
    }

    Serial.println("\nSending UDP message...");
    OThreadCLI.println("udp send ff03::1 12345 \"Hello,M5Stack\"");
  }

  delay(5000);
}
2.2 Router Node
- 加入现有的 Thread 网络,转发网络数据
- 显示连接状态和网络信息
- 串口打印收到的消息
cpp
1 2 3 4 5 6 7 8 9 10 11 12 13 14 15 16 17 18 19 20 21 22 23 24 25 26 27 28 29 30 31 32 33 34 35 36 37 38 39 40 41 42 43 44 45 46 47 48 49 50 51 52 53 54 55 56 57 58 59 60 61 62 63 64 65 66 67 68 69 70 71 72 73 74 75 76 77 78 79 80 81 82 83 84
#include "OThreadCLI.h"
#include "OThreadCLI_Util.h"

#define CLI_NETWORK_KEY    "dataset networkkey 00112233445566778899aabbccddeeff"
#define CLI_NETWORK_CHANEL "dataset channel 24"

otInstance *aInstance = NULL;

bool udpInitialized = false;

void setup() {
  Serial.begin(115200);
  OThread.begin(false);
  OThreadCLI.begin();
  Serial.println();
  Serial.println("Setting up OpenThread Node as Router/Child");
  Serial.println("Make sure the Leader Node is already running");
  aInstance = esp_openthread_get_instance();

  OThreadCLI.println("dataset clear");
  OThreadCLI.println(CLI_NETWORK_KEY);
  OThreadCLI.println(CLI_NETWORK_CHANEL);
  OThreadCLI.println("dataset commit active");
  OThreadCLI.println("ifconfig up");
  OThreadCLI.println("thread start");
}

void loop() {
  while (OThreadCLI.available()) {
    Serial.write(OThreadCLI.read());
  }

  Serial.println("=============================================");
  Serial.print("Thread Node State: ");
  Serial.println(OThread.otGetStringDeviceRole());

  if (OThread.otGetDeviceRole() == OT_ROLE_CHILD || OThread.otGetDeviceRole() == OT_ROLE_ROUTER) {
    const char *networkName = otThreadGetNetworkName(aInstance);
    Serial.printf("Network Name: %s\r\n", networkName);
    uint8_t channel = otLinkGetChannel(aInstance);
    Serial.printf("Channel: %d\r\n", channel);
    uint16_t panId = otLinkGetPanId(aInstance);
    Serial.printf("PanID: 0x%04x\r\n", panId);
    const otExtendedPanId *extPanId = otThreadGetExtendedPanId(aInstance);
    Serial.printf("Extended PAN ID: ");
    for (int i = 0; i < OT_EXT_PAN_ID_SIZE; i++) {
      Serial.printf("%02x", extPanId->m8[i]);
    }
    Serial.println();
    otNetworkKey networkKey;
    otThreadGetNetworkKey(aInstance, &networkKey);
    Serial.printf("Network Key: ");
    for (int i = 0; i < OT_NETWORK_KEY_SIZE; i++) {
      Serial.printf("%02x", networkKey.m8[i]);
    }
    Serial.println();
    char buf[OT_IP6_ADDRESS_STRING_SIZE];
    const otNetifAddress *address = otIp6GetUnicastAddresses(aInstance);
    while (address != NULL) {
      otIp6AddressToString(&address->mAddress, buf, sizeof(buf));
      Serial.printf("IP Address: %s\r\n", buf);
      address = address->mNext;
    }
    const otNetifMulticastAddress *mAddress = otIp6GetMulticastAddresses(aInstance);
    while (mAddress != NULL) {
      otIp6AddressToString(&mAddress->mAddress, buf, sizeof(buf));
      printf("Multicast IP Address: %s\n", buf);
      mAddress = mAddress->mNext;
    }

    if (!udpInitialized) {
      Serial.println("\nInitializing UDP receiver...");
      OThreadCLI.println("udp open");
      delay(100);
      OThreadCLI.println("udp bind :: 12345");
      delay(100);
      udpInitialized = true;
      Serial.println("UDP listening on port 12345");
      Serial.println("Waiting for messages...\n");
    }
  }

  delay(5000);
}
3. Thread Scan
这个例程展示了如何扫描周围的 Thread 网络。
- 扫描 IEEE 802.15.4 设备
- 显示设备地址
- 显示信号强度
- 显示信道信息
- 扫描 Thread 网络(需要设备至少是 Child 状态)
- 显示网络名称
- 显示扩展 PAN ID
- 显示 RLOC16
- 显示版本信息
- 支持持续扫描模式
cpp
1 2 3 4 5 6 7 8 9 10 11 12 13 14 15 16 17 18 19 20 21 22 23 24 25 26 27 28 29 30 31 32
#include "OThreadCLI.h"
#include "OThreadCLI_Util.h"

void setup() {
  Serial.begin(115200);
  OThread.begin(true);  // For scanning, AutoStart must be active, any setup
  OThreadCLI.begin();
  OThreadCLI.setTimeout(100);  // Set a timeout for the CLI response
  Serial.println();
  Serial.println("This sketch will continuously scan the Thread Local Network and all devices IEEE 802.15.4 compatible");
}

void loop() {
  Serial.println();
  Serial.println("Scanning for nearby IEEE 802.15.4 devices:");
  // 802.15.4 Scan just needs a previous OThreadCLI.begin()
  if (!otPrintRespCLI("scan", Serial, 3000)) {
    Serial.println("Scan Failed...");
  }
  delay(5000);
  if (OThread.otGetDeviceRole() < OT_ROLE_CHILD) {
    Serial.println();
    Serial.println("This device has not started Thread yet, bypassing Discovery Scan");
    return;
  }
  Serial.println();
  Serial.println("Scanning MLE Discover:");
  if (!otPrintRespCLI("discover", Serial, 3000)) {
    Serial.println("Discover Failed...");
  }
  delay(5000);
}
4. Simple CLI
这个例程提供了一个完整的 OpenThread CLI 控制台。
- 提供完整的 CLI 命令接口
- 支持所有 OpenThread CLI 命令:
- 网络管理命令
- 设备配置命令
- 诊断命令
- 安全命令
- 实时命令响应
- 支持命令历史
- 方便调试和配置
cpp
1 2 3 4 5 6 7 8 9 10 11
#include "OThreadCLI.h"

void setup() {
  Serial.begin(115200);
  OThread.begin(false);  // No AutoStart - fresh start
  OThreadCLI.begin();
  Serial.println("OpenThread CLI started - type 'help' for a list of commands.");
  OThreadCLI.startConsole(Serial);
}

void loop() {}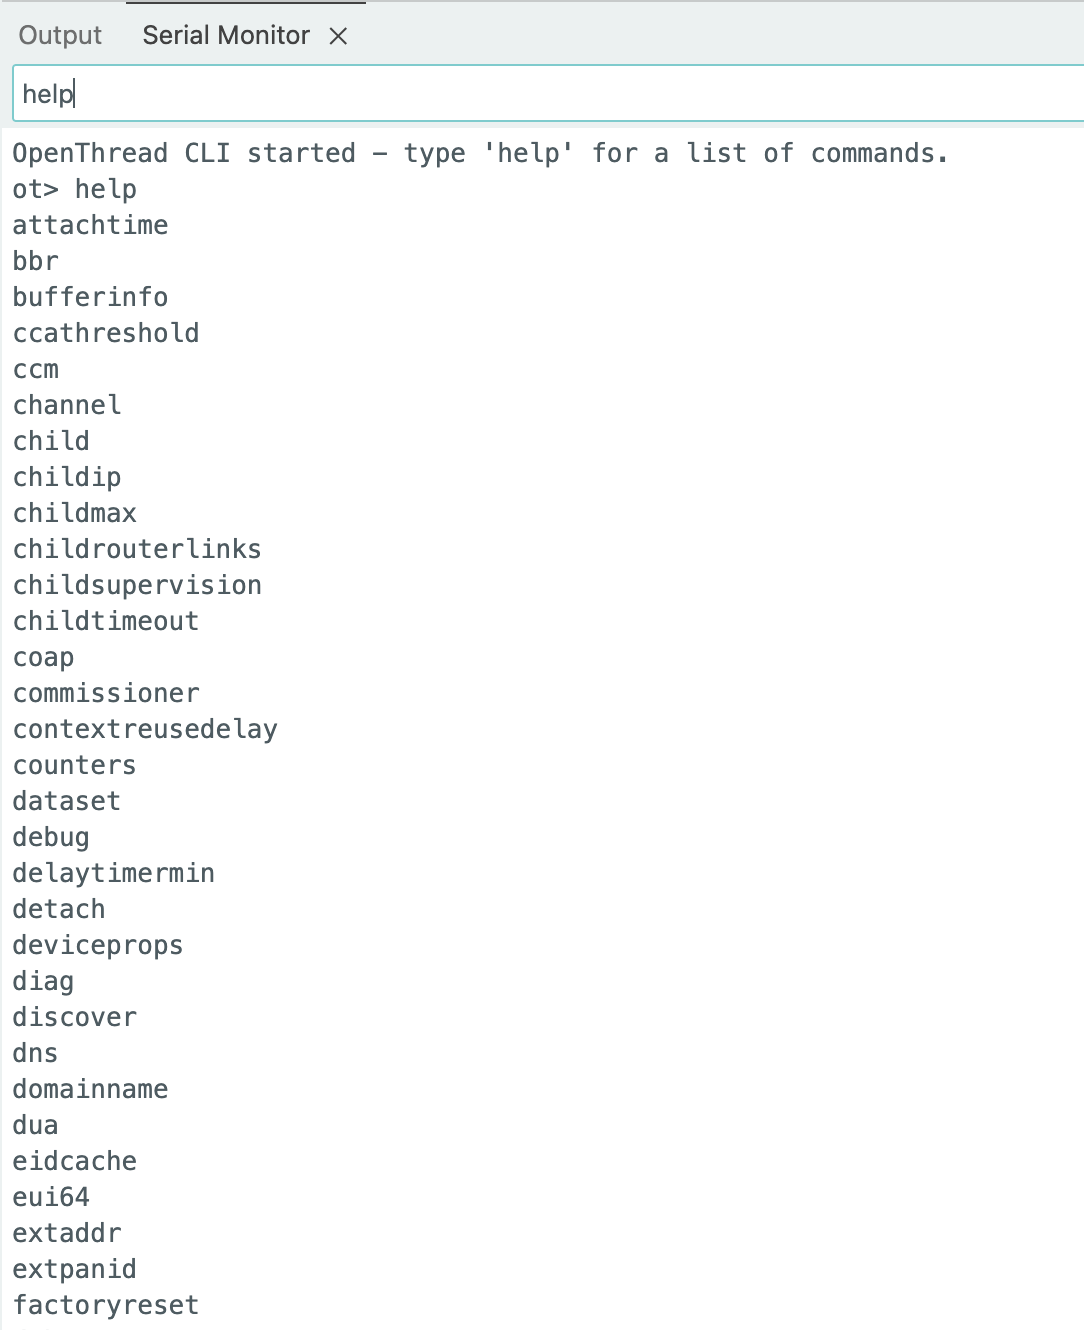
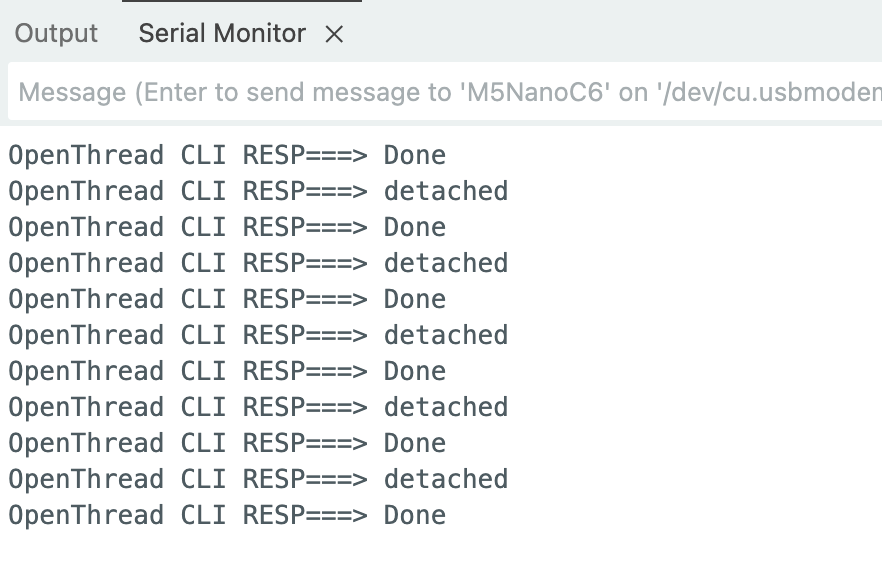
5. 接收回调 (onReceive)
这个例程展示了如何使用回调函数处理 CLI 响应。
- 捕获 CLI 响应
- 自定义响应处理
- 状态监控
- 支持异步处理
cpp
1 2 3 4 5 6 7 8 9 10 11 12 13 14 15 16 17 18 19 20 21 22 23 24 25 26 27 28 29 30 31 32
#include "OThreadCLI.h"

// reads all the lines sent by CLI, one by one
// ignores some lines that are just a sequence of \r\n
void otReceivedLine() {
  String line = "";
  while (OThreadCLI.available() > 0) {
    char ch = OThreadCLI.read();
    if (ch != '\r' && ch != '\n') {
      line += ch;
    }
  }
  // ignores empty lines, usually EOL sequence
  if (line.length() > 0) {
    Serial.print("OpenThread CLI RESP===> ");
    Serial.println(line.c_str());
  }
}

void setup() {
  Serial.begin(115200);
  OThread.begin();  // AutoStart
  OThreadCLI.begin();
  OThreadCLI.onReceive(otReceivedLine);
}

void loop() {
  // sends the "state" command to the CLI every second
  // the onReceive() Callback Function will read and process the response
  OThreadCLI.println("state");
  delay(1000);
}
Page Tools