Arduino 上手教程
2. 设备开发 & 案例程序
3. M5Unified
4. M5GFX
5. 拓展模块
Unit
Base
Cap
IoT
Unit Pbhub v1.1 Arduino 使用教程
1. 准备工作
环境配置: 参考 Arduino IDE上手教程完成 IDE 安装,并根据实际使用的开发板安装对应的板管理,与需要的驱动库。
使用到的驱动库:
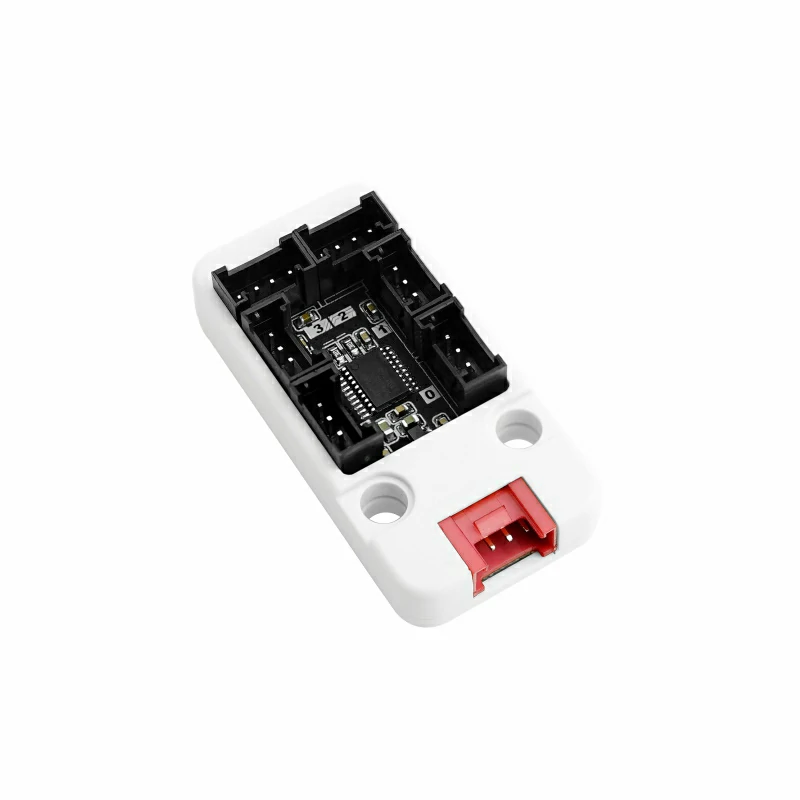
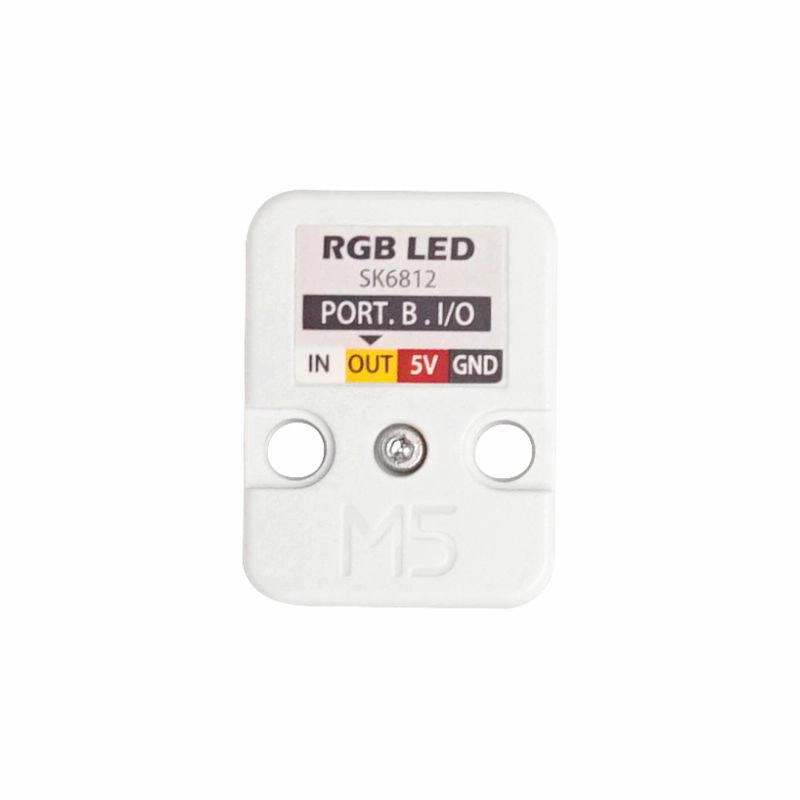
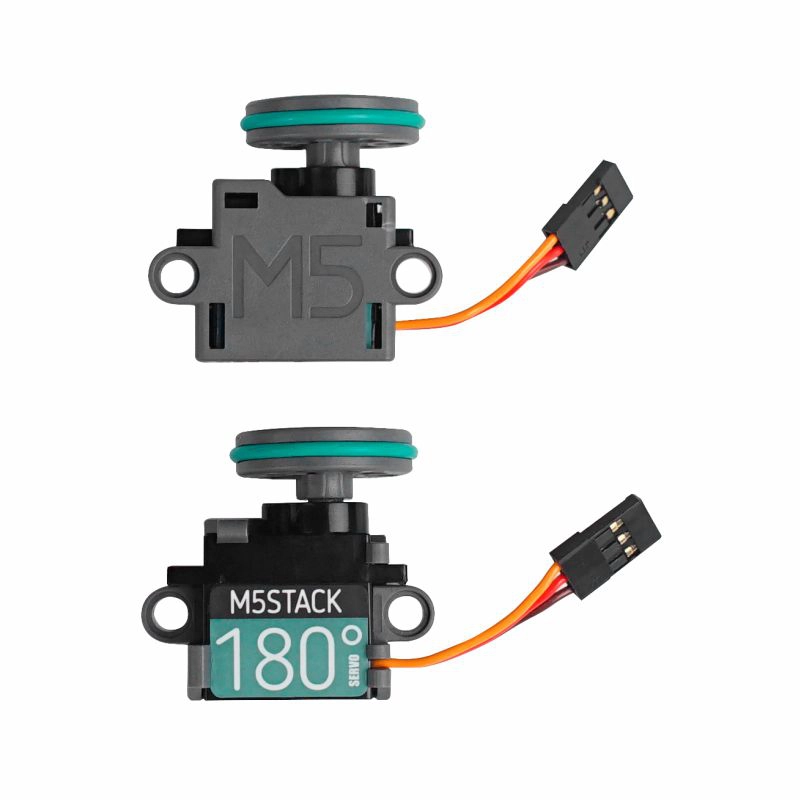
使用到的硬件产品:
- CoreS3
- Unit Pbhub v1.1
- Unit RGB (仅在测试 rgb 函数时使用)
- Servo Kit 180° (仅在测试 servo 函数时使用)

2. 注意事项
引脚兼容性
由于每款主机的引脚配置不同,使用前请参考产品文档中的引脚兼容表,并根据实际引脚连接情况修改案例程序。
引脚定义
本教程中使用的主控设备为 CoreS3 ,搭配 Unit Pbhub v1.1。本引脚拓展模块采用 I2C 的方式通讯,根据实际的电路连接修改程序中的引脚定义,设备连接后对应的引脚 IO 为
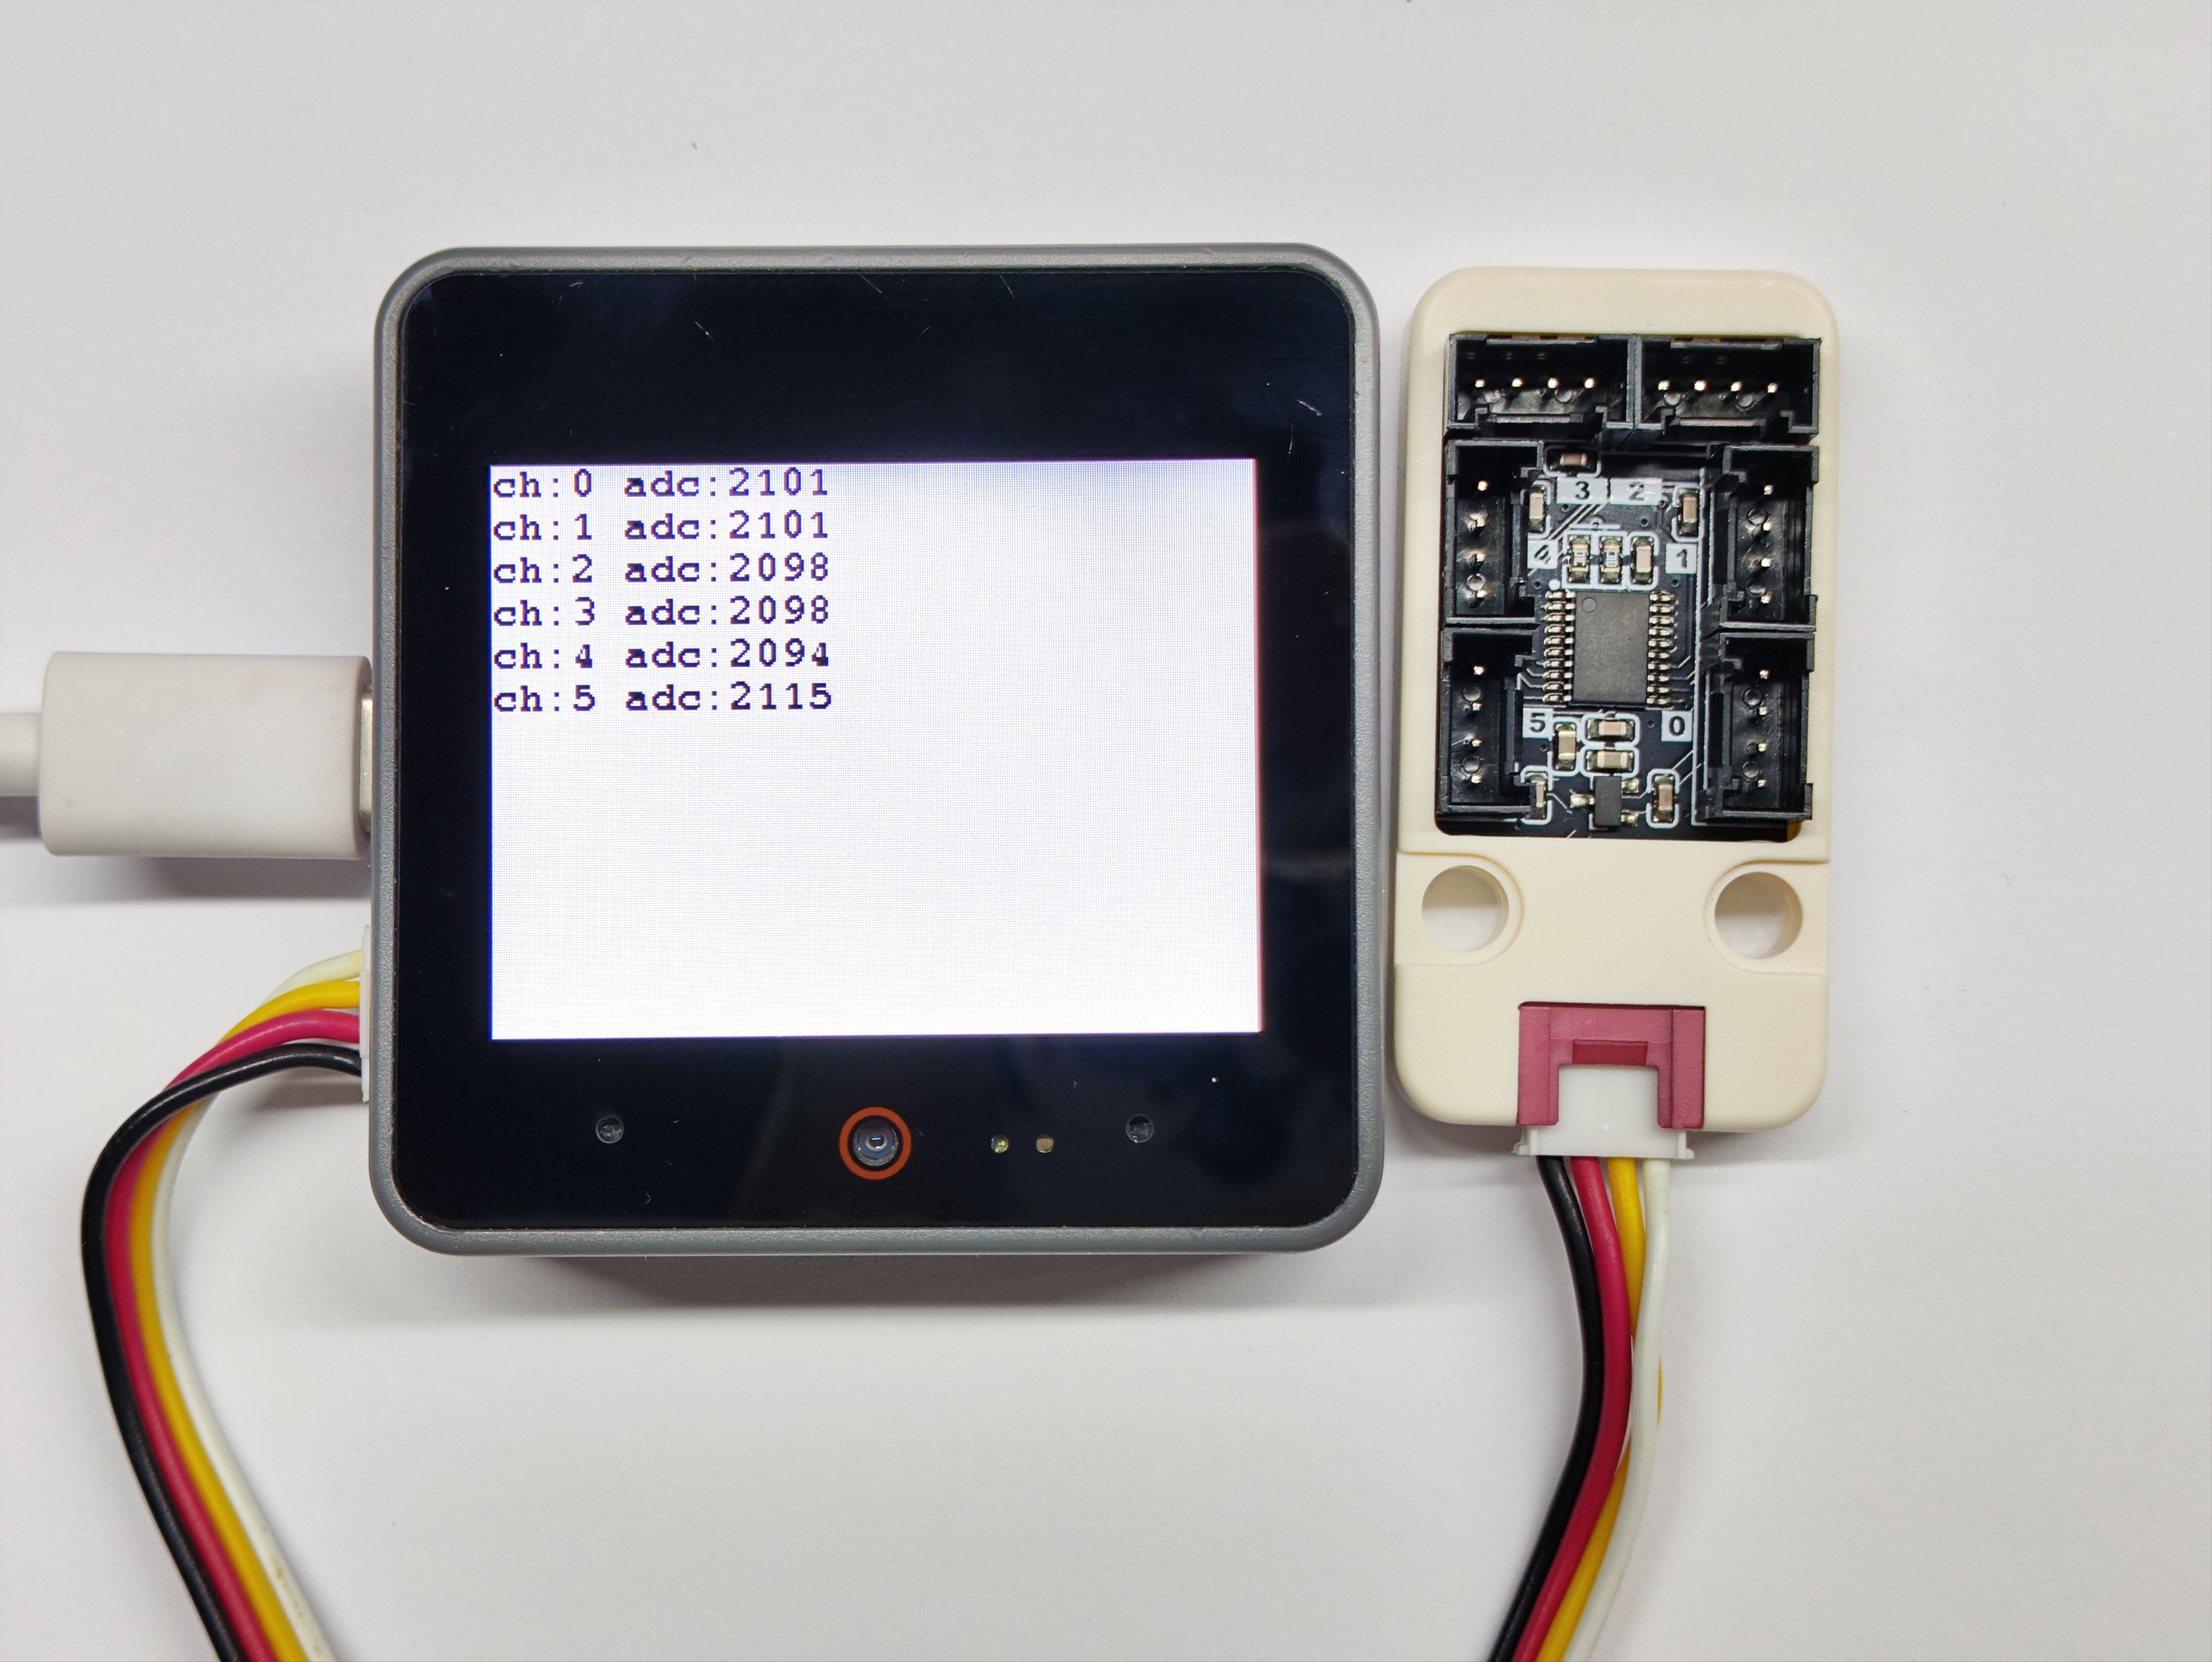
G2 (SDA),G1 (SCL)。3. 模拟量读取实验
- 分别获取到六个通道的引脚电压模拟量
cpp
1 2 3 4 5 6 7 8 9 10 11 12 13 14 15 16 17 18 19 20 21 22 23 24 25 26 27 28 29 30 31 32
#include "M5Unified.h"
#include "M5UnitPbHub.h"

M5UnitPbHub pbhub;

void setup() {
    M5.begin();
    Serial.begin(115200);
    M5.Display.fillScreen(WHITE);
    M5.Display.setTextColor(BLACK);
    M5.Display.setFont(&fonts::FreeMonoBold9pt7b);
    M5.Display.setCursor(0, 0);
    if (!pbhub.begin(&Wire, UNIT_PBHUB_I2C_ADDR, 2, 1, 400000U)) {
        Serial.println("Couldn't find Pbhub");
        while (1) delay(1);
    }
    Serial.println("Pbhub v1.1 analog_read test");
}

void loop() {
    // ch: 0-5
    // index: 0-1
    // status: 0/1
    for (uint8_t ch = 0; ch < 6; ch++) {
        // only one pin supports analog reading each channel
        Serial.printf("ch:%d adc:%d\r\n", ch, pbhub.analogRead(ch));
        M5.Display.printf("ch:%d adc:%d\r\n", ch, pbhub.analogRead(ch));
        delay(500);
    }
    M5.Display.fillScreen(WHITE);
    M5.Display.setCursor(0, 0);
}4. 引脚读写实验
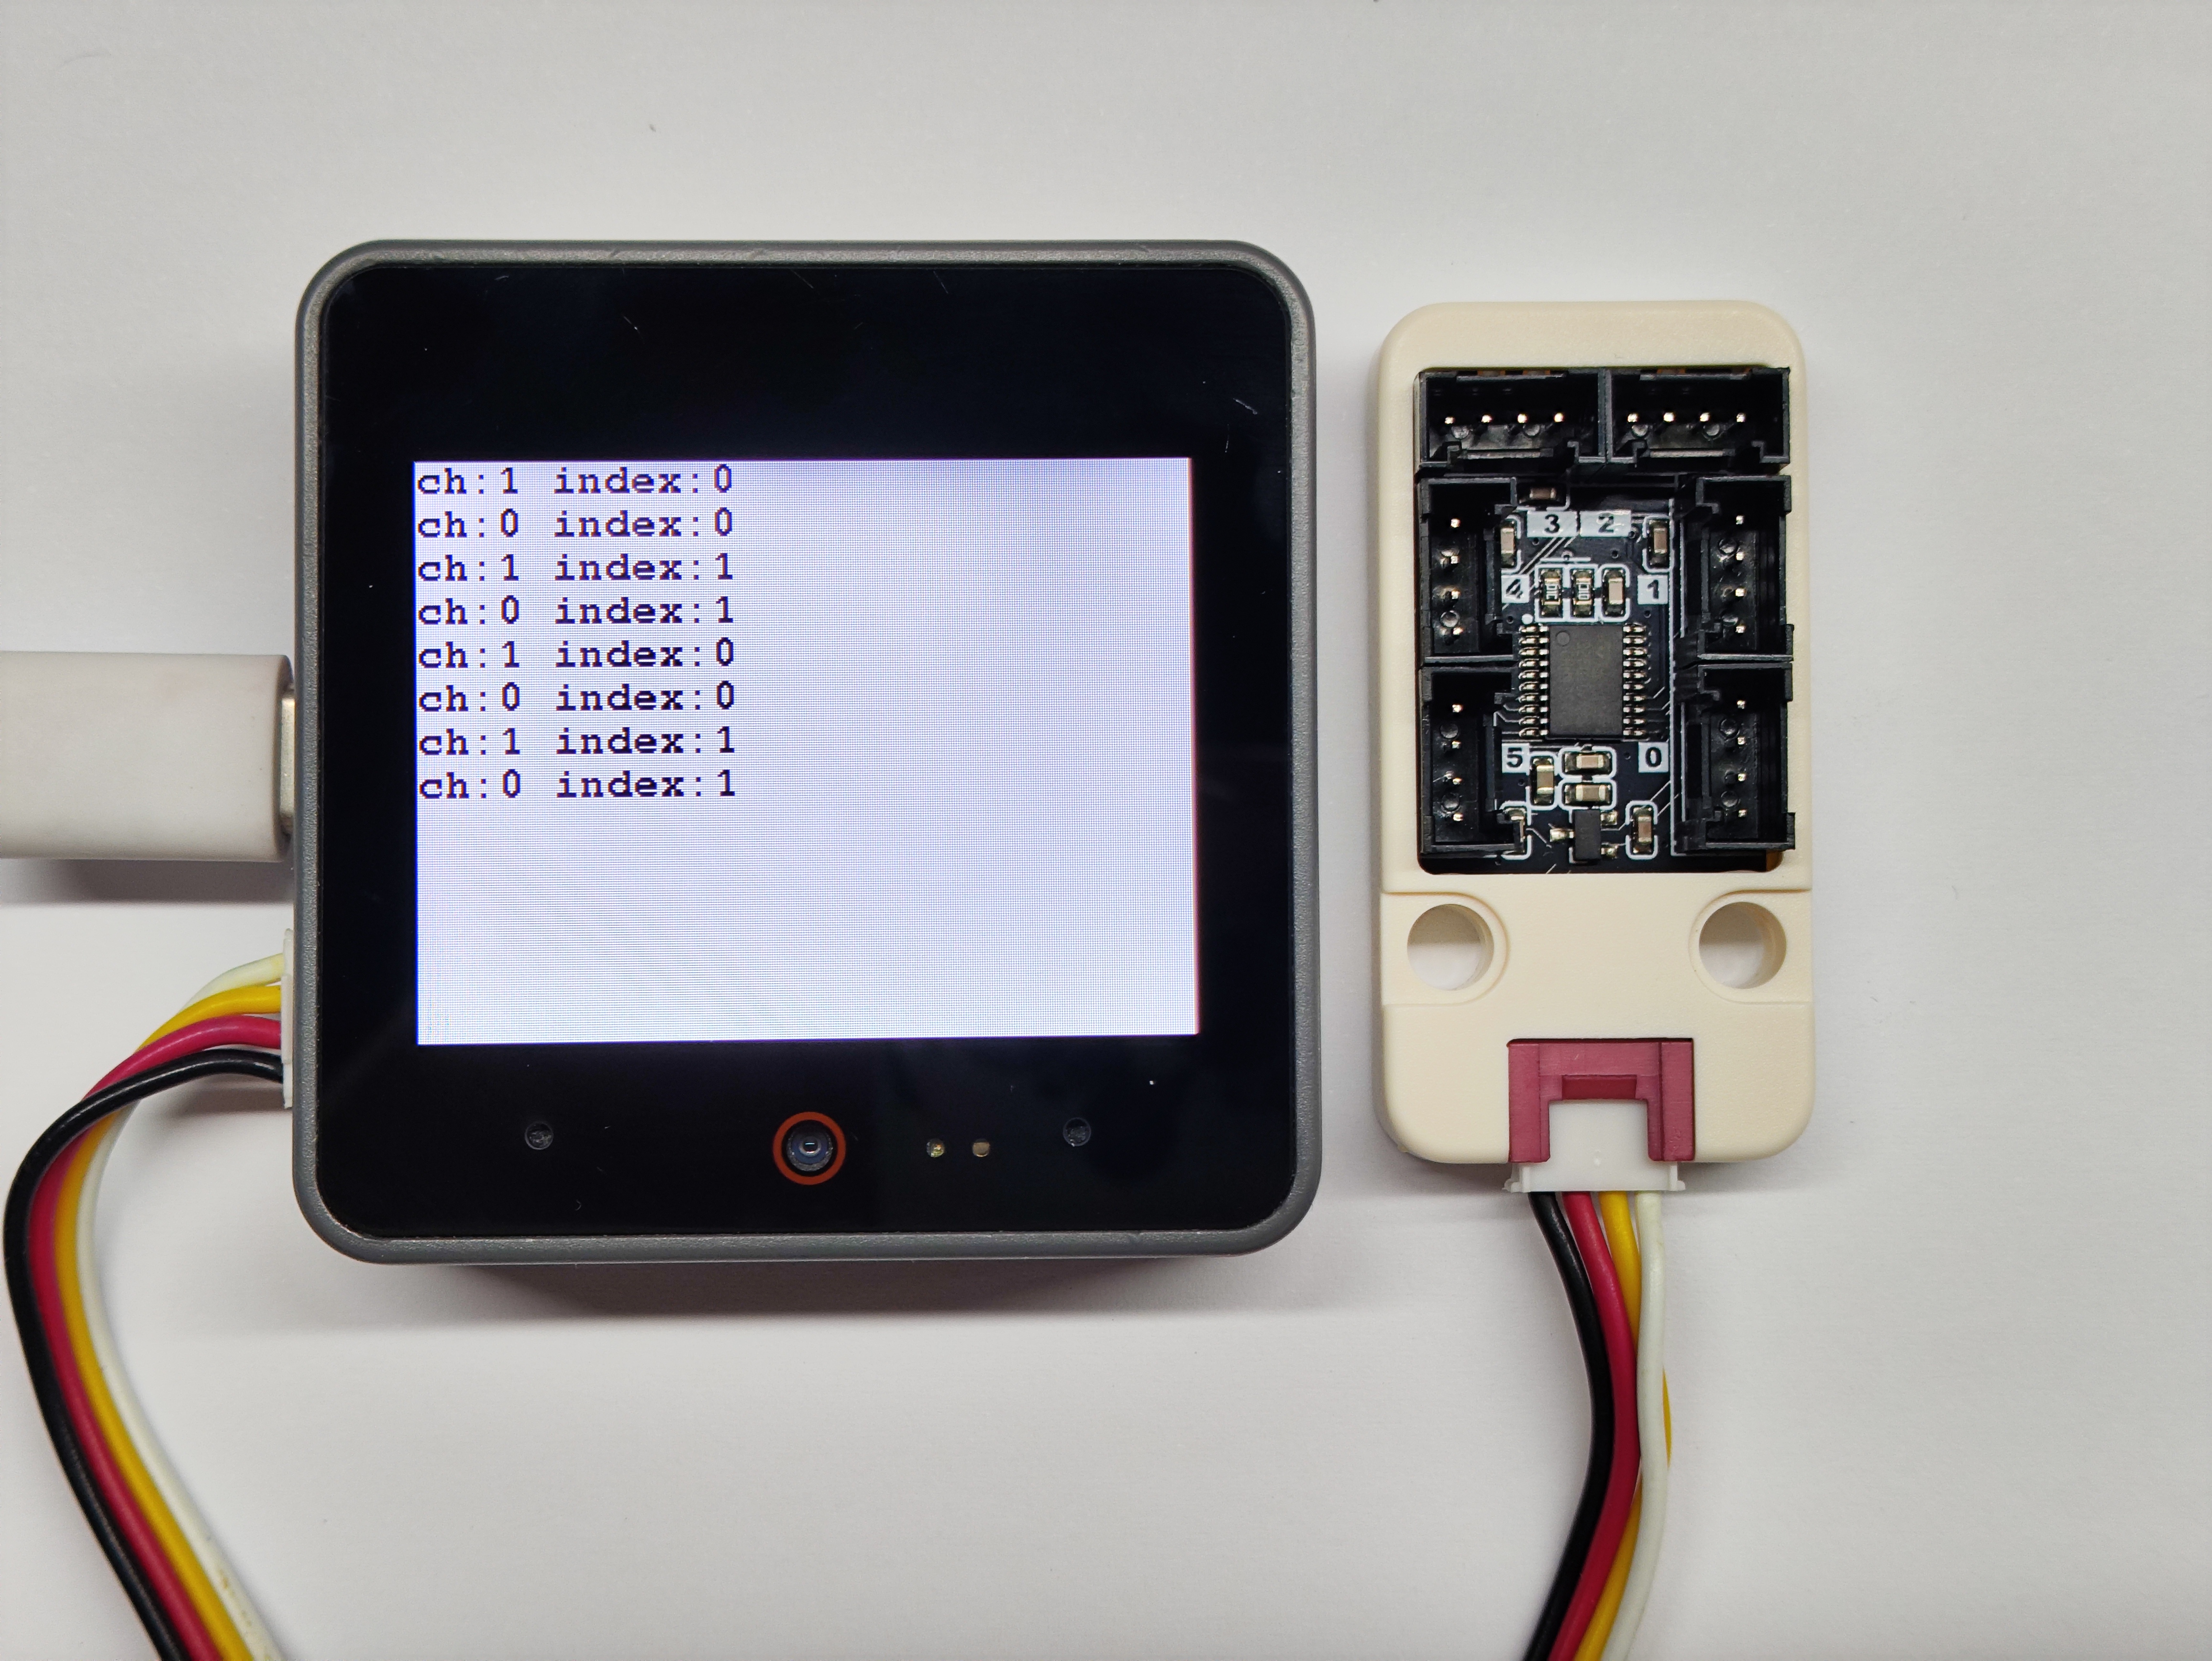
- 读取不同通道的引脚电平状态
cpp
1 2 3 4 5 6 7 8 9 10 11 12 13 14 15 16 17 18 19 20 21 22 23 24 25 26 27 28 29 30 31 32 33 34 35 36 37 38 39 40 41 42 43
#include "M5Unified.h"
#include "M5UnitPbHub.h"

M5UnitPbHub pbhub;

void setup() {
    M5.begin();
    Serial.begin(115200);
    M5.Display.fillScreen(WHITE);
    M5.Display.setTextColor(BLACK);
    M5.Display.setFont(&fonts::FreeMonoBold9pt7b);
    M5.Display.setCursor(0, 0);
    if (!pbhub.begin(&Wire, UNIT_PBHUB_I2C_ADDR, 2, 1, 400000U)) {
        Serial.println("Couldn't find Pbhub");
        while (1) delay(1);
    }
    Serial.println("Pbhub v1.1 digital write read test");
}

void loop() {
    // ch: 0-5
    // index: 0-1
    // status: 0/1
    for (uint8_t ch = 0; ch < 6; ch++) {
        for (uint8_t index = 0; index < 2; index++) {
            pbhub.digitalWrite(ch, index, 1);
            delay(300);
            Serial.printf("ch:%d index:%d\r\n", pbhub.digitalRead(ch, index),
                          index);
            M5.Display.printf("ch:%d index:%d\r\n", pbhub.digitalRead(ch, index),
                          index);
            delay(300);
            pbhub.digitalWrite(ch, index, 0);
            Serial.printf("ch:%d index:%d\r\n", pbhub.digitalRead(ch, index),
                          index);
            M5.Display.printf("ch:%d index:%d\r\n", pbhub.digitalRead(ch, index),
                          index);
            delay(300);
        }
    }
    M5.Display.fillScreen(WHITE);
    M5.Display.setCursor(0, 0);
}5. 引脚占空比设置实验
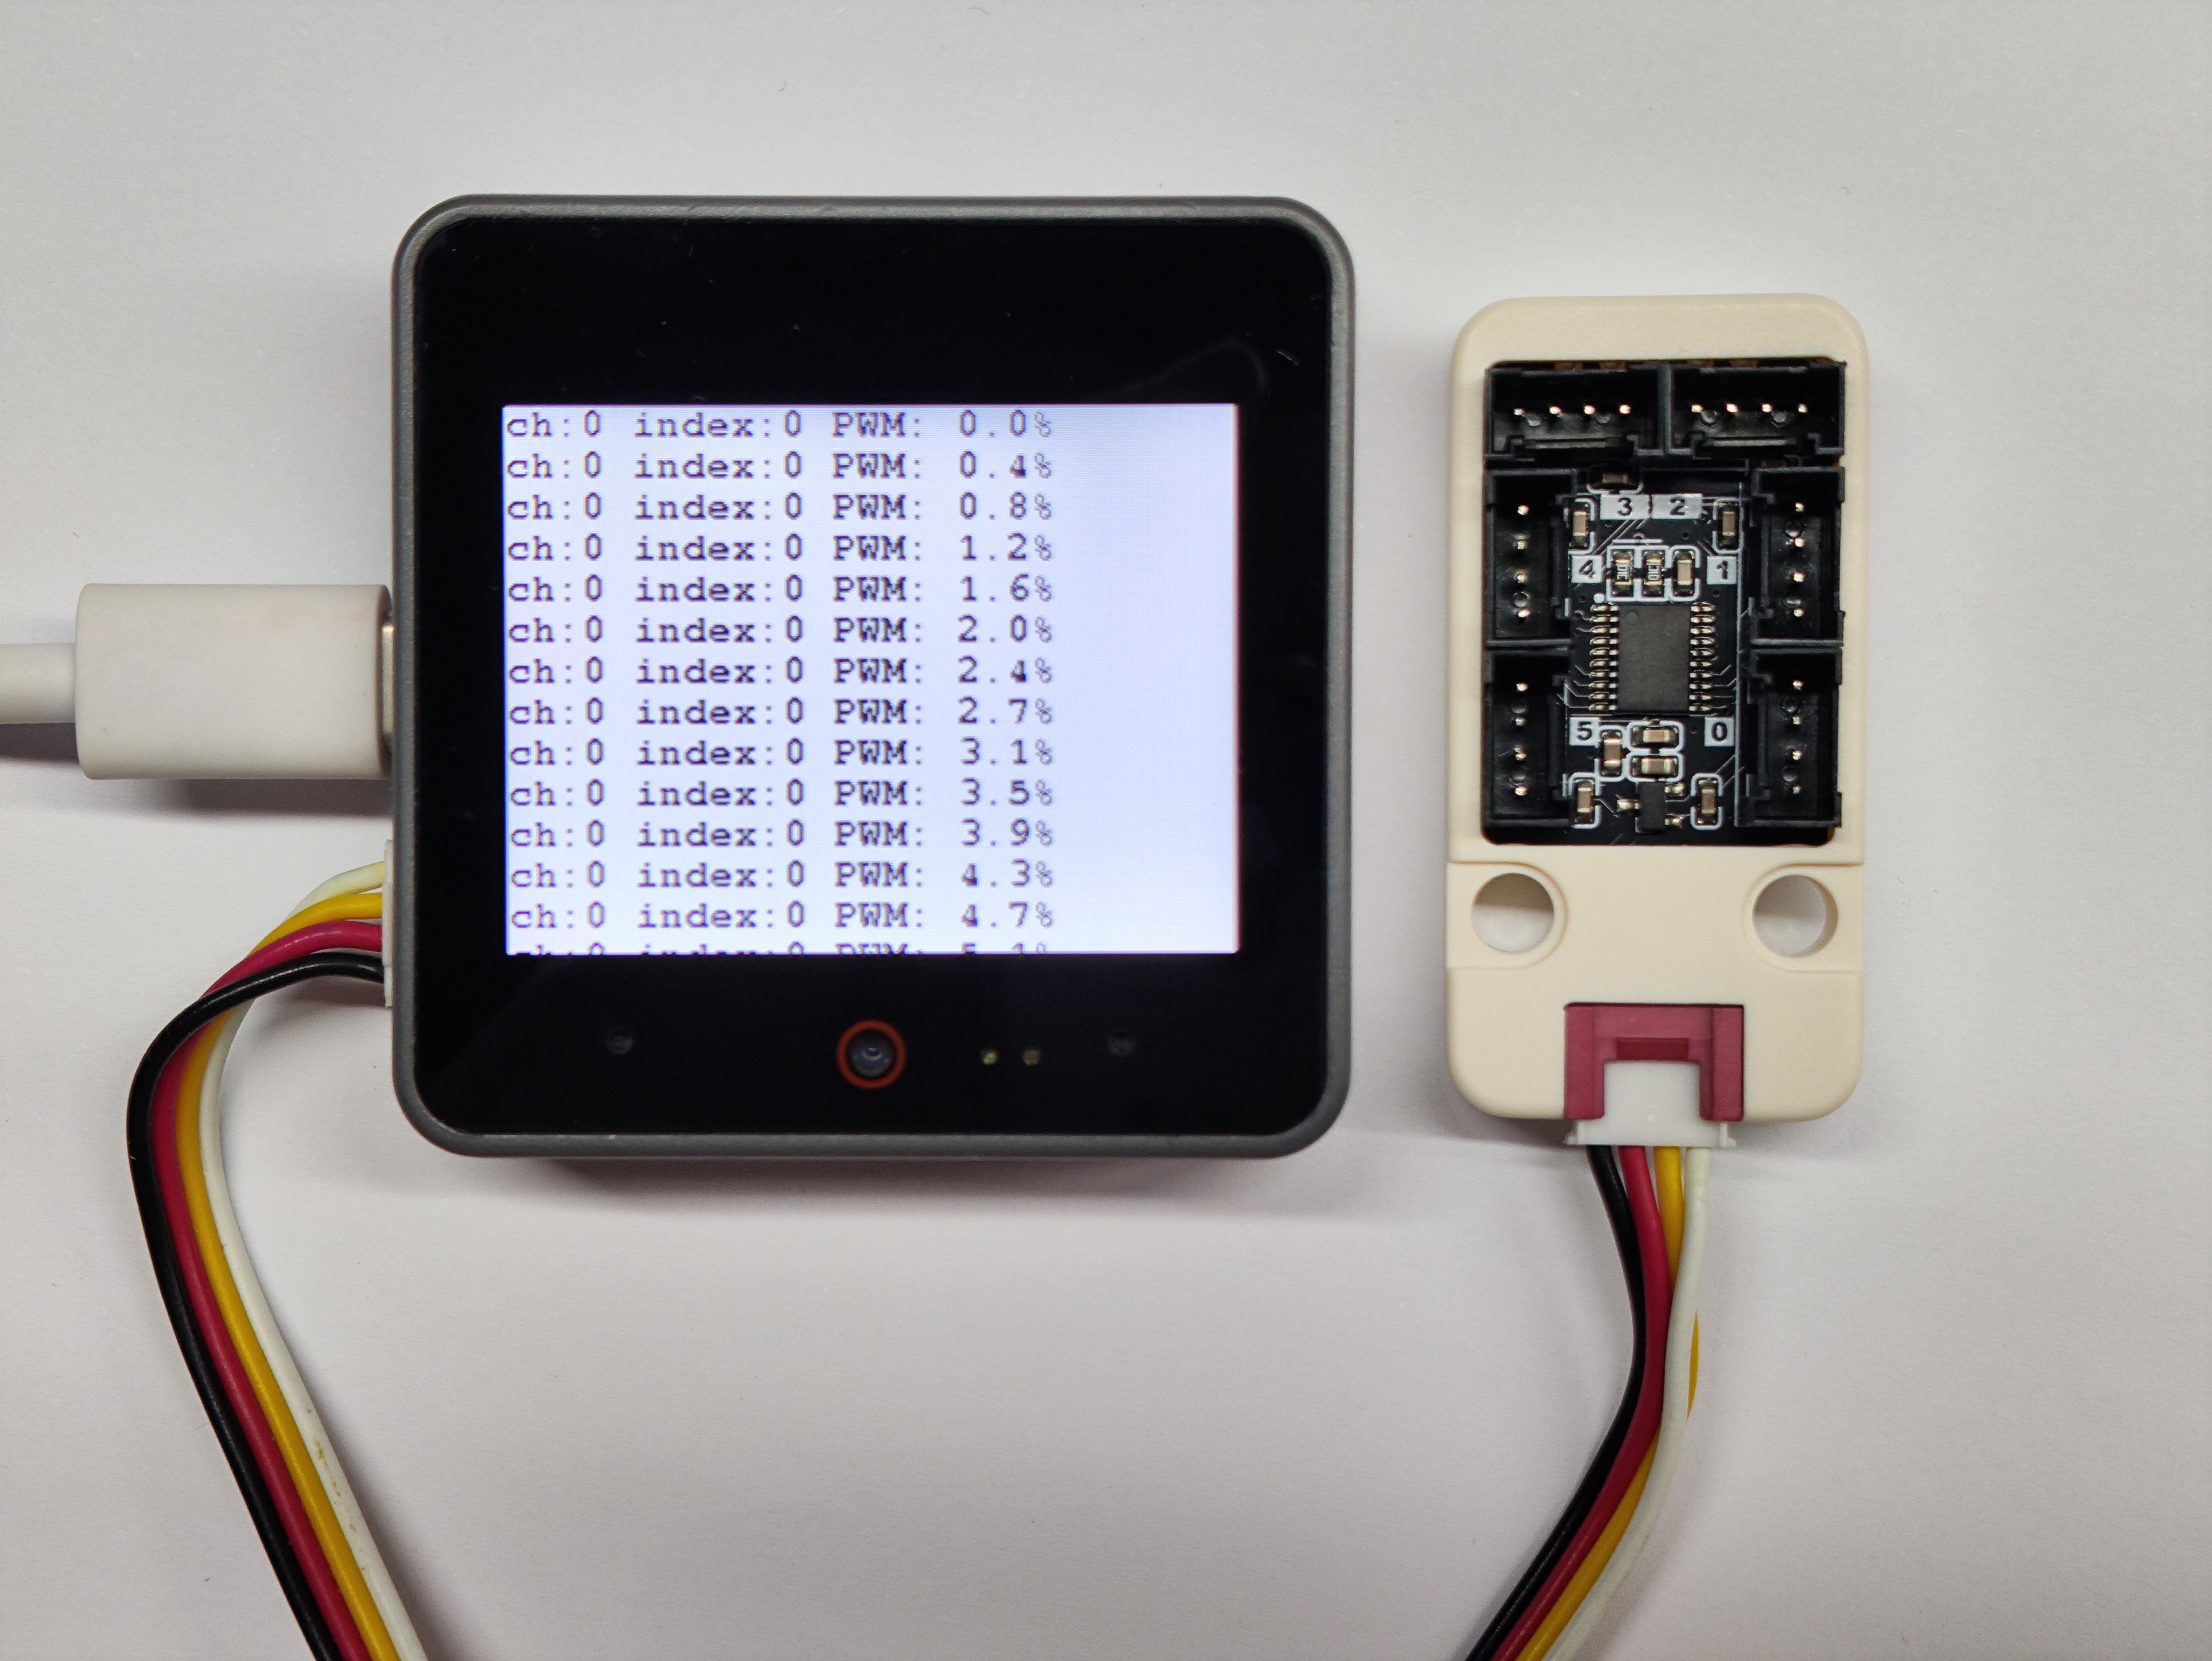
- 设置不同通道引脚占空比并读取
cpp
1 2 3 4 5 6 7 8 9 10 11 12 13 14 15 16 17 18 19 20 21 22 23 24 25 26 27 28 29 30 31 32 33 34 35 36 37 38 39
#include "M5Unified.h"
#include "M5UnitPbHub.h"

M5UnitPbHub pbhub;

void setup() {
    M5.begin();
    M5.Display.fillScreen(WHITE);
    M5.Display.setTextColor(BLACK);
    M5.Display.setFont(&fonts::FreeMonoBold9pt7b);
    M5.Display.setCursor(0, 0);
    Serial.begin(115200);
    if (!pbhub.begin(&Wire, UNIT_PBHUB_I2C_ADDR, 2, 1, 400000U)) {
        Serial.println("Couldn't find Pbhub");
        while (1) delay(1);
    }
    Serial.println("Pbhub v1.1 PWM test");
}

void loop() {
    // ch: 0-5
    // index: 0-1
    // status: 0/1
    for (uint8_t ch = 0; ch < 6; ch++) {
        for (uint8_t index = 0; index < 2; index++) {
            for (uint8_t h = 0; h < 255; h++) {
                pbhub.setPWM(ch, index, h);
                Serial.printf("ch:%d index:%d PWM: %.1f%%\r\n", ch, index,
                              h / 255.0 * 100.0);
                M5.Display.printf("ch:%d index:%d PWM: %.1f%%\r\n", ch, index,
                              h / 255.0 * 100.0);
                delay(1000);
            }
        }
        M5.Display.fillScreen(WHITE);
        M5.Display.setCursor(0, 0);
    }
    delay(1000);
}6. RGB 模块实验
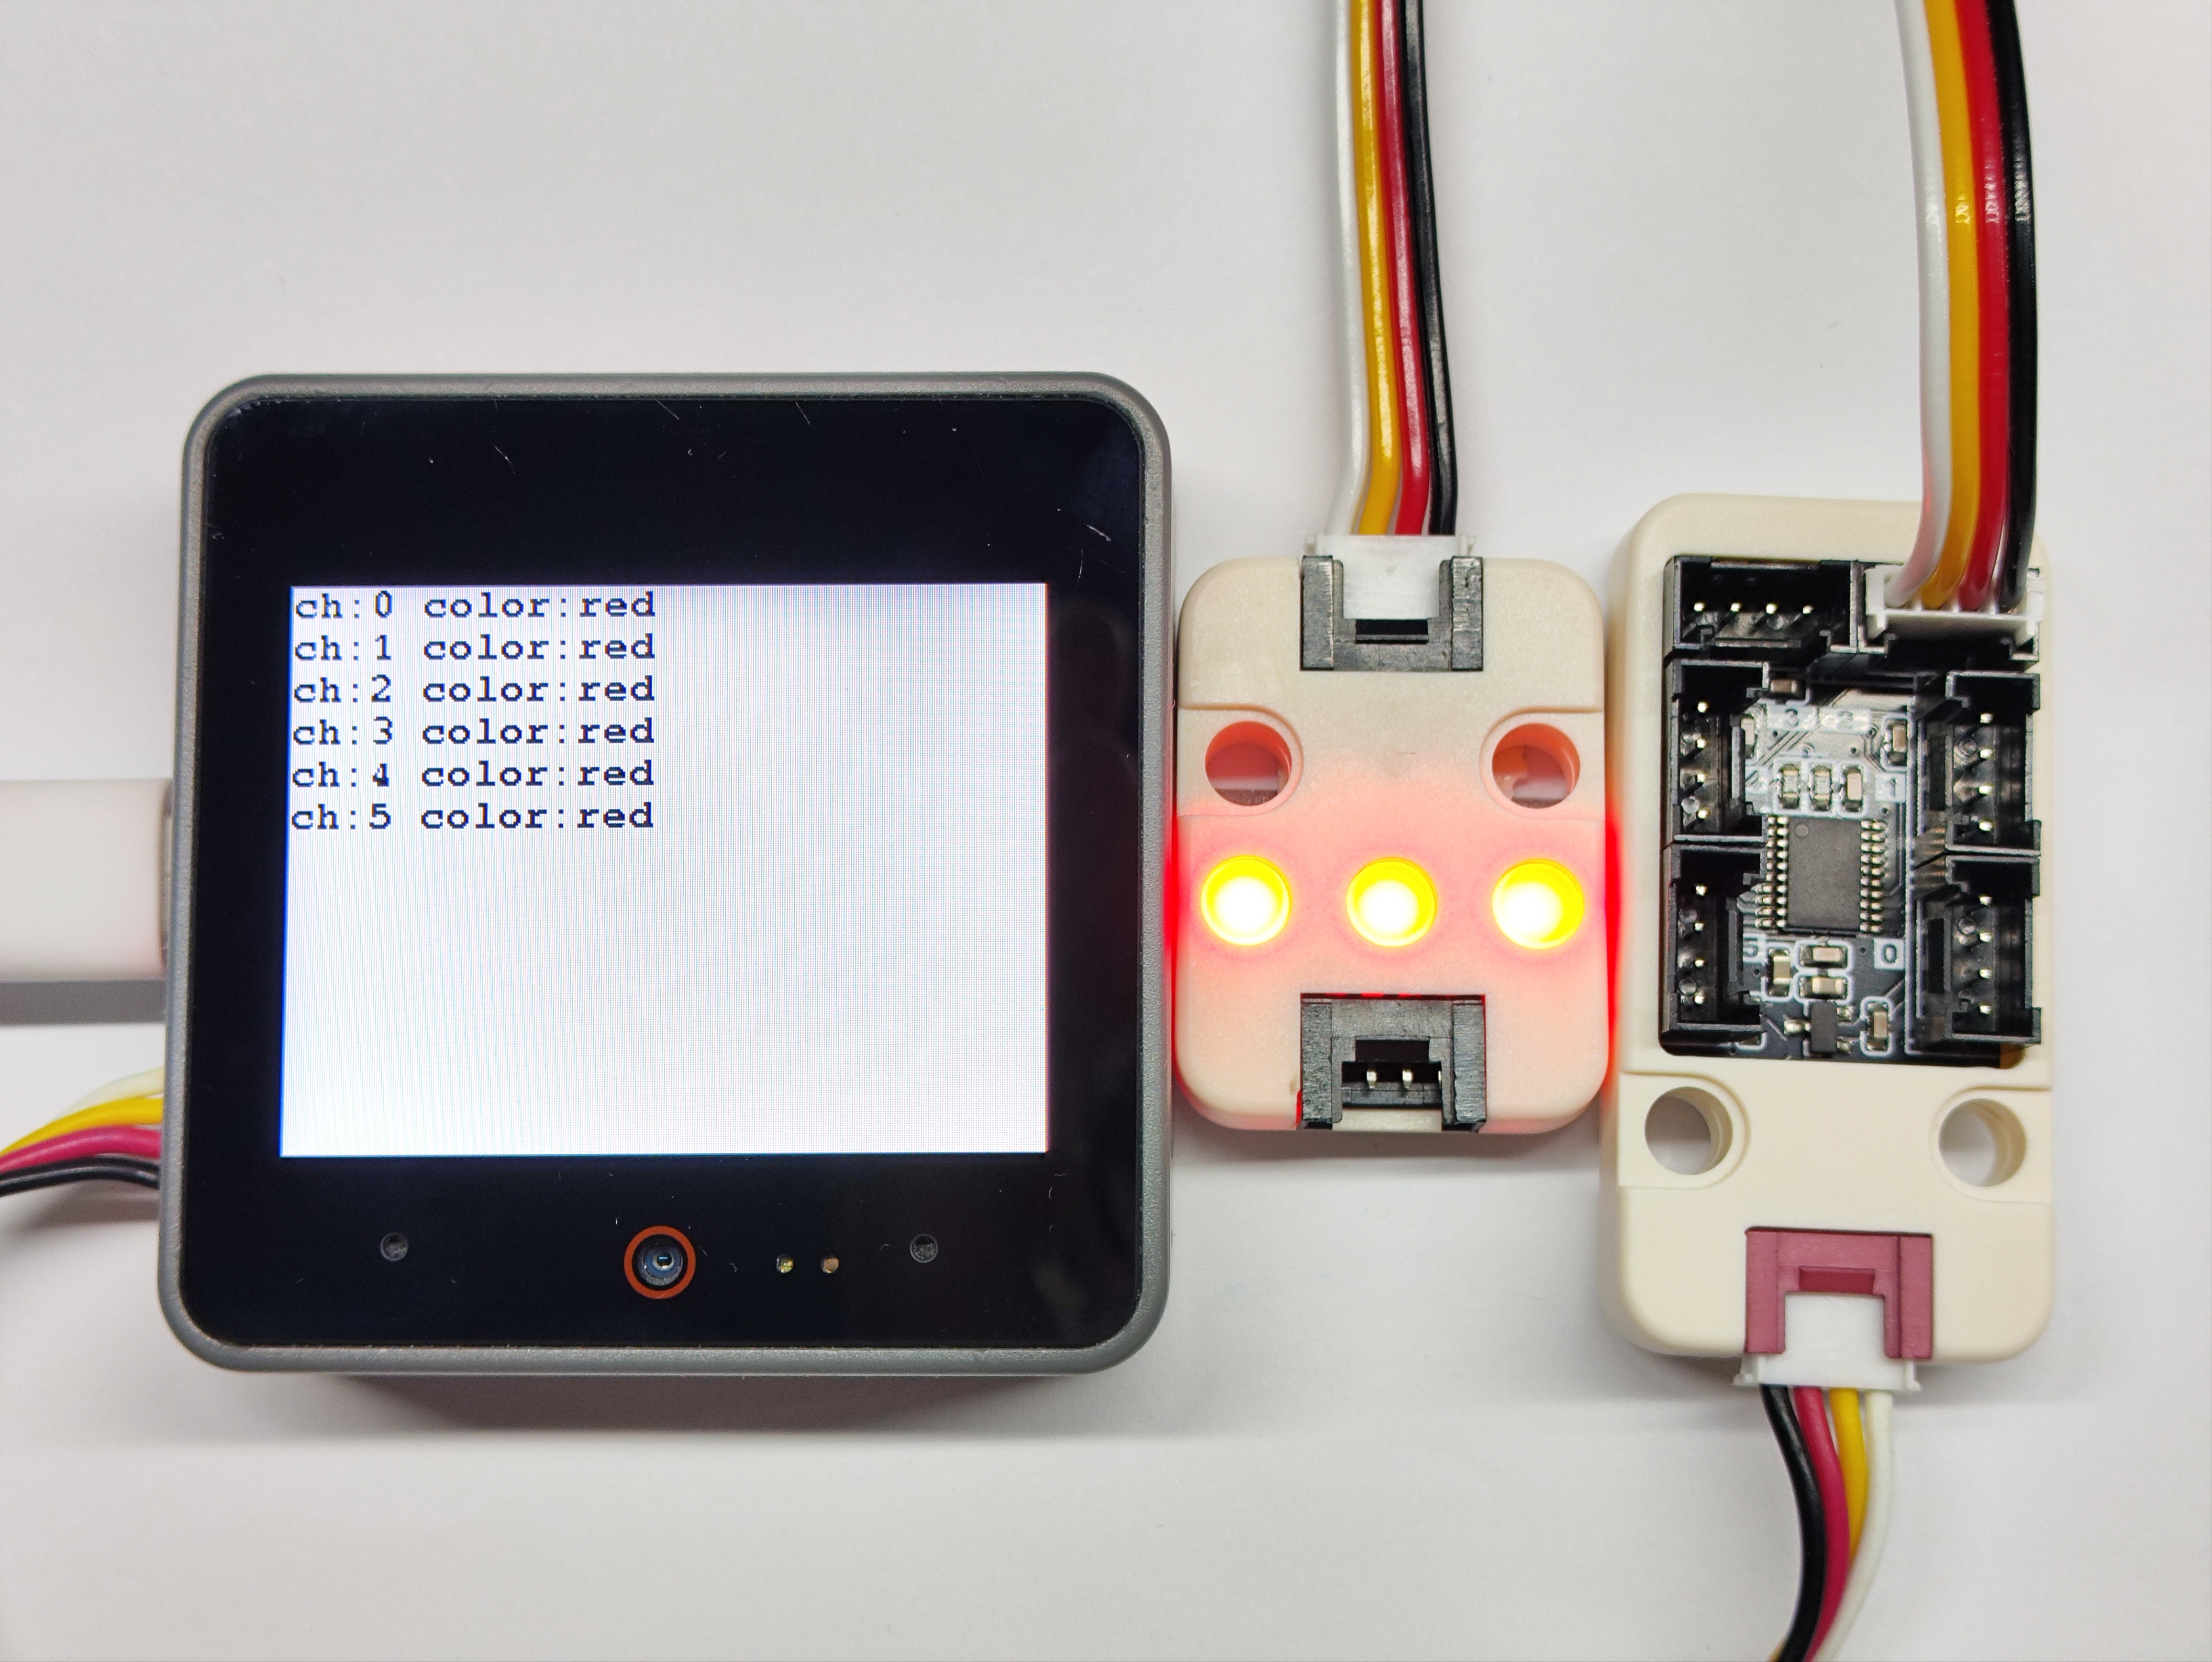
- 外接 Unit RGB 模块进行颜色显示
cpp
1 2 3 4 5 6 7 8 9 10 11 12 13 14 15 16 17 18 19 20 21 22 23 24 25 26 27 28 29 30 31 32 33 34 35 36 37 38 39 40 41 42 43 44 45 46 47 48 49 50 51 52 53
#include "M5Unified.h"
#include "M5UnitPbHub.h"
M5UnitPbHub pbhub;
void setup()
{
M5.begin();
Serial.begin(115200);
M5.Display.fillScreen(WHITE);
M5.Display.setTextColor(BLACK);
M5.Display.setFont(&fonts::FreeMonoBold9pt7b);
M5.Display.setCursor(0, 0);
if (!pbhub.begin(&Wire, UNIT_PBHUB_I2C_ADDR, 2, 1, 100000U)) {
Serial.println("Couldn't find Pbhub");
while (1) delay(1);
}
for (uint8_t ch = 0; ch < 6; ch++) {
pbhub.setLEDNum(ch, 74);
pbhub.setLEDBrightness(ch, 40);
}
}
void loop()
{
// ch: 0-5
// index: 0-1
// status: 0/1
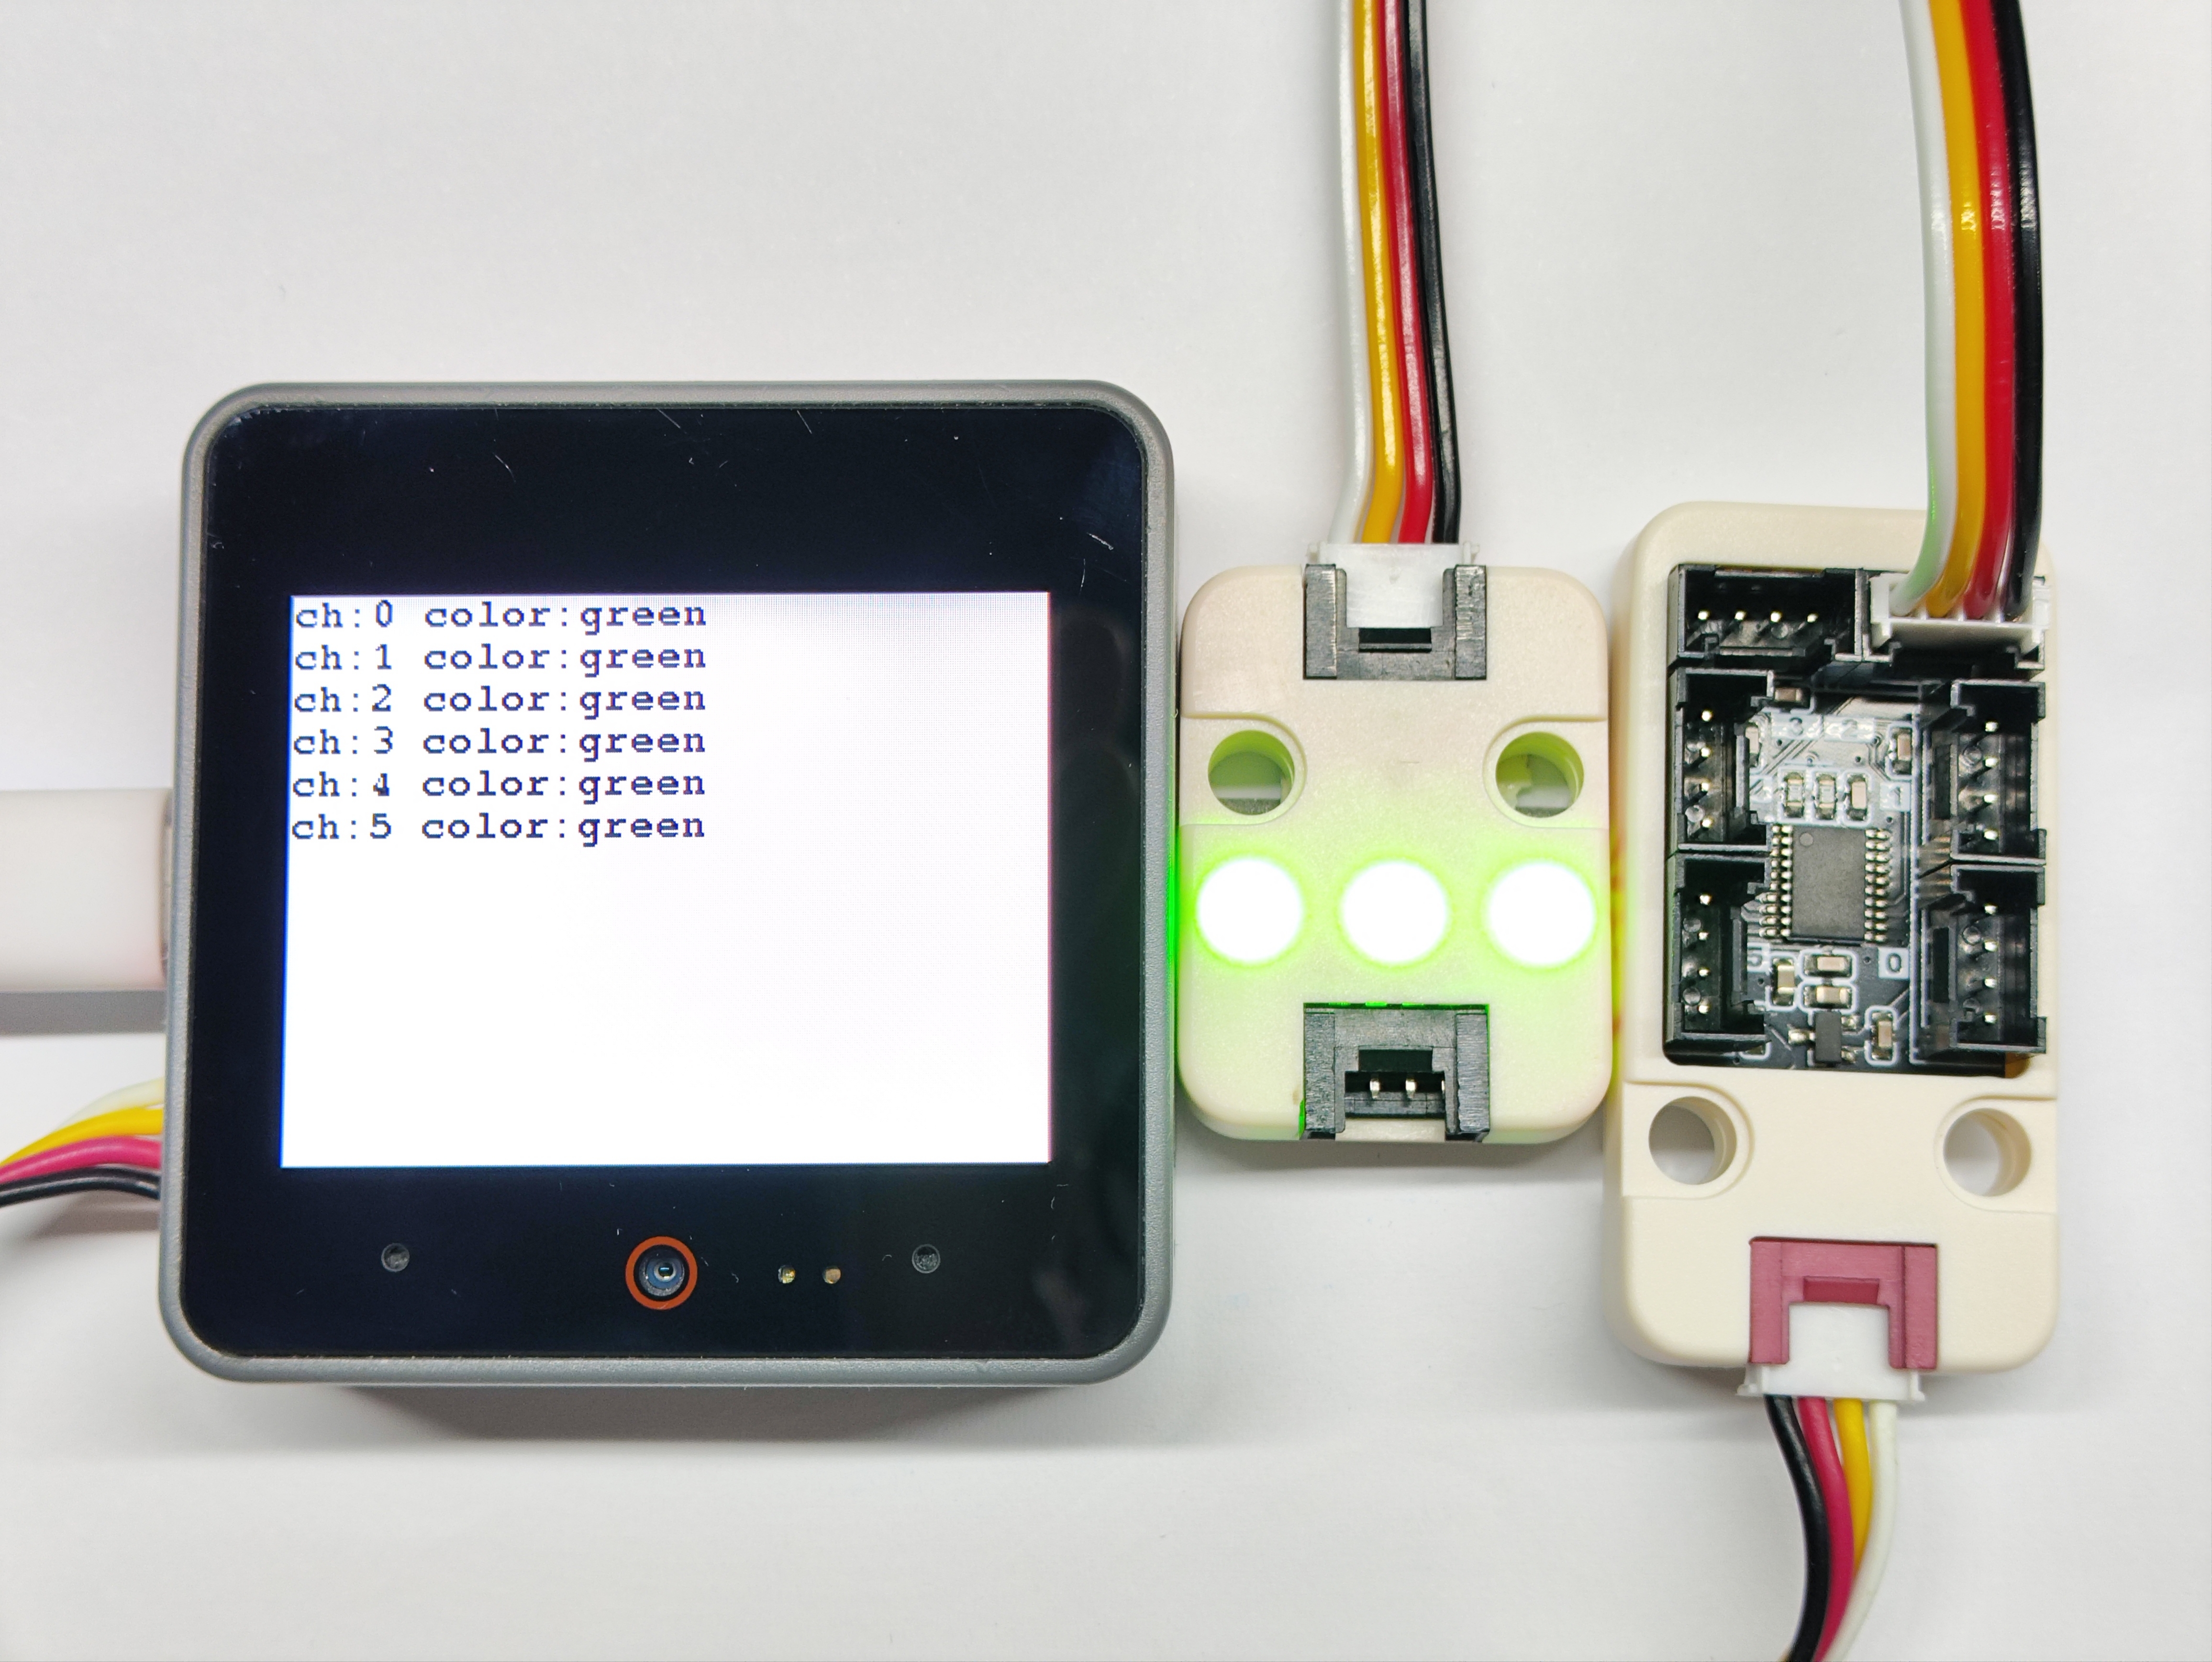
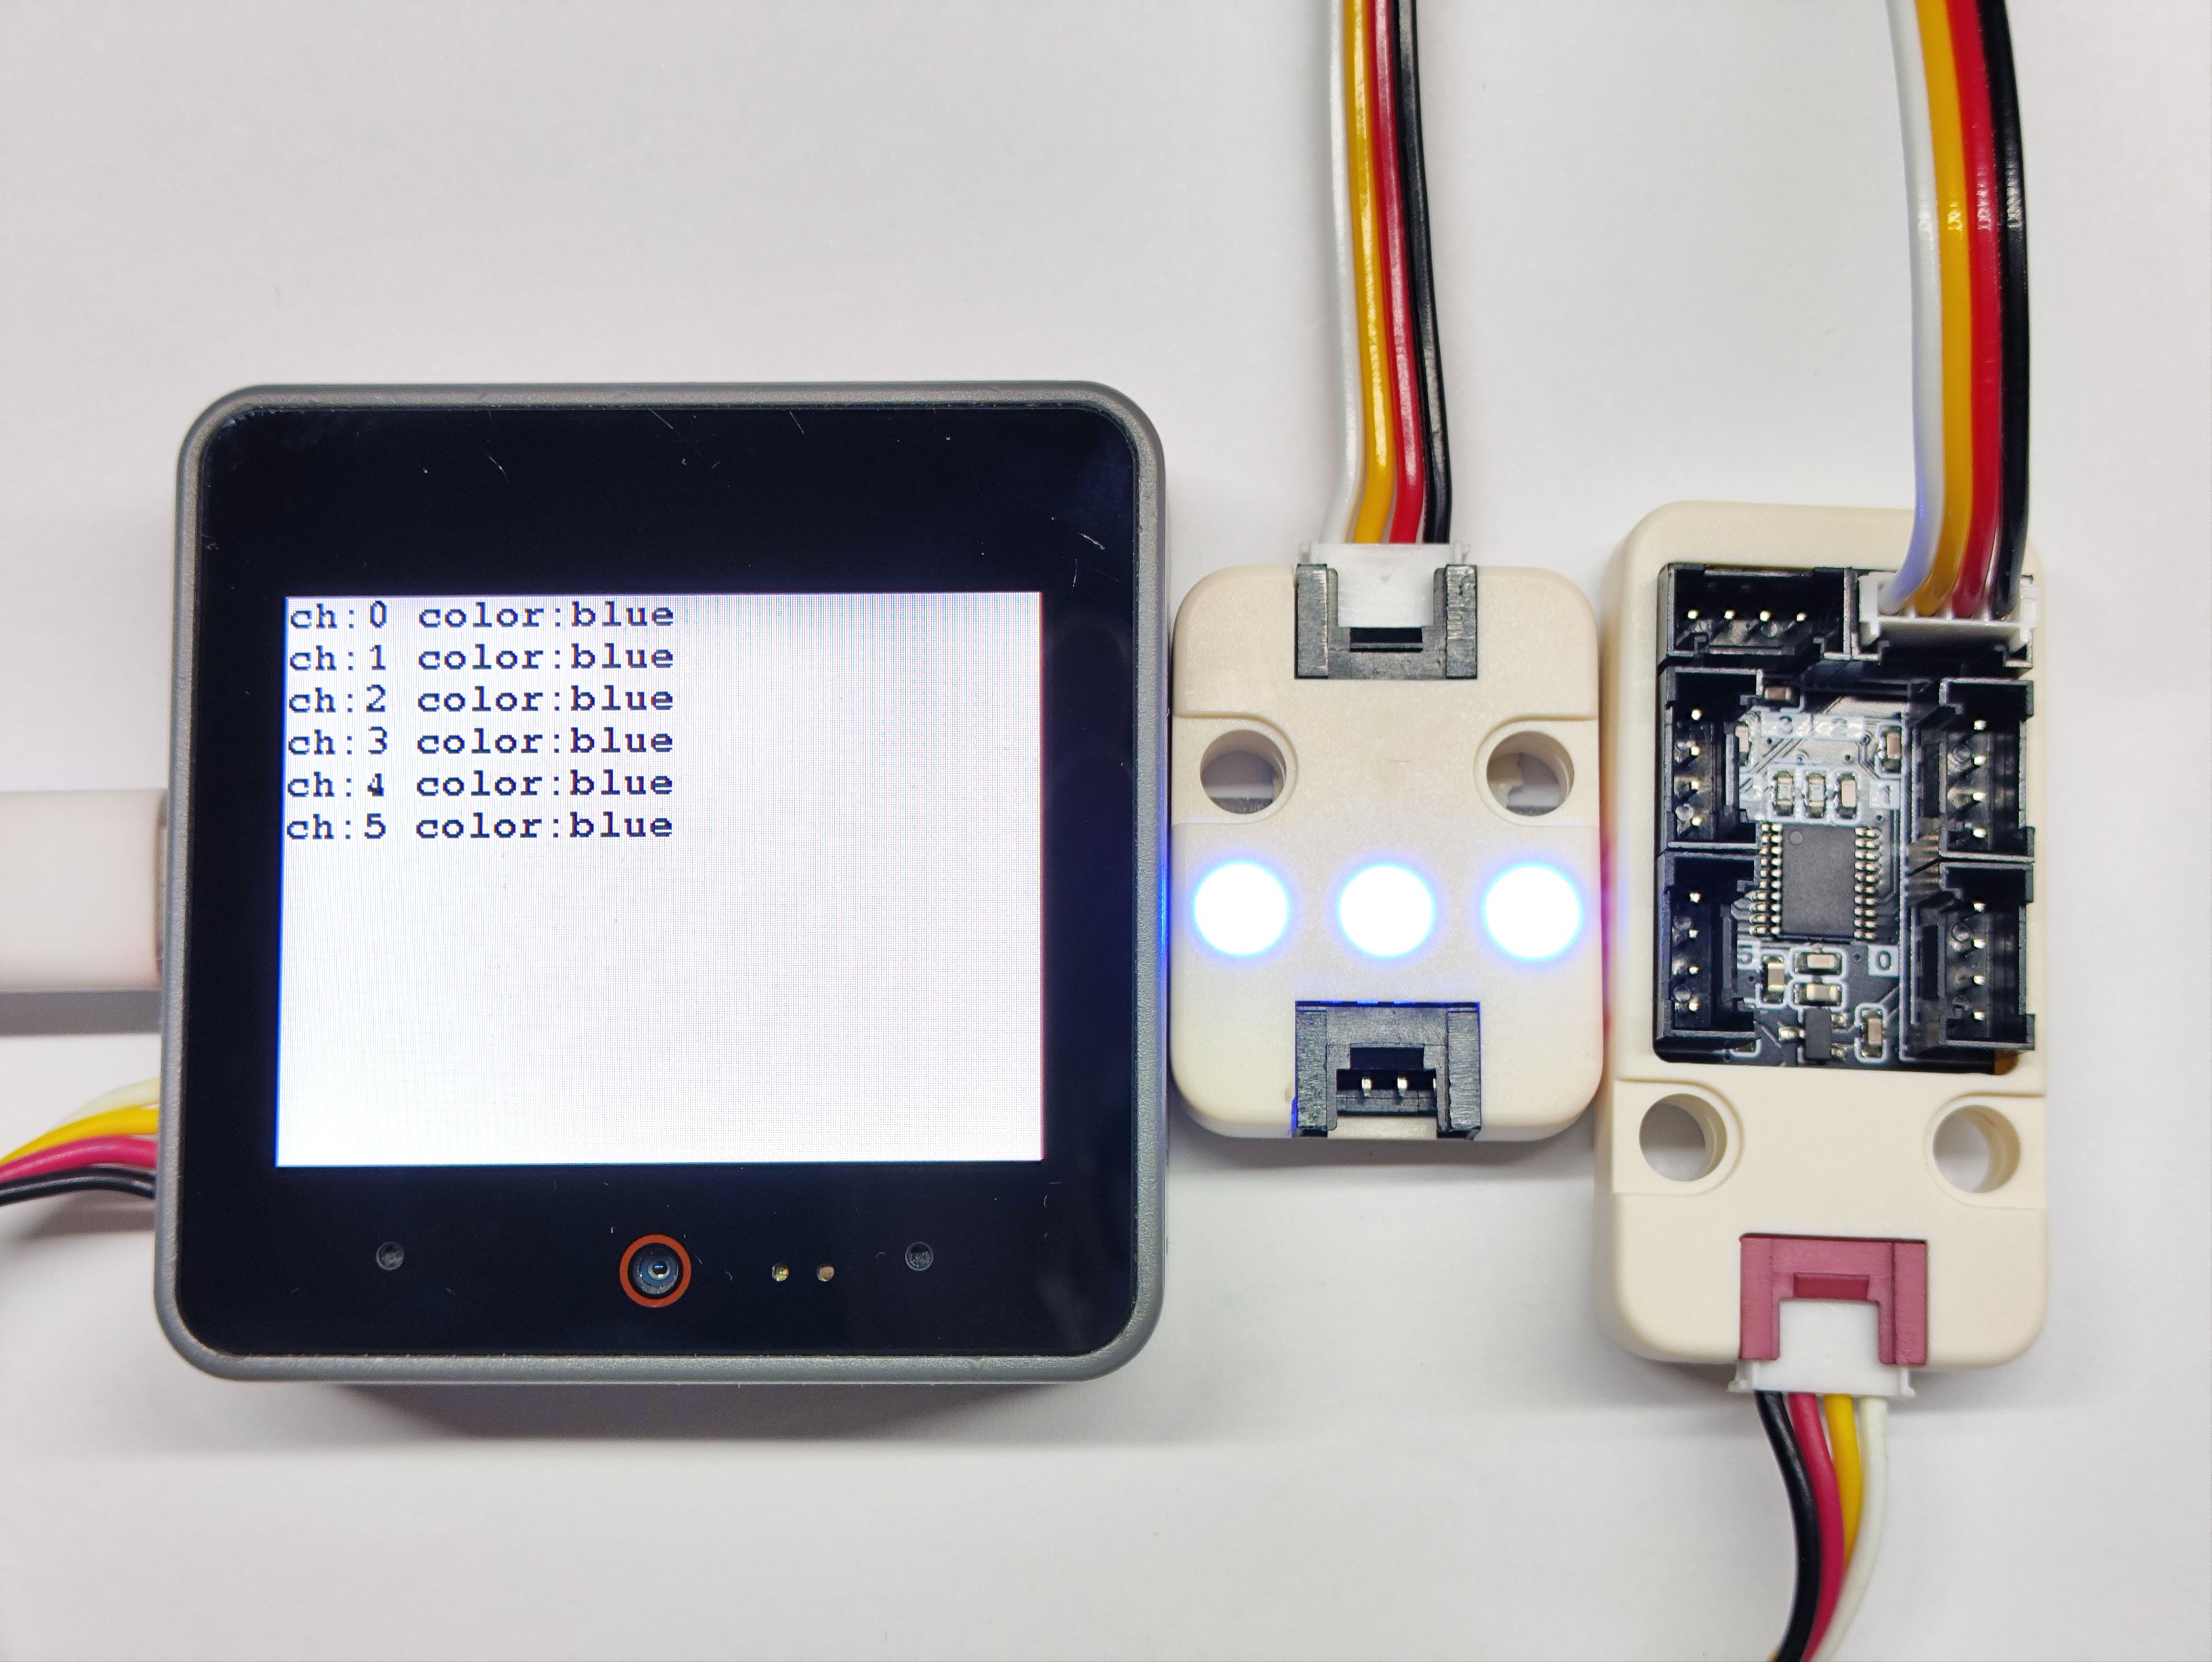
for (uint8_t ch = 0; ch < 6; ch++) {
pbhub.fillLEDColor(ch, 0, 73, 0xff0000); // Red
Serial.printf("ch:%d color:red\r\n", ch);
M5.Display.printf("ch:%d color:red\r\n", ch);
}
delay(1000);
M5.Display.fillScreen(WHITE);
M5.Display.setCursor(0, 0);
for (uint8_t ch = 0; ch < 6; ch++) {
pbhub.fillLEDColor(ch, 0, 73, 0x00ff00); // Green
Serial.printf("ch:%d color:green\r\n", ch);
M5.Display.printf("ch:%d color:green\r\n", ch);
}
delay(1000);
M5.Display.fillScreen(WHITE);
M5.Display.setCursor(0, 0);
for (uint8_t ch = 0; ch < 6; ch++) {
pbhub.fillLEDColor(ch, 0, 73, 0x0000ff); // Blue
Serial.printf("ch:%d color:blue\r\n", ch);
M5.Display.printf("ch:%d color:blue\r\n", ch);
}
delay(1000);
M5.Display.fillScreen(WHITE);
M5.Display.setCursor(0, 0);
}7. 舵机控制实验
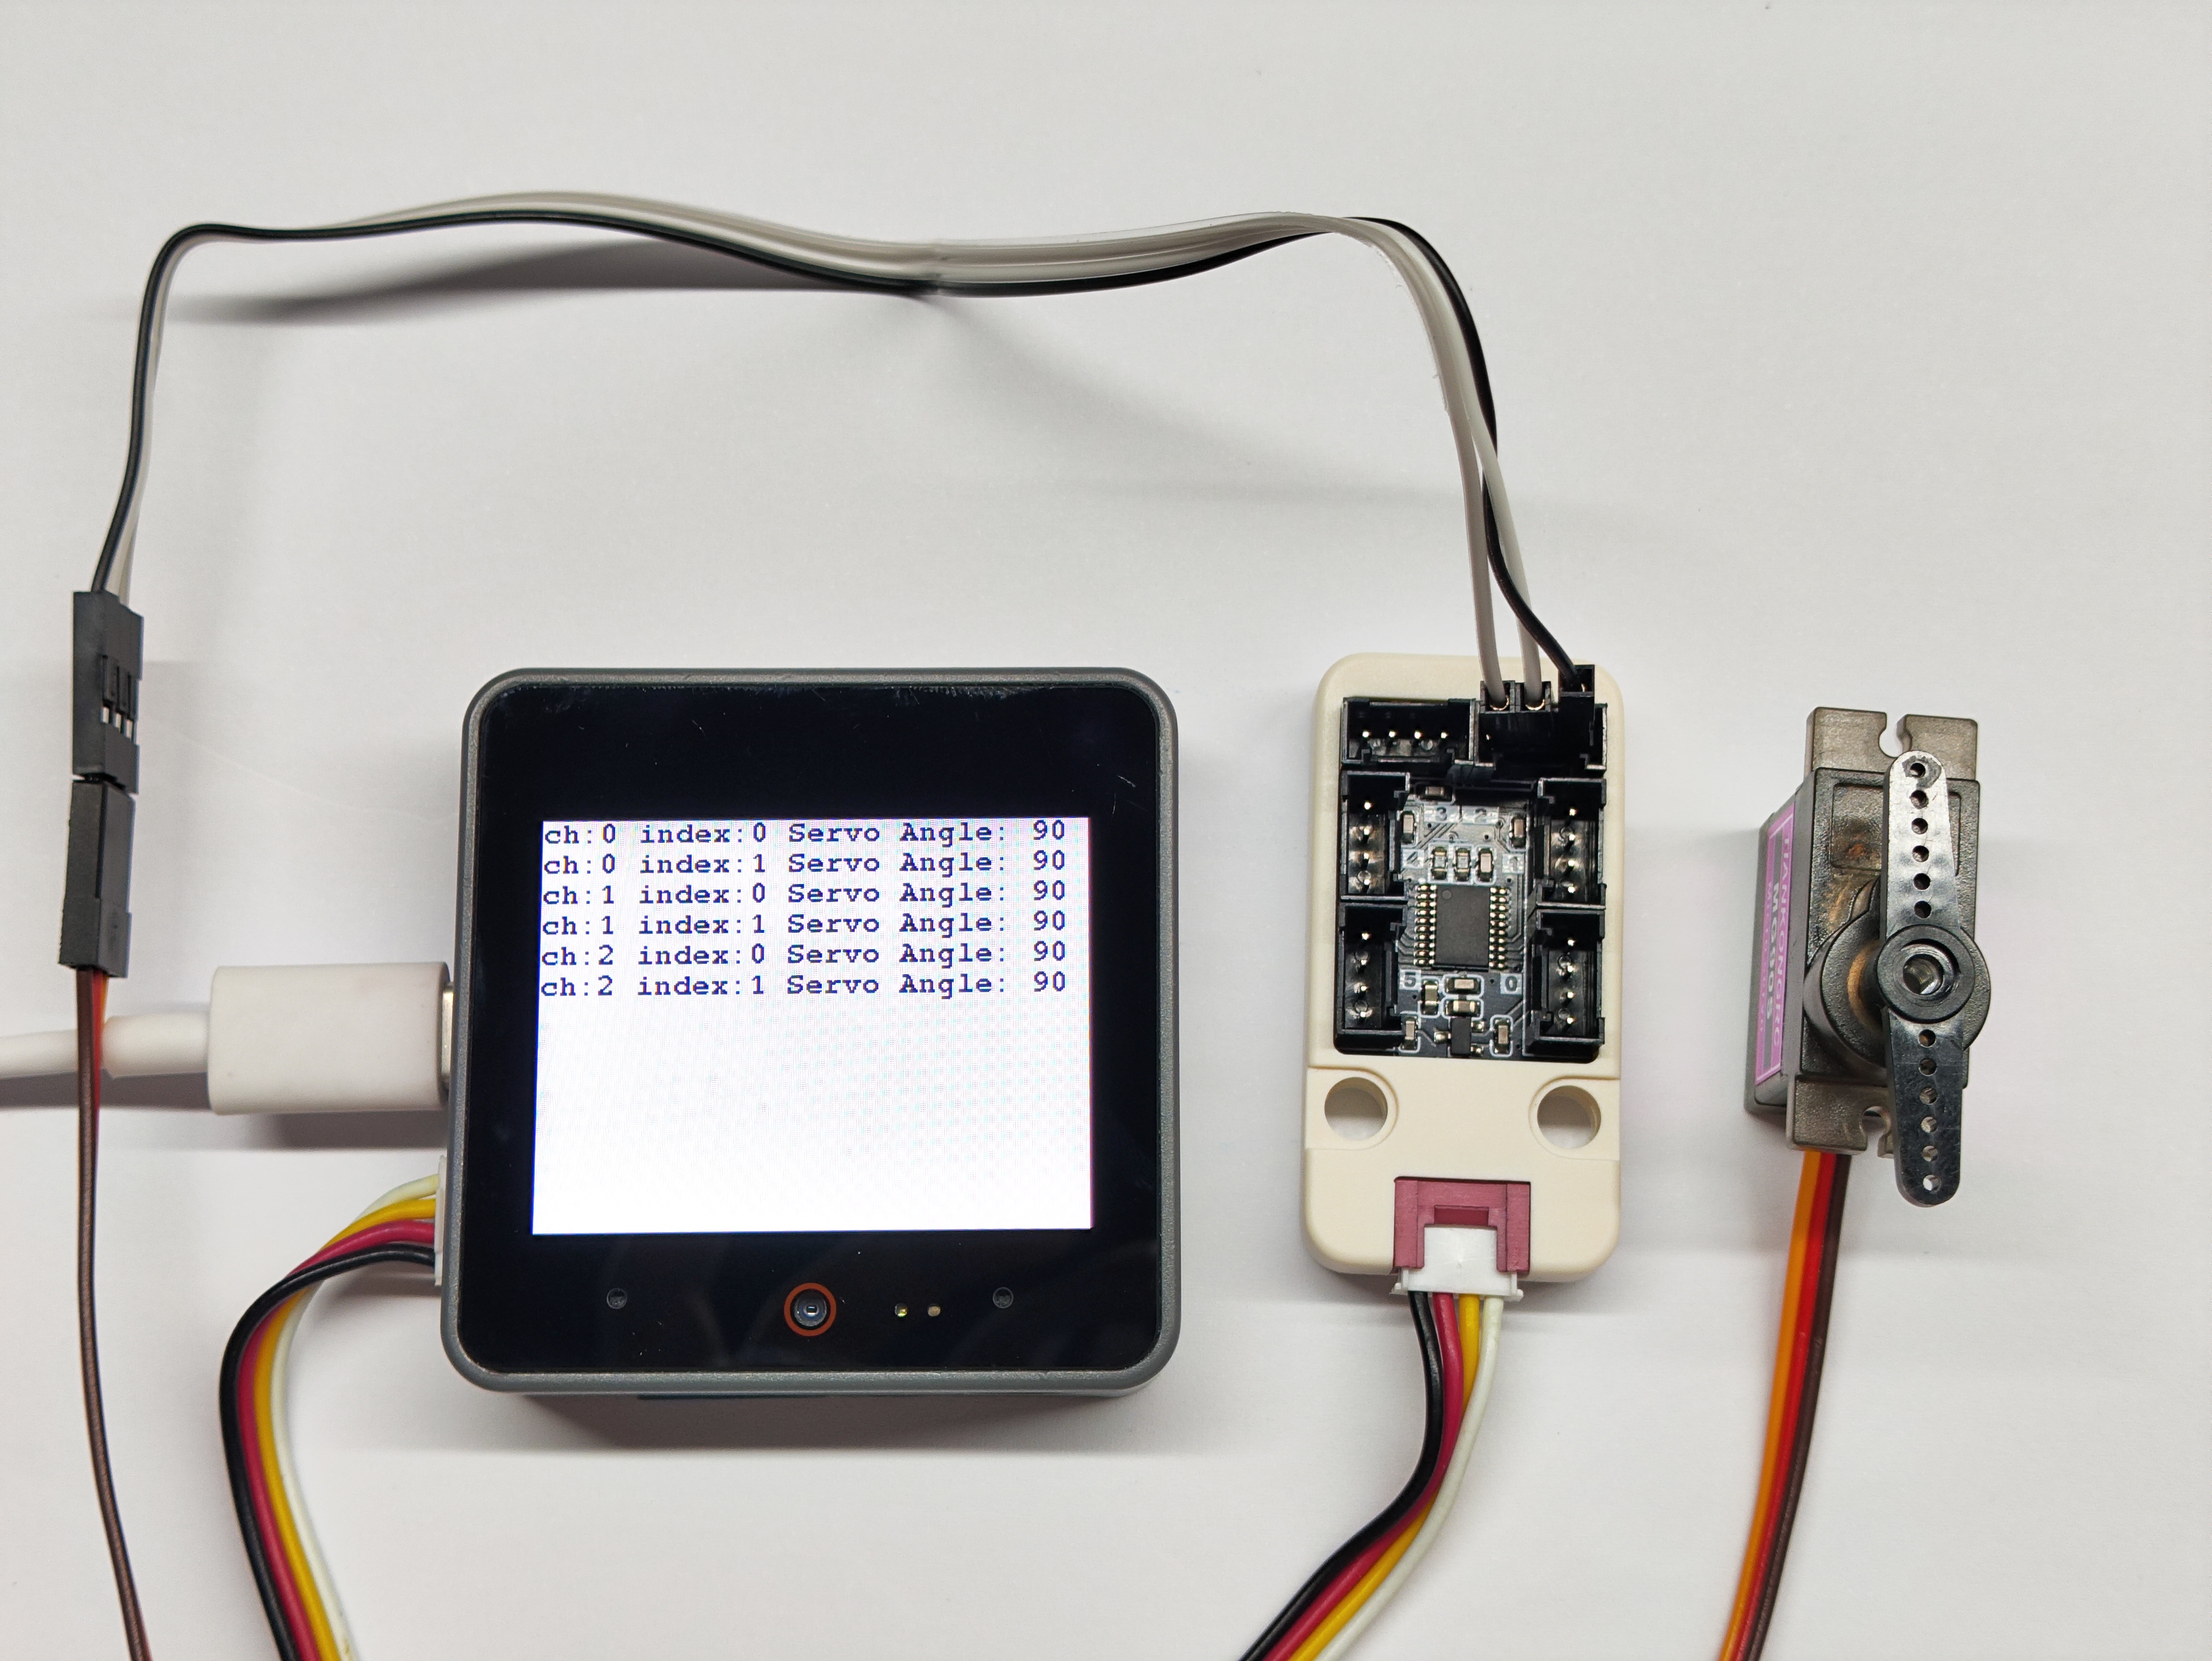
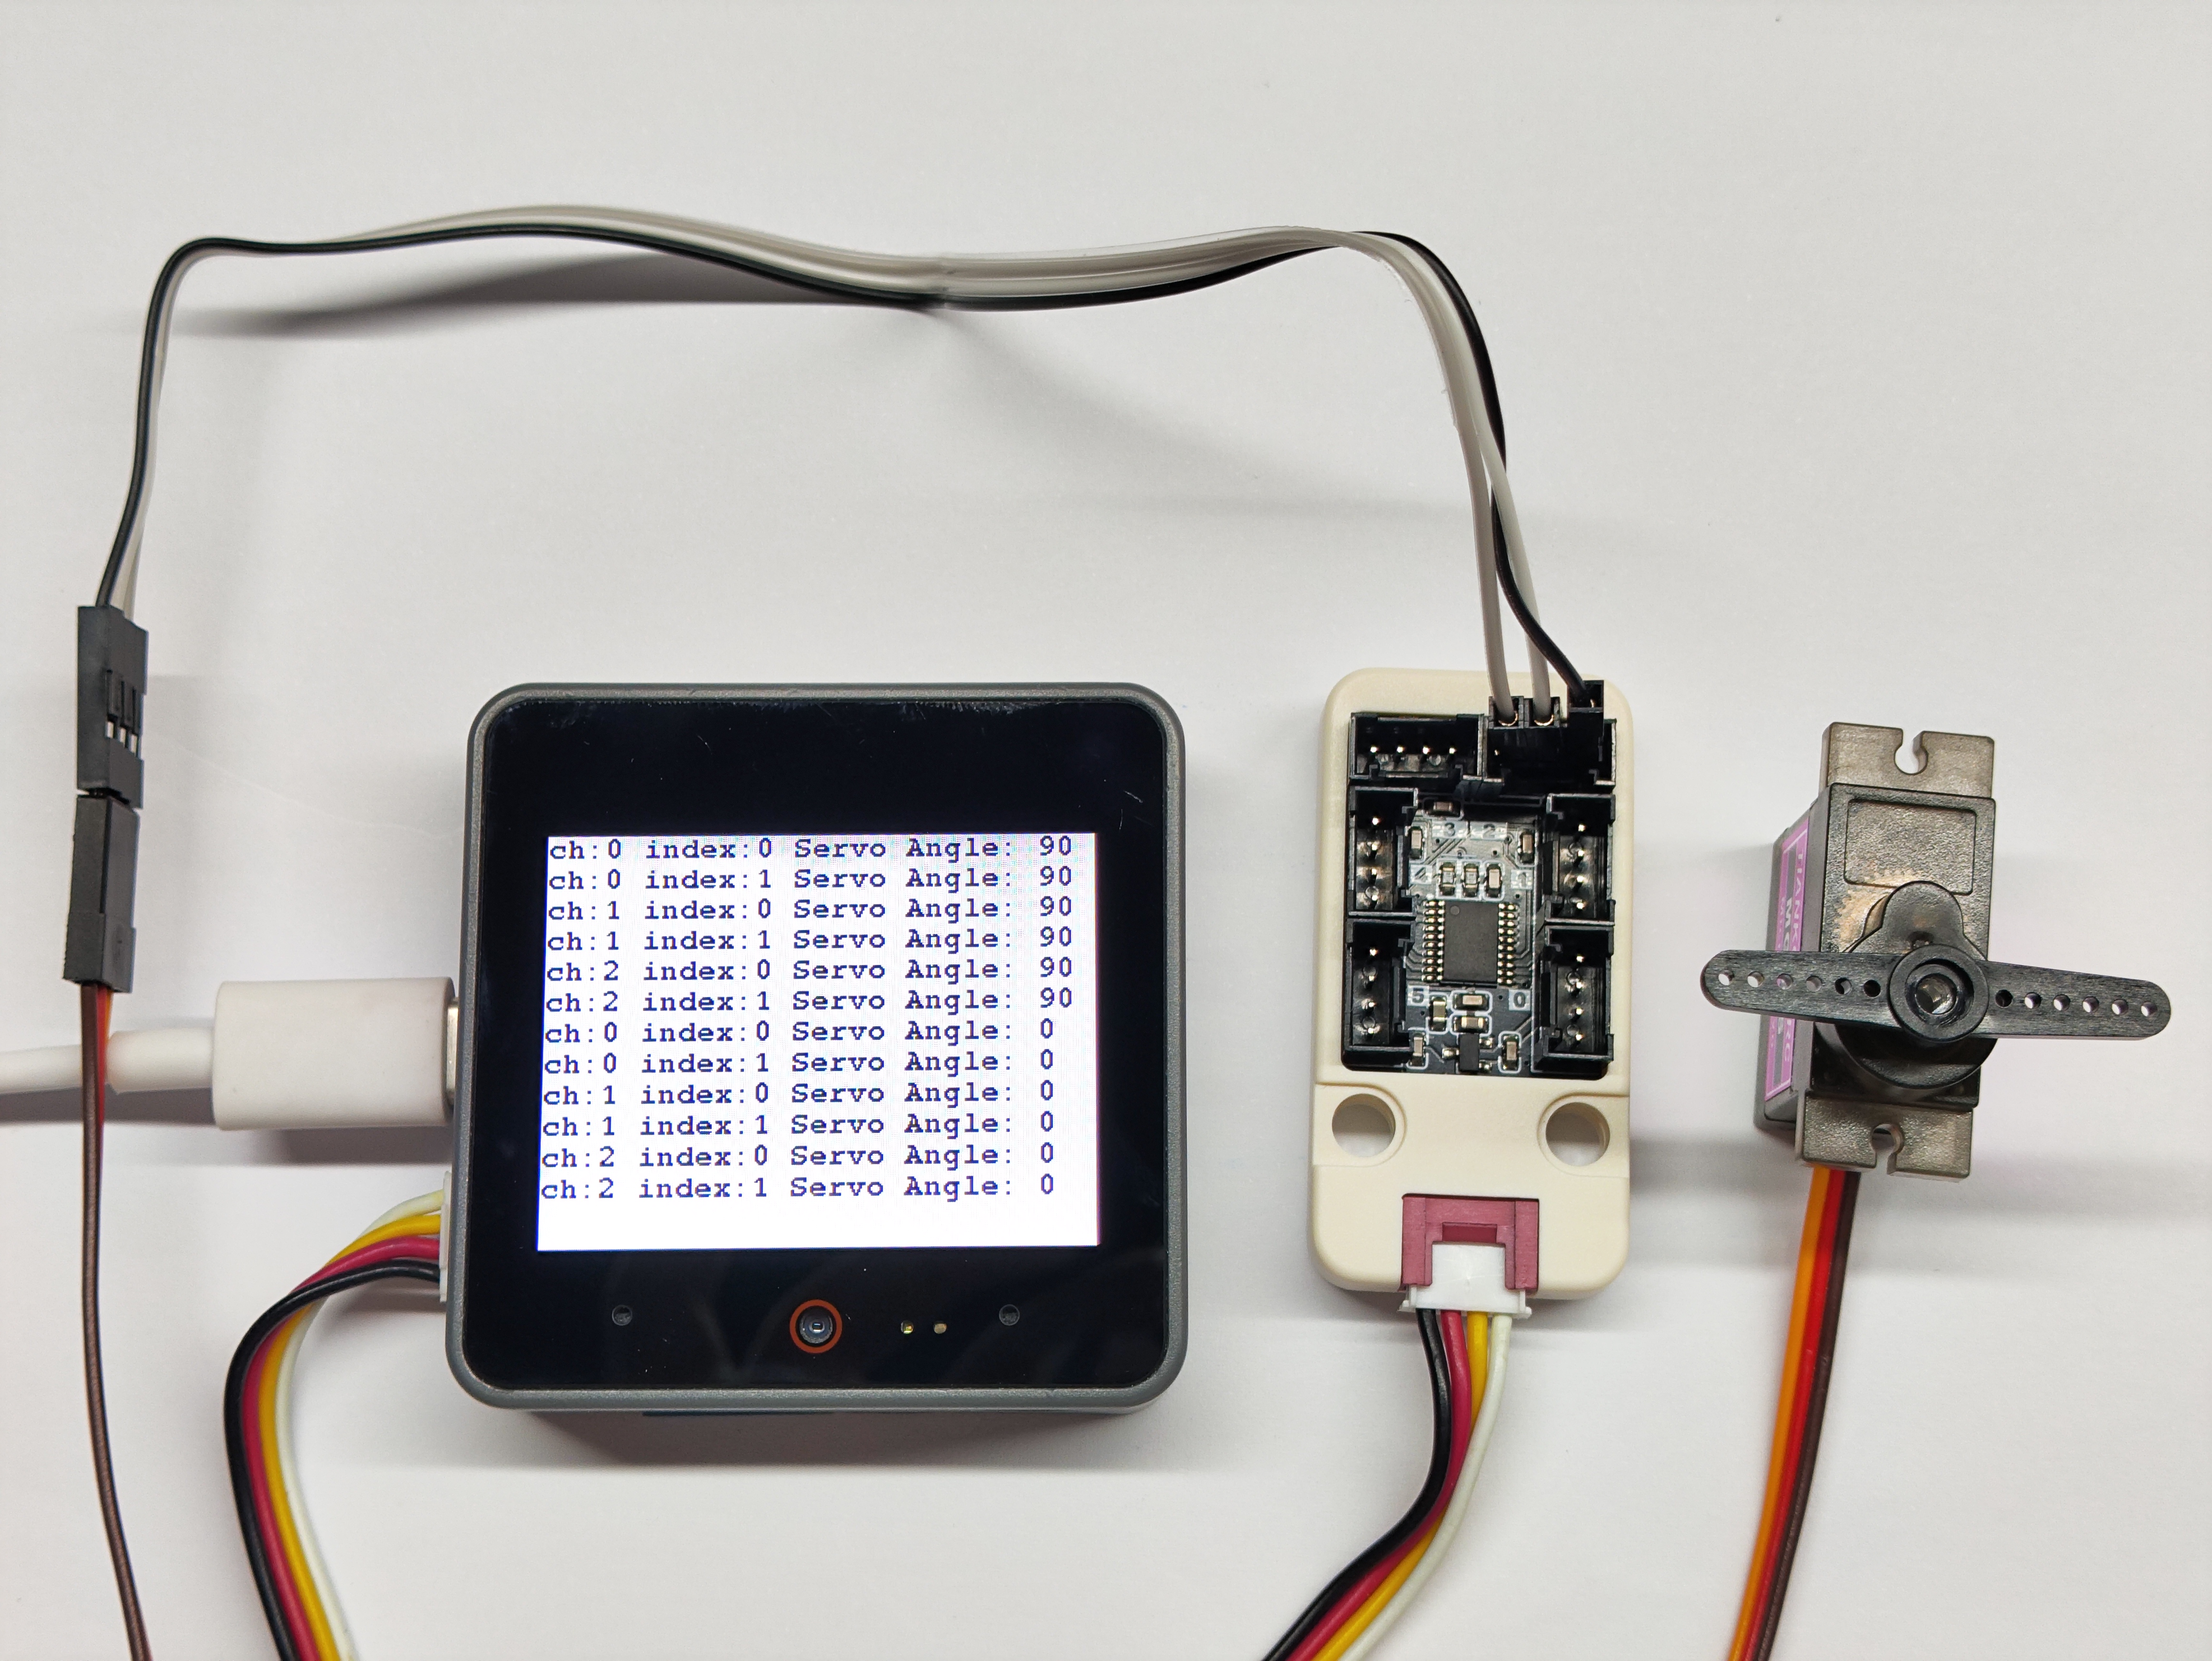
- 控制舵机在 0°~90° 之间进行转动
电路连接
舵机黄色导线为信号线,红色导线为 5V,棕色导线为 GND;在与 Unit Pbhub v1.1 连接时可以参考模块背面的引脚图。
cpp
1 2 3 4 5 6 7 8 9 10 11 12 13 14 15 16 17 18 19 20 21 22 23 24 25 26 27 28 29 30 31 32 33 34 35 36 37 38 39 40 41
#include "M5Unified.h"
#include "M5UnitPbHub.h"
M5UnitPbHub pbhub;

void setup() {
    M5.begin();
    M5.Display.fillScreen(WHITE);
    M5.Display.setTextColor(BLACK);
    M5.Display.setFont(&fonts::FreeMonoBold9pt7b);
    M5.Display.setCursor(0, 0);
    Serial.begin(115200);
    if (!pbhub.begin(&Wire, UNIT_PBHUB_I2C_ADDR, 2, 1, 400000U)) {
        Serial.println("Couldn't find Pbhub");
        while (1) delay(1);
    }
    Serial.println("Pbhub v1.1 Servo test");
}

void loop() {
    // ch: 0-5
    // index: 0-1
    // status: 0/1
    for (uint8_t ch = 0; ch < 3; ch++) {
        for (uint8_t index = 0; index < 2; index++) {
            pbhub.setServoAngle(ch, index, 90);
            Serial.printf("ch:%d index:%d Servo Angle: 90\r\n", ch, index);
            M5.Display.printf("ch:%d index:%d Servo Angle: 90\r\n", ch, index);
        }
    }
    delay(2000);
    for (uint8_t ch = 0; ch < 3; ch++) {
        for (uint8_t index = 0; index < 2; index++) {
            pbhub.setServoAngle(ch, index, 0);
            Serial.printf("ch:%d index:%d Servo Angle: 0\r\n", ch, index);
            M5.Display.printf("ch:%d index:%d Servo Angle: 0\r\n", ch, index);
        }
    }
    delay(2000);
    M5.Display.fillScreen(WHITE);
    M5.Display.setCursor(0, 0);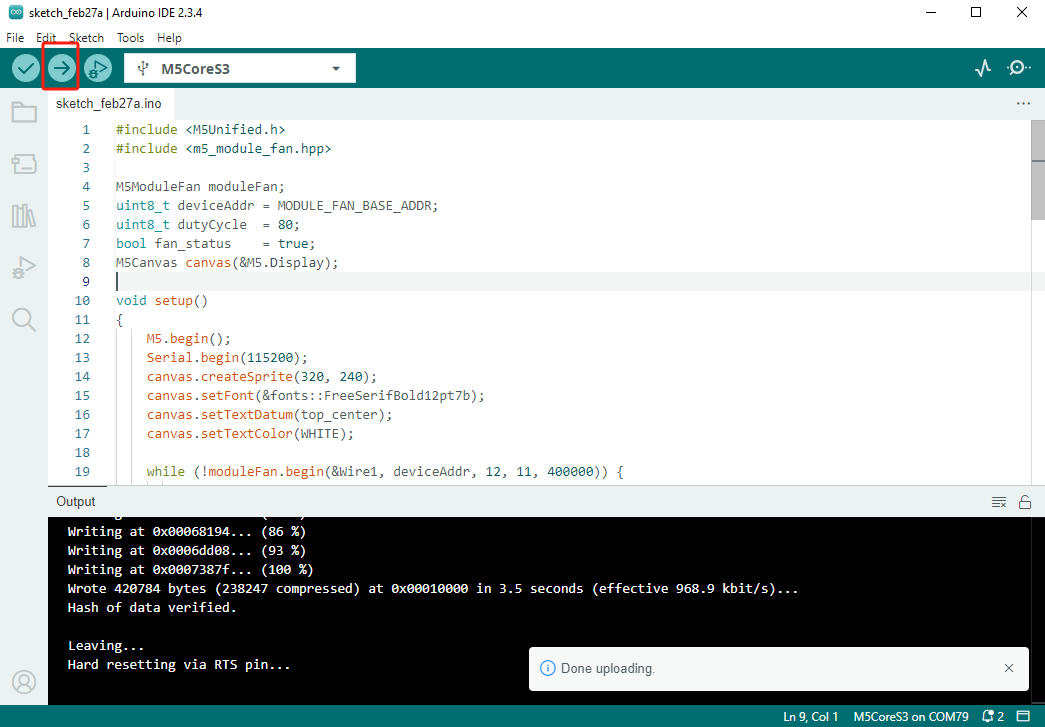
}8. 编译上传
下载模式:不同设备进行程序烧录前需要进入下载模式,不同的主控设备该步骤可能有所不同。详情可参考Arduino IDE上手教程页面底部的设备程序下载教程列表,查看具体的操作方式。
CoreS3 长按复位按键 (大约 2 秒) 直到内部绿色 LED 灯亮起,便可松开,此时设备已进入下载模式,等待烧录。
.gif)
- 选中设备端口,点击 Arduino IDE 左上角编译上传按钮,等待程序完成编译并上传至设备。