

Arduino 上手教程
2. 设备开发 & 案例程序
3. M5Unified
4. M5GFX
5. 拓展模块
Unit
Atomic
Tab5
IoT
Voice Pyramid Arduino 使用教程
1. 准备工作
环境配置:参考 Arduino IDE 上手教程 完成 IDE 安装,并根据实际使用的开发板安装对应的板卡包和所需驱动库。
使用到的库:
使用到的硬件产品:


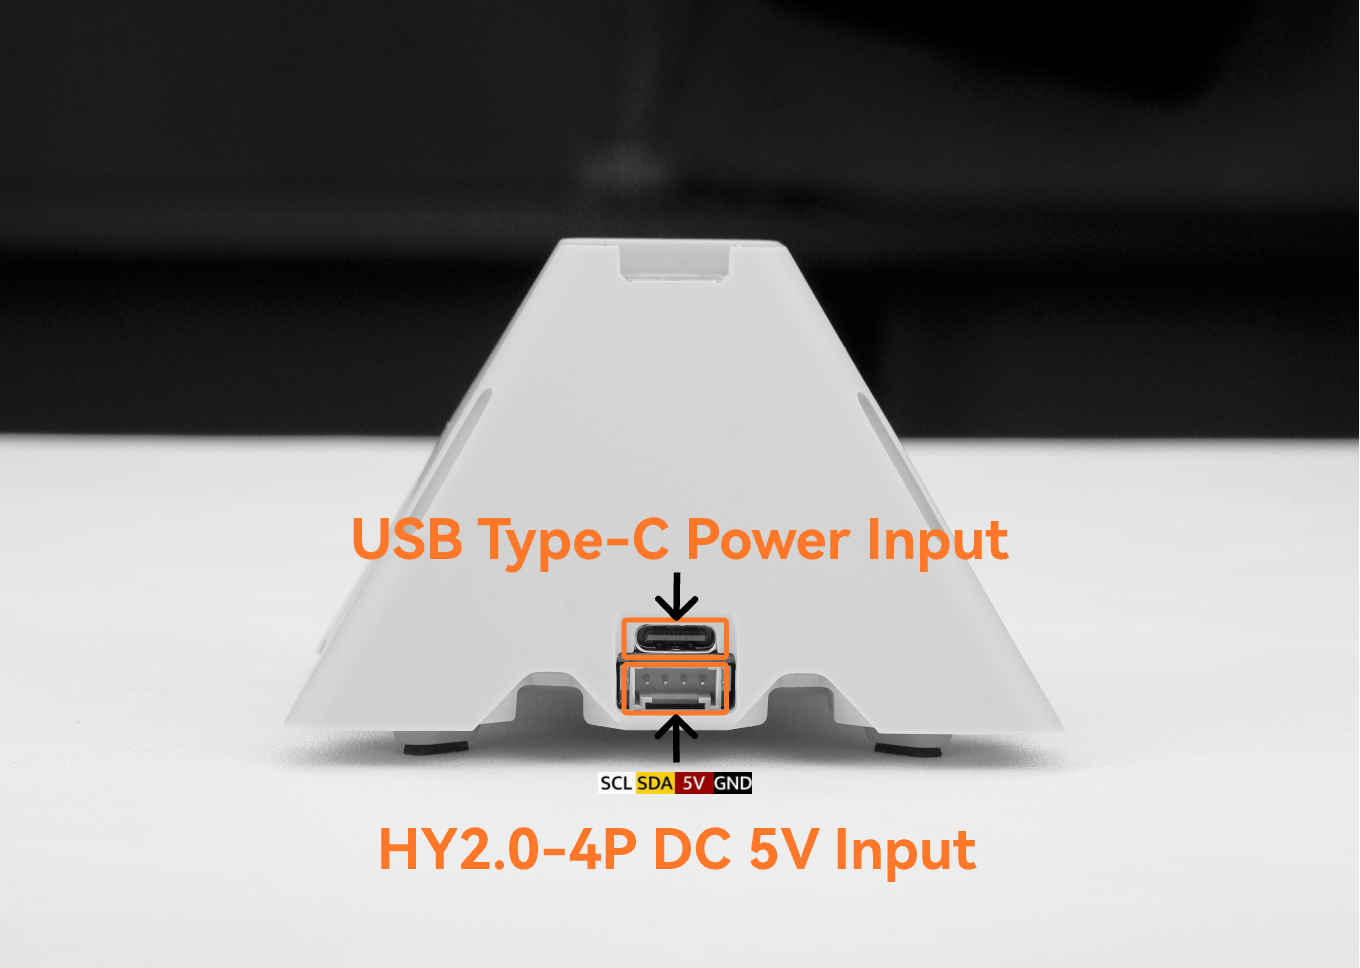
本教程演示如何将 AtomS3R 与 Voice Pyramid 搭配使用。由于不同主控设备的管脚定义各不相同,请参考下方的兼容性示意图进行连线。
2. Voice Pyramid 功能概览
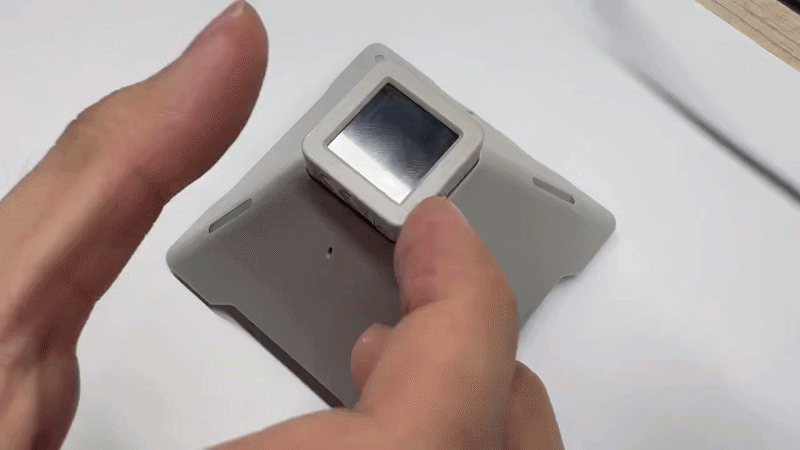
Voice Pyramid 是一款面向智能语音应用的专业音频开发底座,专为 Atom 系列主控设计。通过将 Atom 控制器垂直插入顶部预留的排针座,开发者可以快速构建具备强大语音交互能力的设备。Atom 系列主控(基于 ESP32 或 ESP32-S3)作为主控制器,负责音频处理、无线通信(Wi-Fi/Bluetooth)以及物联网连接,非常适合用作语音助手、智能控制中枢以及语音交互型 IoT 终端等场景。
该设备集成了高品质音频系统,采用 ES8388 音频编解码器与 ES7210 双通道前端及 MEMS 麦克风,实现清晰的语音采集和噪声抑制;内置由 AW87559 D 类功放驱动的 2W 扬声器,提供充足的音频输出功率。在交互方面,板载 STM32G030F6P6 微控制器用于管理电容式触摸按键与 RGB LED,实现灵敏的触摸操作与丰富的视觉反馈;同时集成 Si5351 可编程时钟发生器,为语音应用提供稳定的时钟源,保证音频系统稳定可靠运行。
Touch:4 个电容式触摸按键,可实现直观的人机交互和功能快速切换。Microphone:双 MEMS 麦克风,可用于清晰拾取环境声音,适合语音识别与语音指令类应用。RGB LED:板载可编程 RGB LED,可用于状态指示、视觉反馈以及动态灯效展示。Speaker:内置 2W 扬声器,可用于语音播报、提示音和多媒体音频输出等。
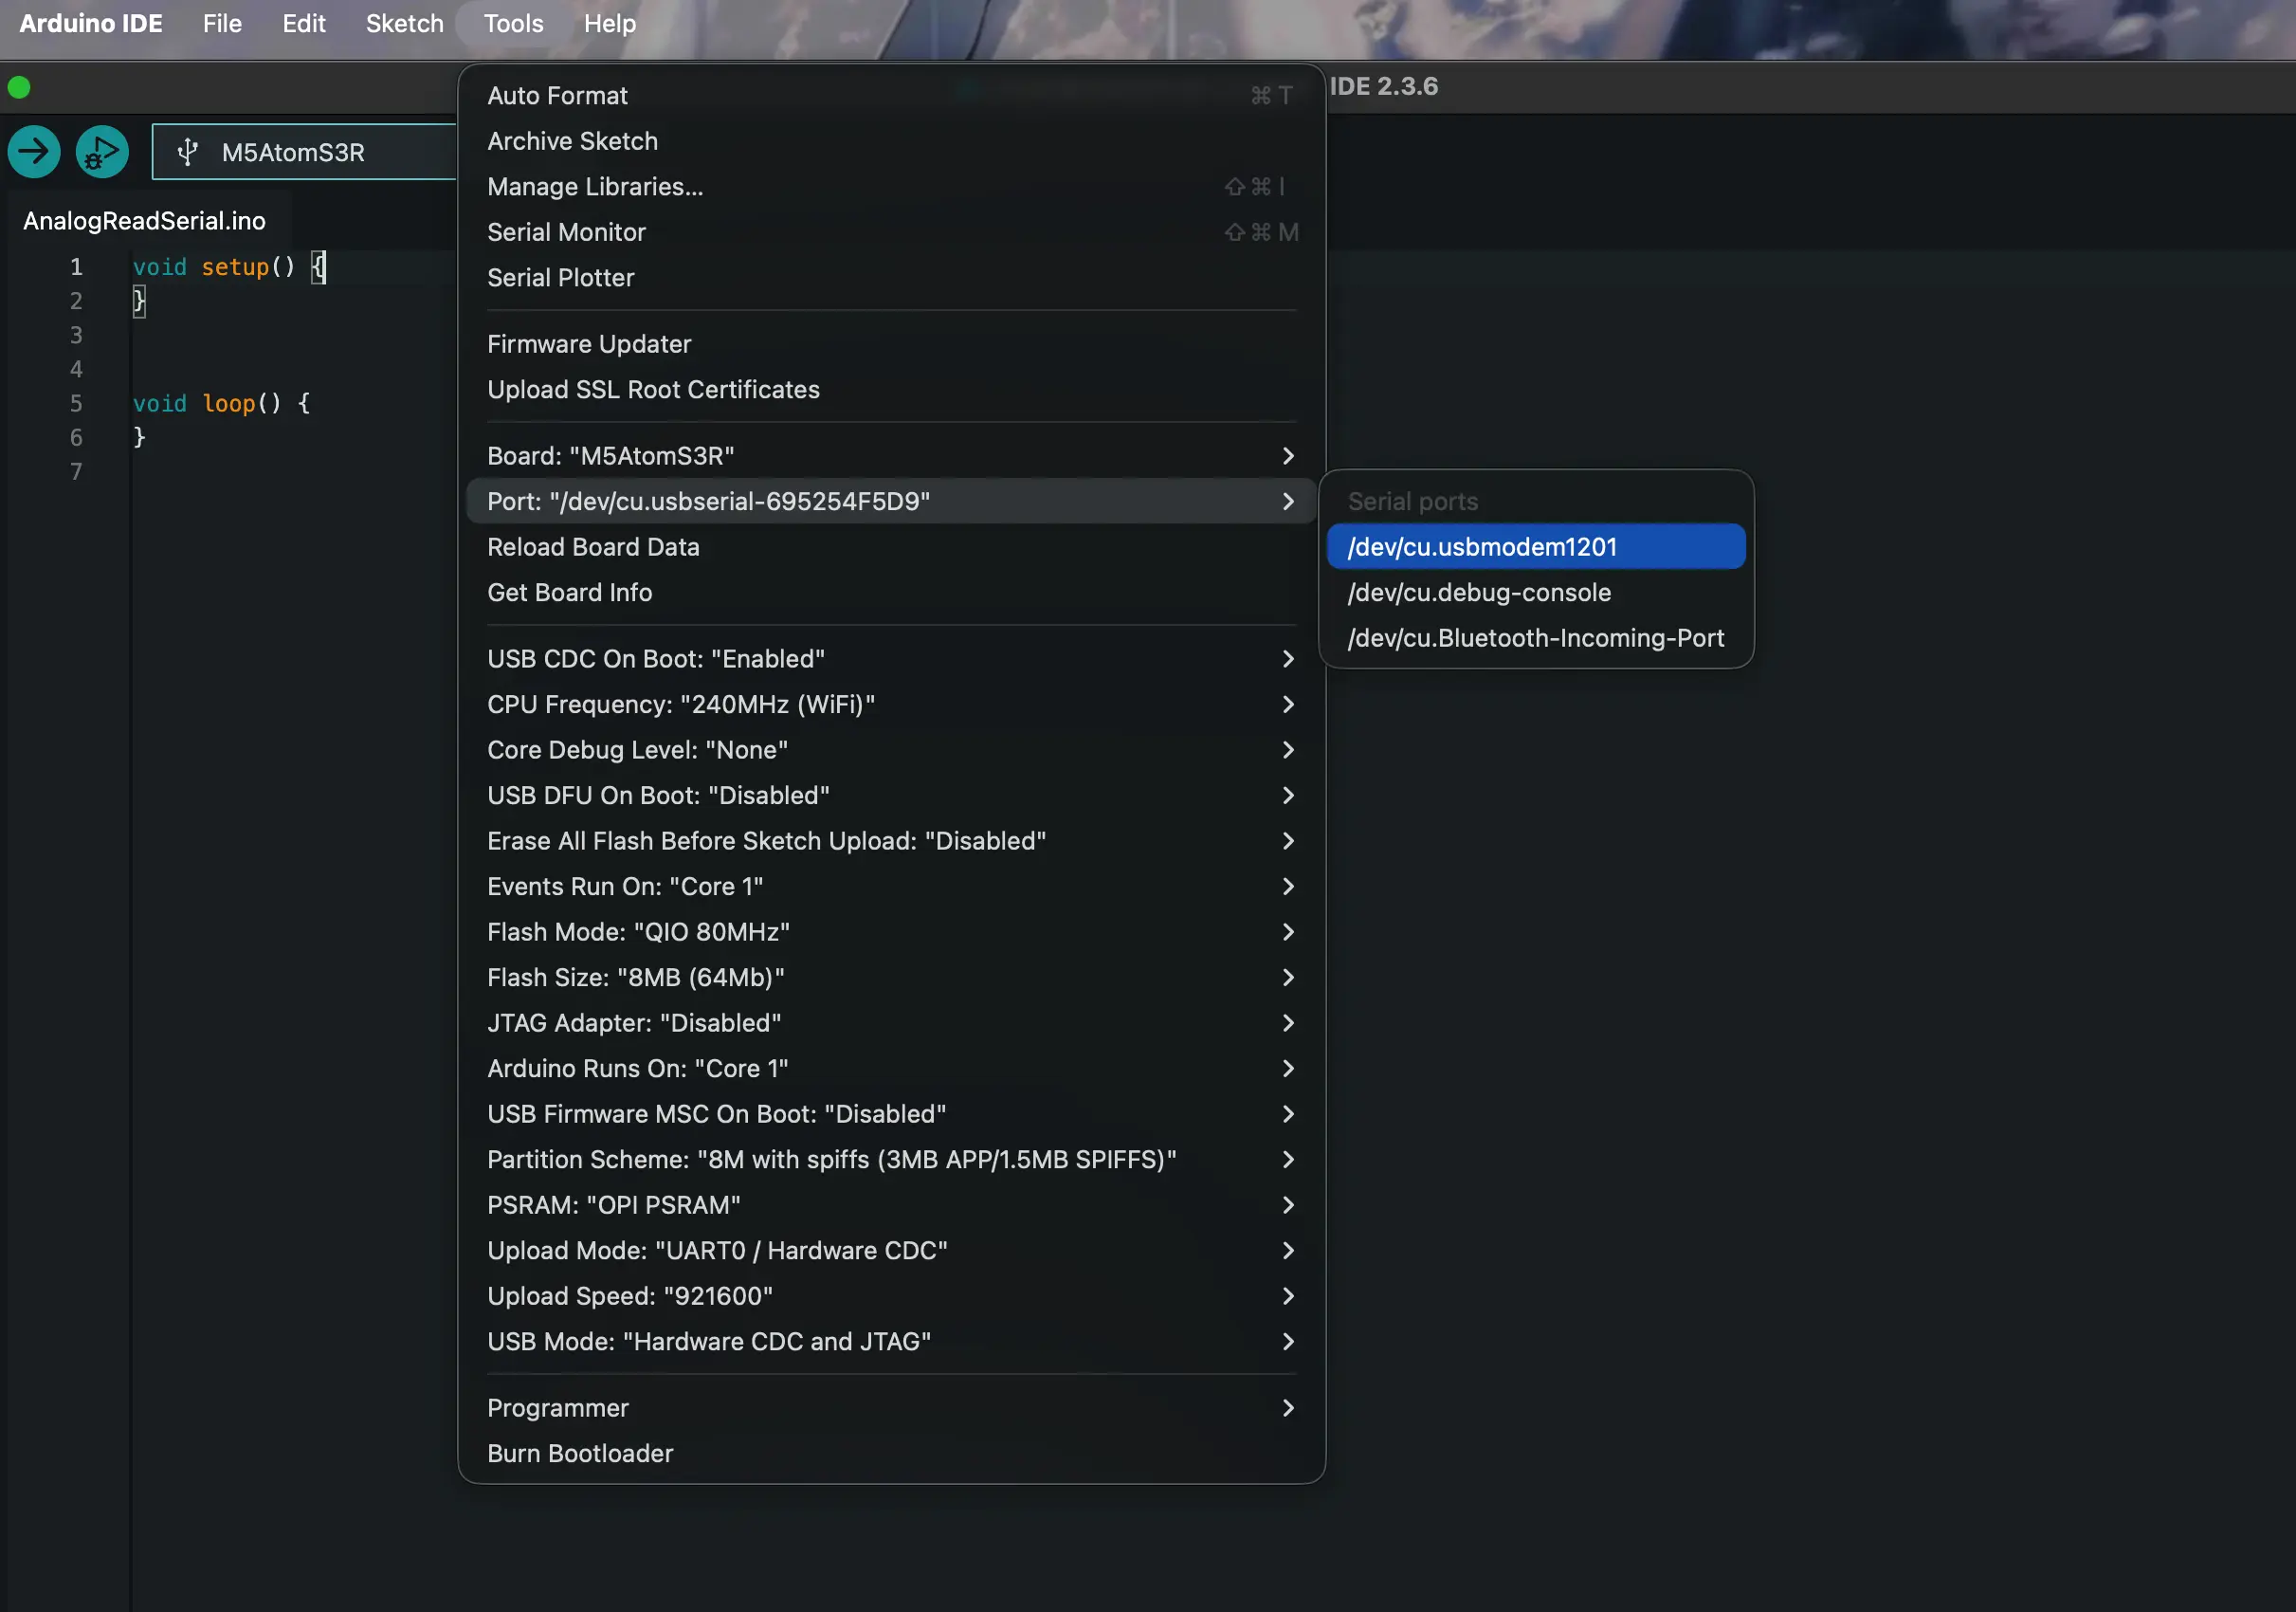
3. 端口选择
长按 AtomS3R 右侧按键,然后连接 USB 线到电脑。
4. 案例程序
下面的示例展示了 Voice Pyramid 的核心硬件特性以及基础用法,涵盖 RGB LED 控制、音频录制与播放、触摸交互以及麦克风音频采集等内容,帮助你通过简单的 Arduino 程序快速了解如何与该设备交互并访问其主要外设。将这些示例程序烧录到设备后,你可以学习如何控制 RGB 灯效、检测触摸按键输入、使用麦克风与扬声器录制和播放声音,以及通过串口监视器查看设备的运行状态。
RGB LED
#include "M5Unified.h"
#include <M5EchoPyramid.h>

M5EchoPyramid ep;

int brightness = 0;
int step = 5;
bool rising = true;

int leds[4] = {0, 3, 7, 10};

void setup()
{
    M5.begin();
    Serial.begin(115200);

    Wire1.end();
    ep.begin(&Wire1, 38, 39, 6, 8, 5, 7, 44100);

    ep.ctrl().setBrightness(1, 100);
    ep.ctrl().setBrightness(2, 100);

    Serial.println("LED demo start");
}

void loop()
{
    if (rising)
    {
        brightness += step;
        if (brightness >= 255)
        {
            brightness = 255;
            rising = false;
        }
    }
    else
    {
        brightness -= step;
        if (brightness <= 10)
        {
            brightness = 10;
            rising = true;
        }
    }
    for (int i = 0; i < 4; i++)
    {
        ep.ctrl().setRGB(1, leds[i], brightness, 0, 255 - brightness);
        ep.ctrl().setRGB(2, leds[i], brightness, 0, 255 - brightness);
    }

    delay(40);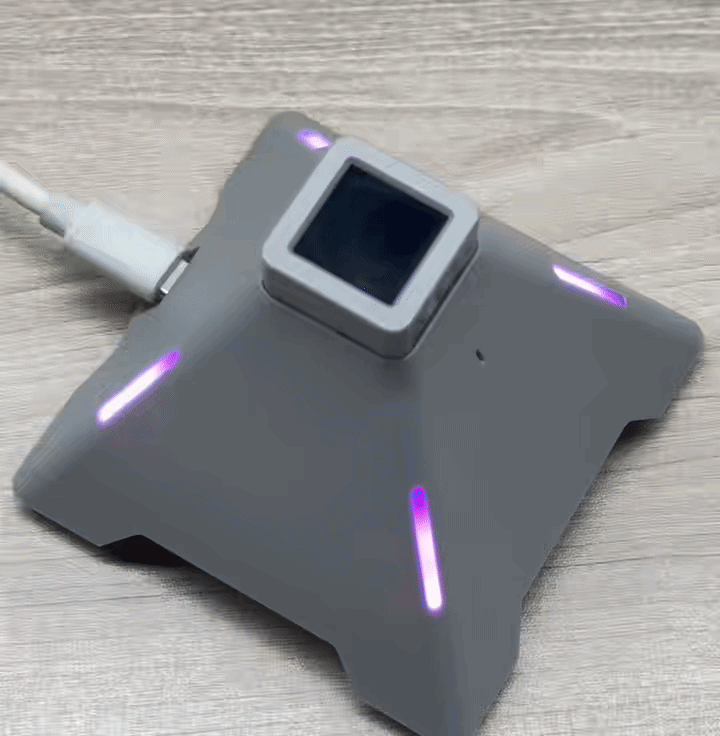
}将上述程序复制到 Arduino IDE 中,点击上传按钮,等待编译和烧录完成。程序运行后,Voice Pyramid 上两圈 LED 中索引为 0、3、7、10 的四颗 LED 会呈现平滑的呼吸灯效果。LED 亮度会在一定范围内缓慢增减,颜色在红色与蓝色之间渐变,并在中间形成紫色过渡。该动画循环播放,用于演示如何在 Voice Pyramid 上控制 RGB LED。
Speaker
#include "M5Unified.h"
#include <M5EchoPyramid.h>

#define SAMPLE_RATE 44100
#define RECORD_SECONDS 5
#define FRAME_SIZE 256
#define TOTAL_SAMPLES (SAMPLE_RATE * RECORD_SECONDS)

M5EchoPyramid ep;

int16_t *recordBuffer = nullptr;
bool recordingBusy = false;

void recordAndPlay5s()
{
    if (recordingBusy) return;
    recordingBusy = true;

    Serial.println("Start 5s Recording...");

    int16_t mic[FRAME_SIZE];
    int16_t ref[FRAME_SIZE];
    int written = 0;

    while (written < TOTAL_SAMPLES) {
        ep.read(mic, ref, FRAME_SIZE);
        memcpy(recordBuffer + written, mic, FRAME_SIZE * sizeof(int16_t));
        written += FRAME_SIZE;
    }

    Serial.println("Recording Done.");
    delay(200);

    Serial.println("Start Playback...");

    int played = 0;
    while (played < TOTAL_SAMPLES) {
        ep.write(recordBuffer + played, FRAME_SIZE);
        played += FRAME_SIZE;
    }

    Serial.println("Playback Done.");

    recordingBusy = false;
}

void setup()
{
    M5.begin();
    Serial.begin(115200);
    delay(2000);

    Wire1.end();
    ep.begin(&Wire1, 38, 39, 6, 8, 5, 7, SAMPLE_RATE);

    ep.codec().setVolume(50);
    ep.codec().mute(false);

    recordBuffer = (int16_t *)malloc(TOTAL_SAMPLES * sizeof(int16_t));
    if (!recordBuffer) {
        Serial.println("Memory allocation failed!");
        while (1) {
            delay(1000);
        }
    }

    Serial.println("System Ready. Press touch1 to record & play 5s audio.");
}

void loop()
{
    if (ep.ctrl().isPressed(1)) {
        recordAndPlay5s();

        while (ep.ctrl().isPressed(1)) {
            delay(10);
        }
    }

    delay(10);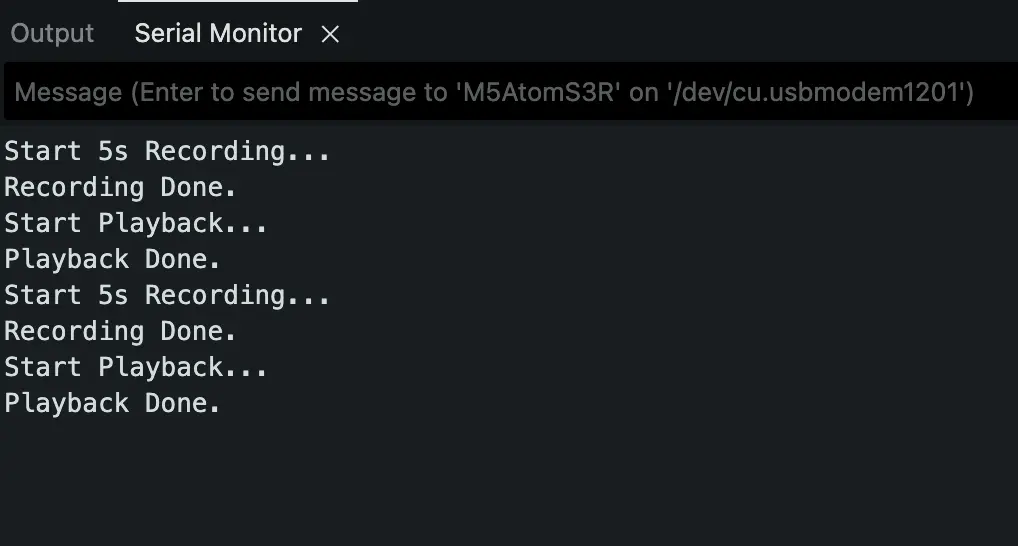
}将上述程序复制到 Arduino IDE 中,点击上传按钮,等待编译和烧录完成。设备启动后,按下 Voice Pyramid 上的触摸键 1 即可开始录音。设备会通过内置麦克风录制 5 秒音频,并将原始 PCM 数据存储在内存中。录音结束后,设备会自动通过扬声器回放刚刚录制的音频。串口监视器中会依次输出 “Start 5s Recording...”“Recording Done.”“Start Playback...”“Playback Done.” 等信息,用于演示如何通过 Voice Pyramid 实现音频录制与立即回放。
Touch
#include "M5Unified.h"
#include <M5EchoPyramid.h>

#define INITIAL_BRIGHTNESS 50
#define INITIAL_VOLUME     50
#define STEP               5

M5EchoPyramid ep;

int brightnessLevel = INITIAL_BRIGHTNESS;
int volumeLevel     = INITIAL_VOLUME;

bool brightnessGestureActive = false;
bool volumeGestureActive     = false;

void applyBrightness()
{
    ep.ctrl().setBrightness(1, brightnessLevel);
    ep.ctrl().setBrightness(2, brightnessLevel);
}

void fillLedsColor(uint8_t r, uint8_t g, uint8_t b)
{
    for (int i = 0; i < 14; ++i) {
        ep.ctrl().setRGB(1, i, r, g, b);
        ep.ctrl().setRGB(2, i, r, g, b);
    }
}

void applyVolume()
{
    ep.codec().setVolume(volumeLevel);
}

void setup()
{
    M5.begin();
    Serial.begin(115200);
    delay(2000);

    Wire1.end();
    ep.begin(&Wire1, 38, 39, 6, 8, 5, 7, 44100);
    ep.codec().mute(false);

    fillLedsColor(255, 255, 255);
    applyBrightness();
    applyVolume();
}

void loop()
{
    bool t1 = ep.ctrl().isPressed(1);
    bool t2 = ep.ctrl().isPressed(2);
    bool t3 = ep.ctrl().isPressed(3);
    bool t4 = ep.ctrl().isPressed(4);

    if (!brightnessGestureActive) {
        if (t1 && !t2) {
            brightnessGestureActive = true;
            brightnessLevel += STEP;
            if (brightnessLevel > 100) brightnessLevel = 100;
            applyBrightness();
            Serial.printf("Brightness: %d%%\n", brightnessLevel);
        } else if (t2 && !t1) {
            brightnessGestureActive = true;
            brightnessLevel -= STEP;
            if (brightnessLevel < 0) brightnessLevel = 0;
            applyBrightness();
            Serial.printf("Brightness: %d%%\n", brightnessLevel);
        }
    } else {
        if (!t1 && !t2) {
            brightnessGestureActive = false;
        }
    }

    if (!volumeGestureActive) {
        if (t4 && !t3) {
            volumeGestureActive = true;
            volumeLevel += STEP;
            if (volumeLevel > 100) volumeLevel = 100;
            applyVolume();
            Serial.printf("Volume: %d%%\n", volumeLevel);
        } else if (t3 && !t4) {
            volumeGestureActive = true;
            volumeLevel -= STEP;
            if (volumeLevel < 0) volumeLevel = 0;
            applyVolume();
            Serial.printf("Volume: %d%%\n", volumeLevel);
        }
    } else {
        if (!t3 && !t4) {
            volumeGestureActive = false;
        }
    }

    delay(10);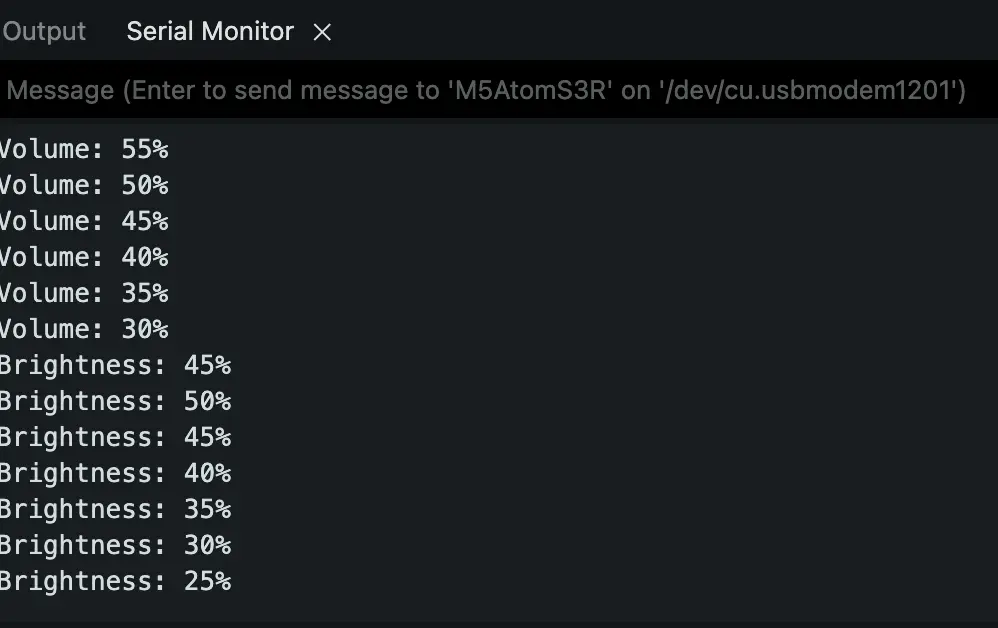
}将上述程序复制到 Arduino IDE 中,点击上传按钮,等待编译和烧录完成。固件在 Voice Pyramid 上运行后,可以通过 4 个触摸按键控制 LED 亮度和扬声器音量。
Touch1 ~ Touch2:
这两个触摸按键用于控制设备的 LED 亮度。
- Touch1:每按一次,亮度增加 5%。
- Touch2:每按一次,亮度减少 5%。 亮度范围为 0% ~ 100%,更新后的数值会打印在串口监视器中。
Touch3 ~ Touch4:
这两个触摸按键用于控制扬声器音量。
- Touch4:每按一次,音量增加 5%。
- Touch3:每按一次,音量减少 5%。 音量值同样在 0% ~ 100% 范围内变化,当前数值会显示在串口监视器中。
Microphone
#include "M5Unified.h"
#include <M5EchoPyramid.h>

#define SAMPLE_RATE 44100
#define RECORD_SECONDS 5
#define FRAME_SIZE 256
#define TOTAL_SAMPLES (SAMPLE_RATE * RECORD_SECONDS)

M5EchoPyramid ep;

int16_t *recordBuffer = nullptr;
bool recordingBusy = false;

void record5s()
{
    if (recordingBusy) return;
    recordingBusy = true;

    Serial.println("Start 5s Recording...");

    int16_t mic[FRAME_SIZE];
    int16_t ref[FRAME_SIZE];

    int written = 0;

    while (written < TOTAL_SAMPLES) {
        ep.read(mic, ref, FRAME_SIZE);
        memcpy(recordBuffer + written, mic, FRAME_SIZE * sizeof(int16_t));
        written += FRAME_SIZE;
    }

    Serial.println("Recording Done.");

    const int channels = 1;
    const int bitsPerSample = 16;
    const int totalSamples = TOTAL_SAMPLES;
    const size_t totalBytes = totalSamples * sizeof(int16_t);
    const float durationSeconds = (float)totalSamples / SAMPLE_RATE;
    const int totalFrames = totalSamples / FRAME_SIZE;

    Serial.println("=== Record Info ===");
    Serial.printf("Sample rate    : %d Hz\n", SAMPLE_RATE);
    Serial.printf("Channels       : %d (mono)\n", channels);
    Serial.printf("Bits per sample: %d bit\n", bitsPerSample);
    Serial.printf("Total samples  : %d\n", totalSamples);
    Serial.printf("Total frames   : %d (frame size = %d)\n", totalFrames, FRAME_SIZE);
    Serial.printf("Total bytes    : %u (%.2f KB)\n", (unsigned int)totalBytes, totalBytes / 1024.0f);
    Serial.printf("Duration       : %.3f s\n", durationSeconds);
    Serial.println("====================");

    recordingBusy = false;
}

void setup()
{
    M5.begin();
    Serial.begin(115200);
    delay(2000);

    Wire1.end();

    ep.begin(&Wire1, 38, 39, 6, 8, 5, 7, SAMPLE_RATE);

    ep.codec().setVolume(50);
    ep.codec().mute(false);

    recordBuffer = (int16_t *)malloc(TOTAL_SAMPLES * sizeof(int16_t));
    if (!recordBuffer) {
        Serial.println("Memory allocation failed!");
        while (1) {
            delay(1000);
        }
    }

    Serial.println("System Ready. Press touch1 to record 5s audio.");
}

void loop()
{
    if (ep.ctrl().isPressed(1)) {
        record5s();

        while (ep.ctrl().isPressed(1)) {
            delay(10);
        }
    }

    delay(10);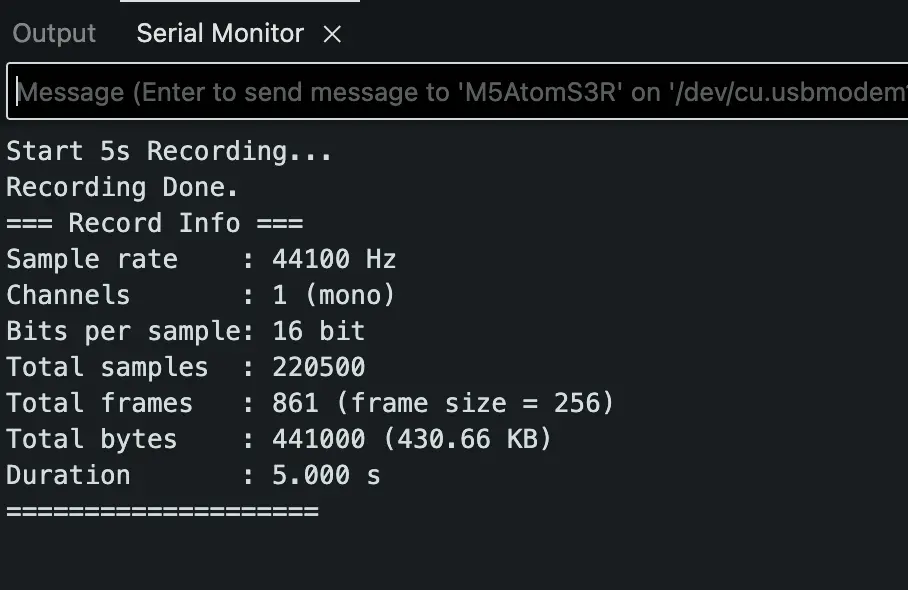
}将上述程序复制到 Arduino IDE 中,点击上传按钮,等待编译和烧录完成。设备启动后,按下 Voice Pyramid 上的触摸键 1 即可开始录音。设备会通过内置麦克风录制 5 秒音频,并将原始 PCM 数据存储在内存中,同时在串口监视器中输出录音相关参数信息,包括采样率(44.1 kHz)、声道配置(单声道)、位深(16 位)、总采样点数、帧数、数据大小以及录音时长等。该示例演示了如何通过 Voice Pyramid 的音频接口采集麦克风音频数据并分析录音参数。
5. 编译上传
- 下载模式:在给不同设备烧录程序之前,需要先让主控进入下载模式。不同的主控设备具体操作方式会有差异。详情可参考 Arduino IDE 上手教程 页面底部的设备程序下载教程列表,查看各设备的具体步骤。
- 对于 AtomS3R,长按复位按键(约 2 秒)直到内部绿色 LED 亮起后松开,此时设备已进入下载模式,等待烧录。

- 选择设备对应的串口,在 Arduino IDE 左上角点击编译 / 上传按钮,等待程序编译完成并成功烧录到设备中。
