

Arduino入門
2. デバイス&サンプル
3. M5Unified
4. M5GFX
5. 拡張モジュール&サンプル
Unit
Module
Atomic
Tab5
IoT
アクセサリー
Module13.2 2Relay Arduino チュートリアル
1. 準備
- 環境設定:Arduino IDE セットアップガイドを参照して IDE をインストールし、使用する開発ボードに対応したボードマネージャーとドライバをインストールしてください。
- 使用するライブラリ:
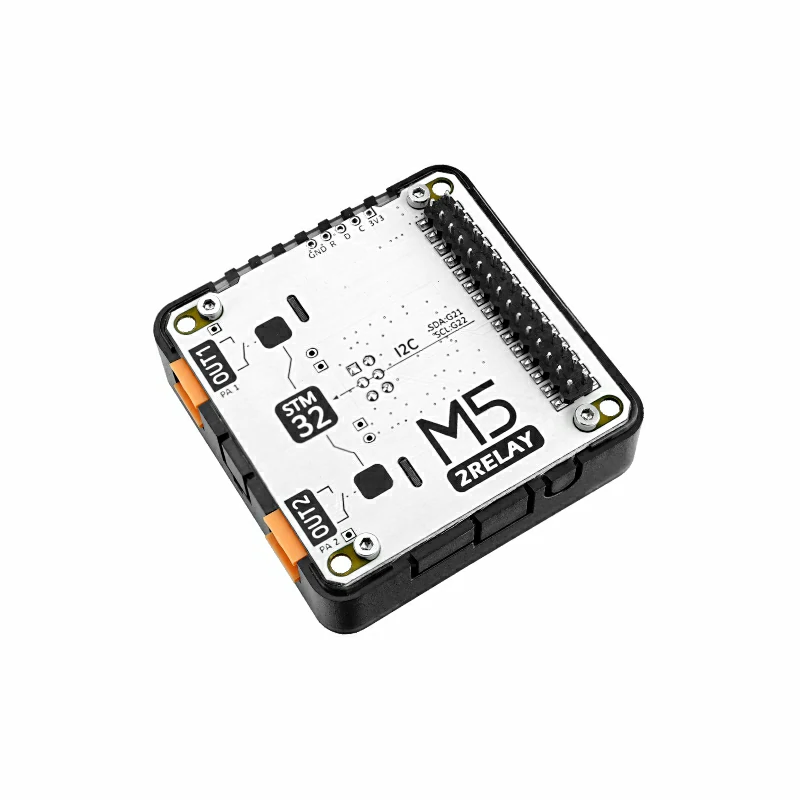
- 使用するハードウェア:

2. 注意事項
高電圧接点
Module13.2 2Relay のリレー接点は、最大 AC 250V@5A に対応しています。配線、配線の取り外し、負荷の交換を行う前に、必ず電源を切ってください。露出した接点が通電している状態で操作しないでください。実際の使用時は、負荷の種類、配線方法、リレーの仕様書に基づいて安全な動作範囲を確認してください。
ピン互換性
ホストごとにピン配置が異なるため、使用前に製品ドキュメントのピン互換表を参照し、実際の接続に合わせてサンプルプログラムを変更してください。
3. サンプルプログラム
3.1 リレー制御
cpp
1 2 3 4 5 6 7 8 9 10 11 12 13 14 15 16 17 18 19 20 21 22 23 24 25 26 27 28 29 30 31 32 33 34 35 36 37 38 39 40 41 42 43 44 45 46 47 48 49 50 51 52 53 54 55 56 57 58 59 60 61 62 63 64 65 66 67 68 69 70 71 72 73 74 75 76 77 78 79 80 81 82 83 84 85 86 87 88 89 90 91 92 93 94 95 96 97 98 99 100 101 102 103 104 105 106 107 108 109 110 111 112 113 114 115 116 117 118 119 120 121 122 123 124 125 126 127 128 129 130 131 132 133 134 135 136 137 138 139 140 141 142 143 144 145 146 147 148 149
#include <M5Unified.h>
#include <M5GFX.h>
#include <Wire.h>
#include "MODULE_2RELAY.h"

M5Canvas canvas(&M5.Display);
MODULE_2RELAY RELAY;

constexpr uint8_t RELAY_I2C_ADDRESS = MODULE_2RELAY_ADDR;
constexpr uint8_t RELAY_SDA = 12;
constexpr uint8_t RELAY_SCL = 11;

uint8_t stepChannel = 0;

constexpr int16_t TOUCH_BUTTON_Y = 176;
constexpr int16_t TOUCH_BUTTON_HEIGHT = 58;
constexpr int16_t TOUCH_BUTTON_WIDTH = 100;
constexpr int16_t TOUCH_BUTTON_GAP = 6;

int16_t getButtonX(uint8_t index)
{
    return TOUCH_BUTTON_GAP + index * (TOUCH_BUTTON_WIDTH + TOUCH_BUTTON_GAP);
}

int8_t getTouchedButton(int16_t x, int16_t y)
{
    if (y < TOUCH_BUTTON_Y || y >= TOUCH_BUTTON_Y + TOUCH_BUTTON_HEIGHT) {
        return -1;
    }

    for (uint8_t index = 0; index < 3; ++index) {
        const int16_t buttonX = getButtonX(index);
        if (x >= buttonX && x < buttonX + TOUCH_BUTTON_WIDTH) {
            return index;
        }
    }
    return -1;
}

void drawTouchButton(uint8_t index, const char *label)
{
    const int16_t x = getButtonX(index);
    canvas.fillRoundRect(x, TOUCH_BUTTON_Y, TOUCH_BUTTON_WIDTH,
                         TOUCH_BUTTON_HEIGHT, 5, TFT_DARKGREY);
    canvas.drawRoundRect(x, TOUCH_BUTTON_Y, TOUCH_BUTTON_WIDTH,
                         TOUCH_BUTTON_HEIGHT, 5, TFT_ORANGE);
    canvas.drawString(label, x + TOUCH_BUTTON_WIDTH / 2,
                      TOUCH_BUTTON_Y + TOUCH_BUTTON_HEIGHT / 2);
}

void drawStatus(const char *action)
{
    canvas.fillSprite(TFT_BLACK);
    canvas.setTextDatum(MC_DATUM);
    canvas.setTextColor(TFT_WHITE);
    canvas.drawString("Module13.2 2Relay", 160, 12);
    canvas.drawString(action, 160, 32);

    for (uint8_t channel = 0; channel < 2; ++channel) {
        const int16_t y = 50 + 42 * channel;
        const bool state = RELAY.getRelayState(channel);

        if (state) {
            canvas.fillRect(12, y, 136, 32, TFT_GREEN);
        } else {
            canvas.drawRect(12, y, 136, 32, TFT_LIGHTGREY);
        }
        canvas.drawString("CH" + String(channel + 1) +
                              (state ? ": ON" : ": OFF"),
                          80, y + 16);
    }

    canvas.drawString("FW: " + String(RELAY.getVersion()),
                      160, 138);
    drawTouchButton(0, "REVERSE");
    drawTouchButton(1, "STEP");
    drawTouchButton(2, "ALL");
    canvas.pushSprite(0, 0);
}

void drawInitError()
{
    canvas.fillSprite(TFT_BLACK);
    canvas.setTextDatum(MC_DATUM);
    canvas.setTextColor(TFT_RED);
    canvas.drawString("Module13.2 2Relay ERROR", 160, 108);
    canvas.setTextColor(TFT_WHITE);
    canvas.drawString("Check address / wiring", 160, 136);
    canvas.pushSprite(0, 0);
}

void setup()
{
    M5.begin();
    Serial.begin(115200);

    canvas.setColorDepth(8);
    canvas.setFont(&fonts::FreeMonoBold9pt7b);
    canvas.setTextSize(1);
    canvas.createSprite(M5.Display.width(), M5.Display.height());

    // while(!RELAY.begin(&Wire1, RELAY_SDA, RELAY_SCL, RELAY_I2C_ADDRESS)){
    while(!RELAY.begin(&M5.In_I2C, RELAY_I2C_ADDRESS)){
        Serial.println("Module13.2 2Relay INIT ERROR");
        drawInitError();
    }
    Serial.println("Module13.2 2Relay INIT SUCCESS");
    drawStatus("Ready");
}

void loop()
{
    M5.update();
    const auto touch = M5.Touch.getDetail();

    if (touch.wasClicked()) {
        switch (getTouchedButton(touch.x, touch.y)) {
        case 0:
            drawStatus(RELAY.reverseRelay() ? "Reverse" : "Reverse Error");
            break;

        case 1: {
            const bool currentState = RELAY.getRelayState(stepChannel);
            if (RELAY.setRelay(stepChannel, !currentState)) {
                stepChannel = (stepChannel + 1) % 2;
                drawStatus("Step");
            } else {
                drawStatus("Step Error");
            }
            break;
        }

        case 2: {
            const bool channel0 = RELAY.getRelayState(0);
            const bool channel1 = RELAY.getRelayState(1);
            const bool allOn = channel0 && channel1;
            const bool success = RELAY.setAllRelay(!allOn);
            drawStatus(success ? (allOn ? "All OFF" : "All ON")
                               : "All Error");
            break;
        }

        default:
            break;
        }
    }

    delay(20);
}3.2 I2C アドレスの設定
この例では、CoreS3 のタッチスクリーンと setDeviceAddr() を使用して、Module13.2 2Relay の I2C アドレスを 0x26 と 0x66 の間で切り替えます。プログラムの起動時に 0x26 と 0x66 を順番に検出します。0x26 が検出された場合、ボタンの切り替え先アドレスは 0x66 になり、0x66 が検出された場合は 0x26 になります。どちらのアドレスも検出できない場合は、画面にエラーメッセージを表示します。コードは Wire1 と M5.In_I2C の両方の I2C 初期化方法に対応しています。3.1 節と同様に、対応する begin() 呼び出しをコメントアウトまたはコメント解除して、どちらか一方を選択してください。画面上の SET ADDRESS 領域をタップするとアドレスが切り替わります。
cpp
1 2 3 4 5 6 7 8 9 10 11 12 13 14 15 16 17 18 19 20 21 22 23 24 25 26 27 28 29 30 31 32 33 34 35 36 37 38 39 40 41 42 43 44 45 46 47 48 49 50 51 52 53 54 55 56 57 58 59 60 61 62 63 64 65 66 67 68 69 70 71 72 73 74 75 76 77 78 79 80 81 82 83 84 85 86 87 88 89 90 91 92 93 94 95 96 97 98 99 100 101 102
#include <M5Unified.h>
#include <M5GFX.h>
#include <Wire.h>
#include "MODULE_2RELAY.h"

MODULE_2RELAY RELAY;

constexpr uint8_t RELAY_ADDRESS_26 = 0x26;
constexpr uint8_t RELAY_ADDRESS_66 = 0x66;
constexpr uint8_t RELAY_SDA = 12;
constexpr uint8_t RELAY_SCL = 11;

constexpr int16_t ADDRESS_BUTTON_X = 60;
constexpr int16_t ADDRESS_BUTTON_Y = 110;
constexpr int16_t ADDRESS_BUTTON_WIDTH = 200;
constexpr int16_t ADDRESS_BUTTON_HEIGHT = 60;

bool moduleReady = false;
uint8_t currentRelayAddress = 0;
uint8_t newRelayAddress = 0;

void drawAddressScreen(const char *result = nullptr)
{
    M5.Display.fillScreen(TFT_BLACK);
    M5.Display.setFont(&fonts::FreeMonoBold9pt7b);
    M5.Display.setTextSize(1);
    M5.Display.setTextDatum(MC_DATUM);
    M5.Display.setTextColor(TFT_WHITE);
    M5.Display.drawString("Module13.2 2Relay", 160, 32);
    const String currentAddress = moduleReady ? String(currentRelayAddress, HEX)
                                              : String("--");
    const String newAddress = moduleReady ? String(newRelayAddress, HEX)
                                          : String("--");
    M5.Display.drawString("Current: 0x" + currentAddress +
                              " -> New: 0x" + newAddress,
                          160, 75);
    M5.Display.drawRoundRect(ADDRESS_BUTTON_X, ADDRESS_BUTTON_Y,
                             ADDRESS_BUTTON_WIDTH, ADDRESS_BUTTON_HEIGHT,
                             6, TFT_ORANGE);
    M5.Display.drawString("SET ADDRESS", 160, 140);

    if (result != nullptr) {
        M5.Display.drawString(result, 160, 205);
    }
}

void setup()
{
    M5.begin();
    Serial.begin(115200);

    M5.Display.setFont(&fonts::FreeMonoBold9pt7b);
    // moduleReady = RELAY.begin(&Wire1, RELAY_SDA, RELAY_SCL, RELAY_ADDRESS_26);
    moduleReady = RELAY.begin(&M5.In_I2C, RELAY_ADDRESS_26);
    if (moduleReady) {
        currentRelayAddress = RELAY_ADDRESS_26;
        newRelayAddress = RELAY_ADDRESS_66;
    } else {
        // moduleReady = RELAY.begin(&Wire1, RELAY_SDA, RELAY_SCL, RELAY_ADDRESS_66);
        moduleReady = RELAY.begin(&M5.In_I2C, RELAY_ADDRESS_66);
        if (moduleReady) {
            currentRelayAddress = RELAY_ADDRESS_66;
            newRelayAddress = RELAY_ADDRESS_26;
        }
    }
    if (moduleReady) {
        Serial.printf("Module13.2 2Relay found at 0x%02X\n",
                      currentRelayAddress);
        drawAddressScreen();
    } else {
        Serial.println("Module13.2 2Relay INIT ERROR");
        drawAddressScreen("Module13.2 2Relay ERROR");
    }
}

void loop()
{
    M5.update();
    const auto touch = M5.Touch.getDetail();

    if (touch.wasClicked() && touch.x >= ADDRESS_BUTTON_X &&
        touch.x < ADDRESS_BUTTON_X + ADDRESS_BUTTON_WIDTH &&
        touch.y >= ADDRESS_BUTTON_Y &&
        touch.y < ADDRESS_BUTTON_Y + ADDRESS_BUTTON_HEIGHT) {
        if (!moduleReady) {
            drawAddressScreen("Module not found");
        } else if (RELAY.setDeviceAddr(newRelayAddress)) {
            currentRelayAddress = newRelayAddress;
            newRelayAddress = (currentRelayAddress == RELAY_ADDRESS_26)
                                  ? RELAY_ADDRESS_66
                                  : RELAY_ADDRESS_26;
            Serial.printf("I2C address updated to 0x%02X\n",
                          currentRelayAddress);
            drawAddressScreen("Success!");
        } else {
            Serial.println("I2C address update failed");
            drawAddressScreen("Failed!");
        }
    }

    delay(20);
}4. コンパイルと書き込み
- 書き込みモードに入る:CoreS3 のリセットボタンを約 2 秒間長押しし、内部の緑色 LED が点灯したら離してください。ボタンを離すと緑色 LED が消灯し、デバイスが書き込みモードに入り、書き込み待機中であることを示します。
注記
プログラムを書き込む前に書き込みモードへ入る手順は、デバイスによって異なる場合があります。詳しくは Arduino IDE セットアップガイドページ下部の各デバイスのプログラム書き込みチュートリアル一覧を参照してください。
.gif)
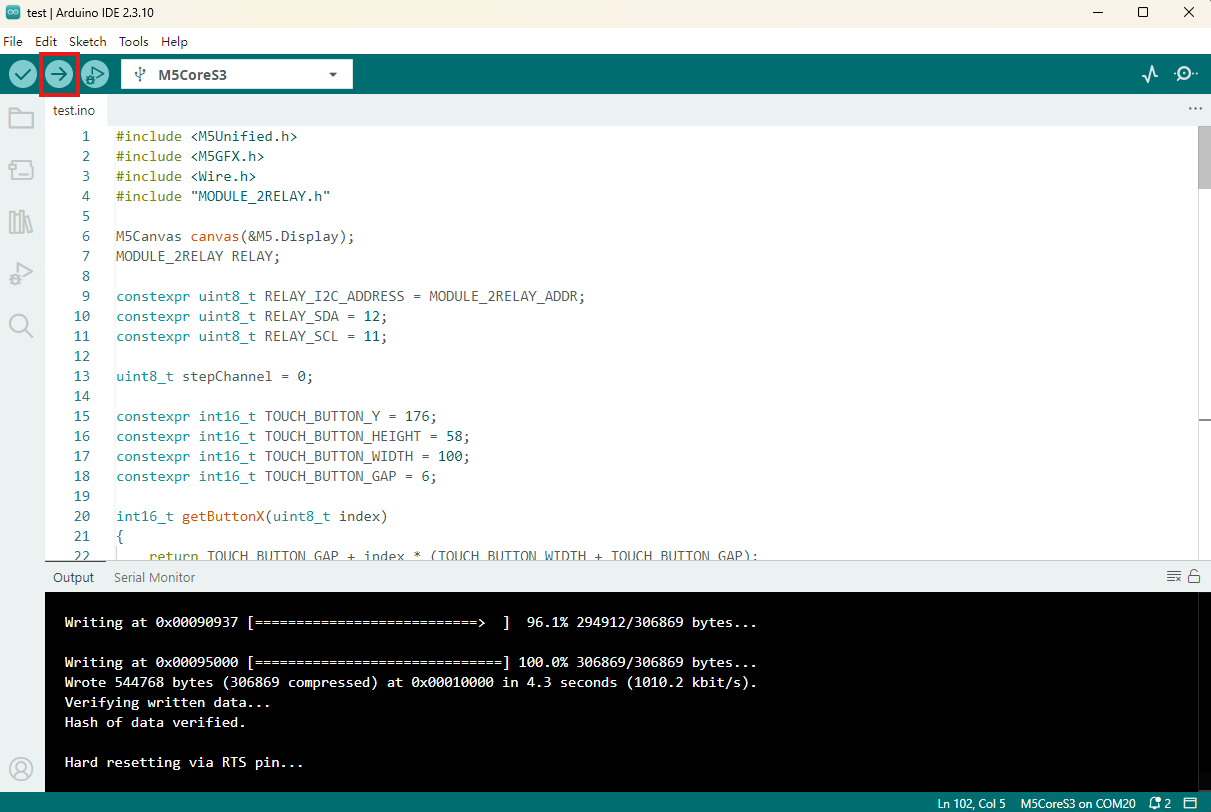
- デバイスのポートを選択し、Arduino IDE 左上のコンパイルと書き込みボタンをクリックして、コンパイルと書き込みが完了するまで待ちます。
5. リレー制御
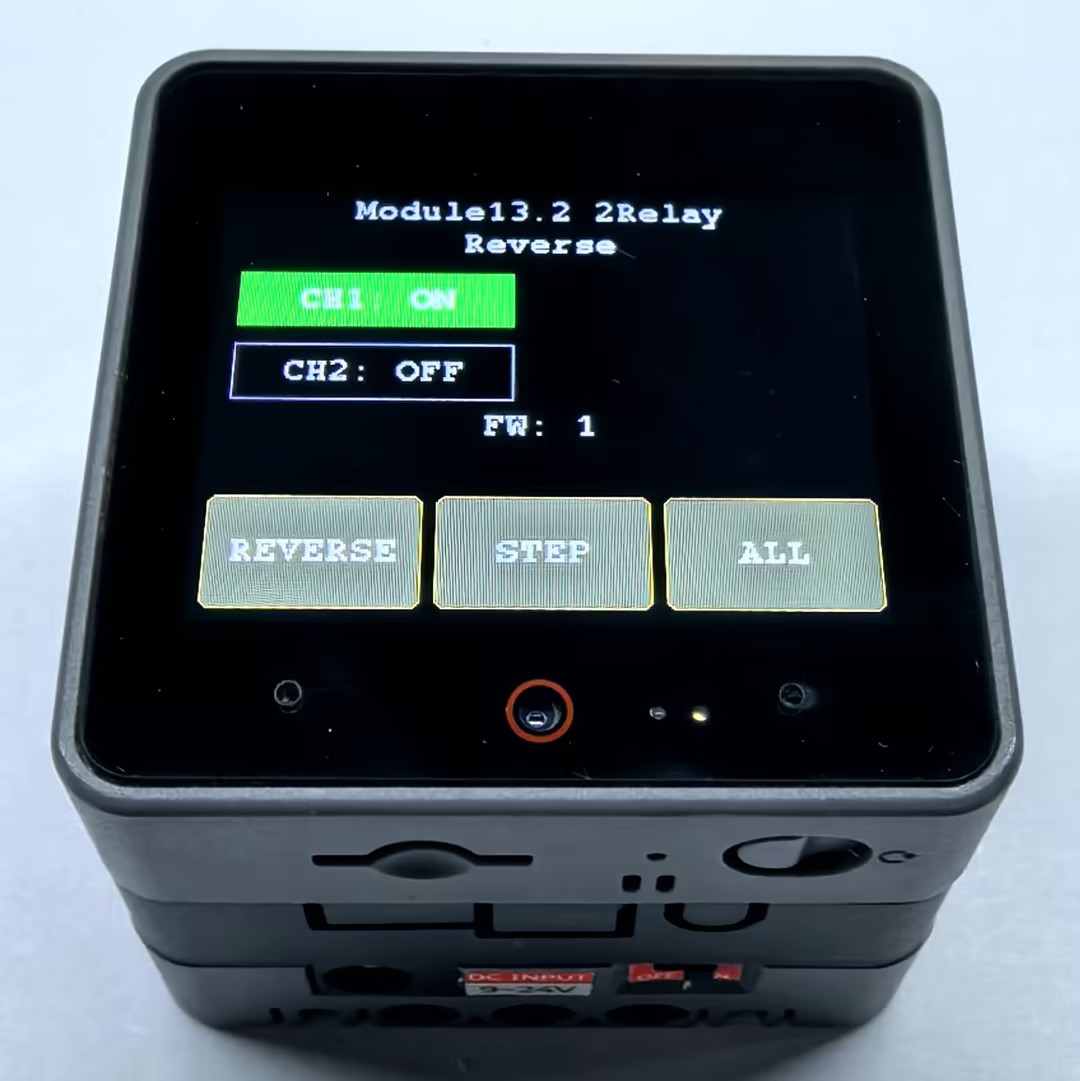
- 書き込みが完了したら CoreS3 を再起動してプログラムを実行します。
REVERSEをタップすると 2 つのリレーの状態が反転し、STEPをタップすると 2 つのリレーの状態が順番に切り替わり、ALLをタップすると 2 つのリレーを同時にオンまたはオフにできます。
Page Tools